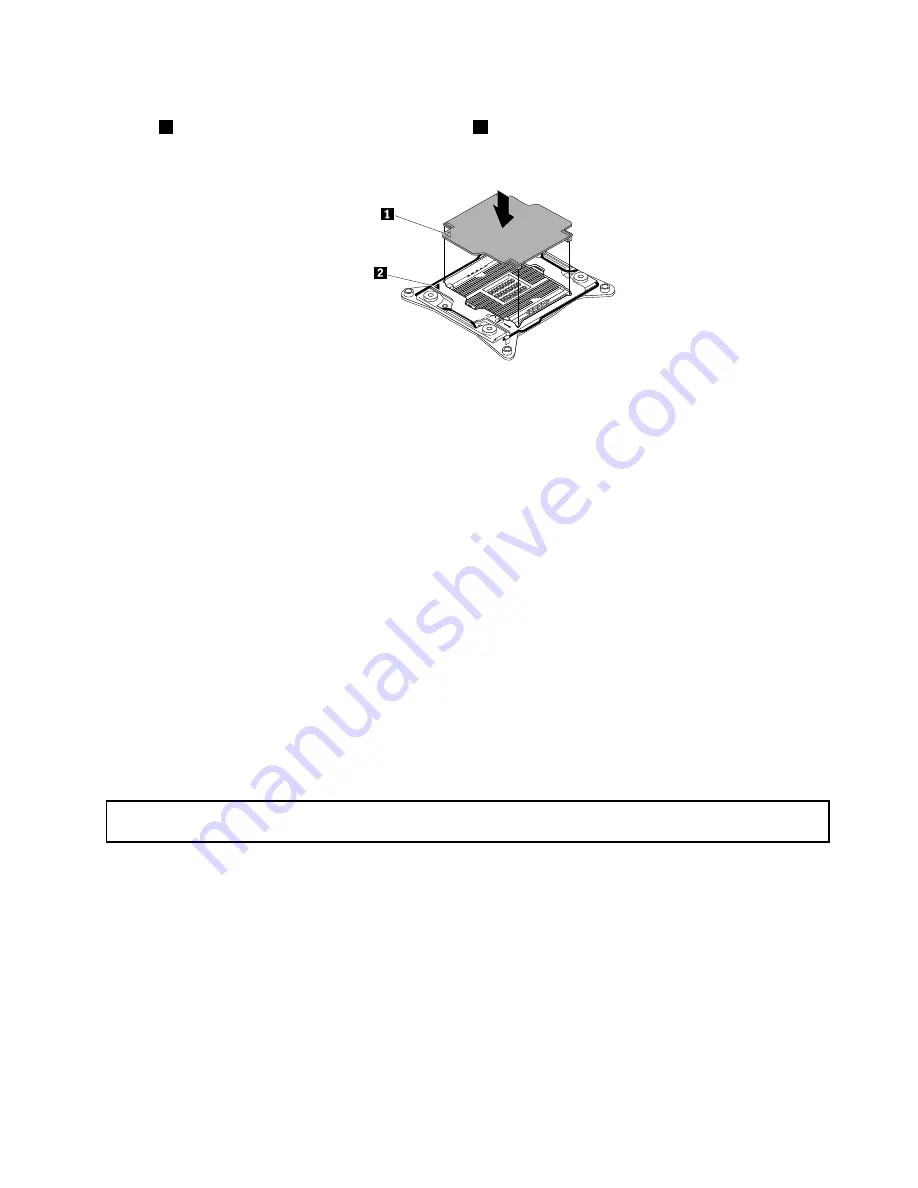
b. Position the microprocessor socket cover above the microprocessor socket so that the small triangle
1
on the socket cover faces the small triangle
2
on the microprocessor retainer. Then, carefully
press the socket cover straight down into the socket until it snaps into position.
Figure 141. Installing the microprocessor socket cover
23. Install all parts that you have removed and connect all cables to the new system board. Refer to the
information that you have recorded and the related topics in Chapter 6 “Replacing hardware” on page 67.
24. If you are instructed to return the old system board, follow all packaging instructions and use any
packaging materials that are supplied to you for shipping.
What to do next:
• To work with another piece of hardware, go to the appropriate section.
• To complete the replacement, go to “Completing the parts replacement” on page 175.
• After a system board is replaced, do the following:
1. Start the Setup Utility program by pressing the F1 key, and then check the BIOS and BMC version.
2. Go to http://www.lenovo.com/drivers and follow the instructions on the Web page to download the
latest version of firmware. Then, install the firmware to your server.
3. Update the machine type, model number, and serial number of the system board. Either you will
be prompted to do this while upgrading the BIOS, or you can locate the files for updating the
VPD within the DOS BIOS package. For some servers, the VPD utility is available for download
at: http://www.lenovo.com/drivers.
For service technician only: replacing the power interface board
Attention:
This procedure must be performed only by trained service personnel of Lenovo. Do not open your server or
attempt any repair before reading and understanding “Safety information” on page iii and “Guidelines” on page 67.
Before you begin, print all the related instructions or ensure that you can view the PDF version on another
computer for reference.
To replace the power interface board, do the following:
1. Remove all external media from the drives and turn off all attached devices and the server. Then,
disconnect all power cords from electrical outlets and disconnect all cables that are connected to
the server.
2. If the server is installed in a rack cabinet, remove the server from the rack cabinet and place it on a flat,
clean, and static-protective surface. See the
Rack Installation Instructions
that comes with the server. If
the server is in tower form factor, lay the server on its side for easier operation.
3. Remove the server cover. See “Removing the server cover” on page 70.
Chapter 6
.
Replacing hardware
173
Summary of Contents for ThinkServer TD350 70DG
Page 14: ...xii ThinkServer TD350 User Guide and Hardware Maintenance Manual ...
Page 18: ...4 ThinkServer TD350 User Guide and Hardware Maintenance Manual ...
Page 20: ...6 ThinkServer TD350 User Guide and Hardware Maintenance Manual ...
Page 66: ...52 ThinkServer TD350 User Guide and Hardware Maintenance Manual ...
Page 192: ...178 ThinkServer TD350 User Guide and Hardware Maintenance Manual ...
Page 202: ...188 ThinkServer TD350 User Guide and Hardware Maintenance Manual ...
Page 217: ...guidelines 69 Copyright Lenovo 2014 2015 203 ...
Page 218: ...204 ThinkServer TD350 User Guide and Hardware Maintenance Manual ...
Page 219: ......
Page 220: ......


