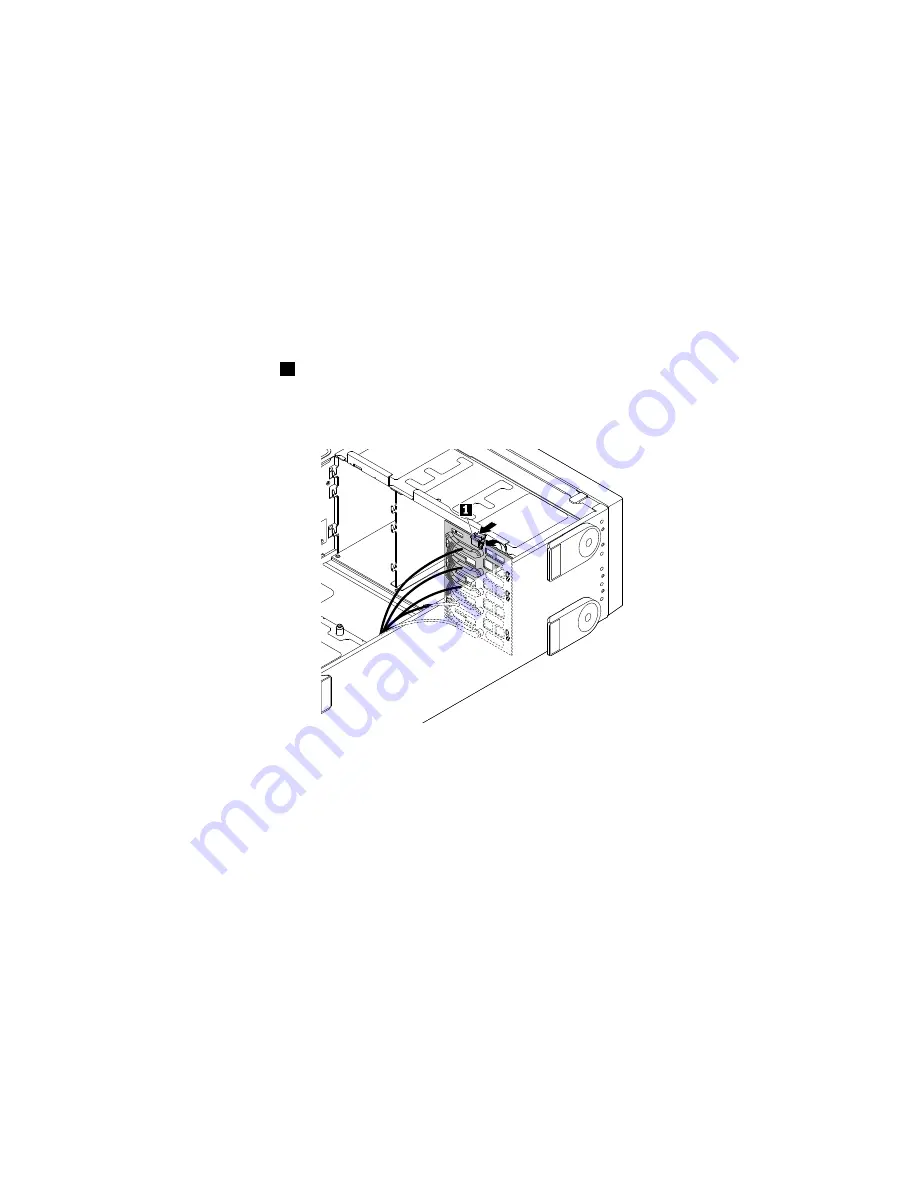
To replace the easy-swap-drive module, do the following:
1. Remove all external media from the drives and turn off all attached devices and the server. Then,
disconnect all power cords from electrical outlets and disconnect all cables that are connected to
the server.
2. If the server is installed in a rack cabinet, remove the server from the rack cabinet and place it on a flat,
clean, and static-protective surface. See the
Rack Installation Instructions
that comes with the server. If
the server is in tower form factor, lay the server on its side for easier operation.
3. Remove the server cover. See “Removing the server cover” on page 70.
4. Locate the easy-swap-drive module. See “Server components” on page 26.
5. Remove all the installed easy-swap hard disk drives and dummy trays (if any) from the storage-drive
bays. See “Installing or replacing an easy-swap drive” on page 128.
6. Disconnect the signal cable and power cable from the system board.
7. Press the release tab
1
and gently lift the easy-swap-drive module slightly upward so that it is released
from the hooks on the chassis. Then, move the easy-swap-drive module to the rear of the chassis
to remove the module.
Figure 130. Removing the easy-swap-drive module
8. Touch the static-protective package that contains the new module to any unpainted surface on the
outside of the server. Then, remove the new module from the package.
Note:
Carefully handle the module by its edges.
9. Position the new module on the hard-disk-drive cage so that the holes in the new module are aligned with
the corresponding hooks on the chassis. Then, slightly press the new module until it snaps into position.
10. Reinstall all the easy-swap storage drives and dummy trays. See “Installing or replacing an easy-swap
drive” on page 128.
11. Reconnect the signal cable and power cable to the system board. See “Connecting the easy-swap-drive
module to the system board” on page 43.
12. If you are instructed to return the old module, follow all packaging instructions and use any packaging
materials that are supplied to you for shipping.
What to do next:
• To work with another piece of hardware, go to the appropriate section.
Chapter 6
.
Replacing hardware
163
Summary of Contents for ThinkServer TD350 70DG
Page 14: ...xii ThinkServer TD350 User Guide and Hardware Maintenance Manual ...
Page 18: ...4 ThinkServer TD350 User Guide and Hardware Maintenance Manual ...
Page 20: ...6 ThinkServer TD350 User Guide and Hardware Maintenance Manual ...
Page 66: ...52 ThinkServer TD350 User Guide and Hardware Maintenance Manual ...
Page 192: ...178 ThinkServer TD350 User Guide and Hardware Maintenance Manual ...
Page 202: ...188 ThinkServer TD350 User Guide and Hardware Maintenance Manual ...
Page 217: ...guidelines 69 Copyright Lenovo 2014 2015 203 ...
Page 218: ...204 ThinkServer TD350 User Guide and Hardware Maintenance Manual ...
Page 219: ......
Page 220: ......


