4. Remove the cooling shroud. See “Removing the cooling shroud” on page 73.
5. Remove any parts and disconnect any cables that might impede your operation.
6. Locate the M.2 storage module and disconnect the cables. See “Server components” on page 26.
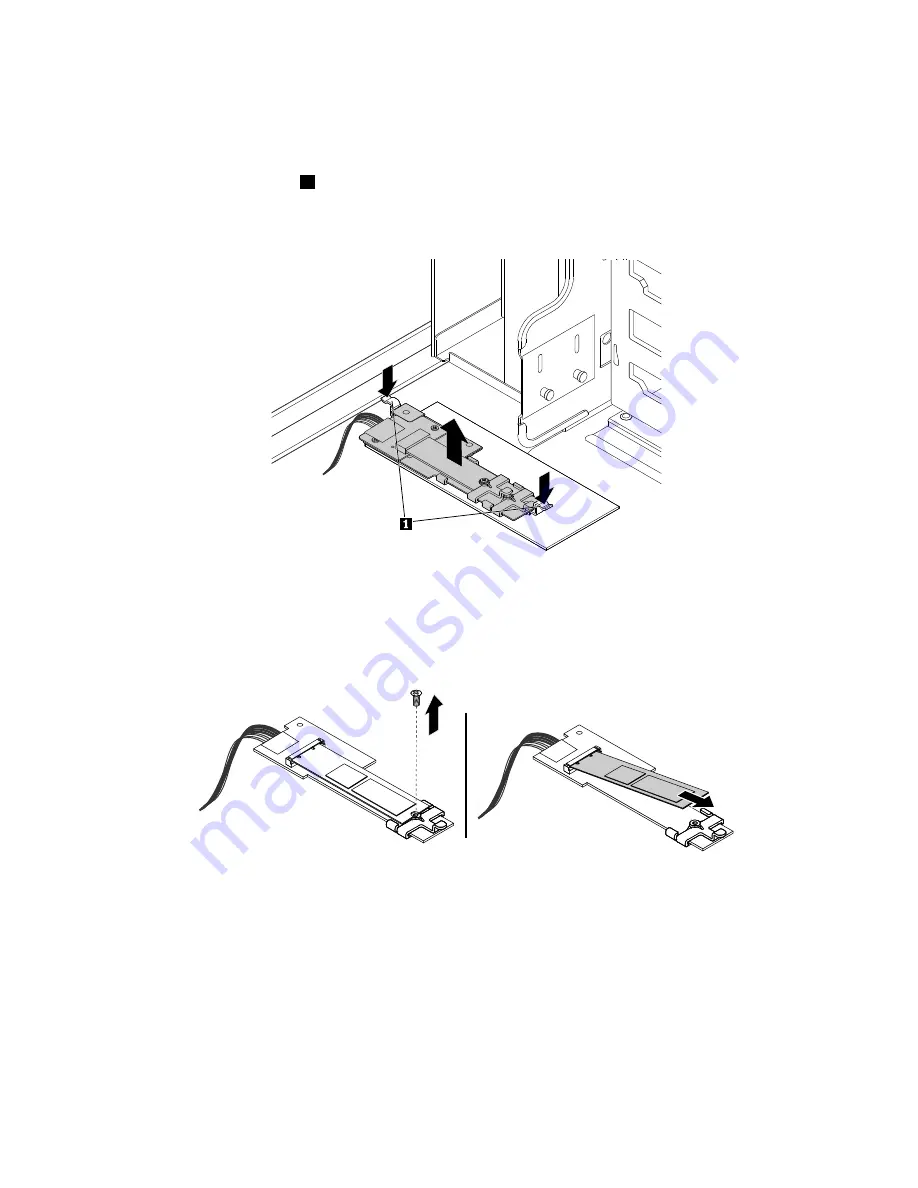
7. Press the two release tabs
1
and lift the M.2 storage module out of the chassis.
Note:
Carefully handle the M.2 storage module by its edges.
Figure 66. Removing the M.2 storage module
8. Remove the screw that secures the M.2 storage drive. Then, remove the M.2 storage drive.
Figure 67. Removing the M.2 storage drive
9. If you are instructed to return the old M.2 storage module, follow all packaging instructions and use any
packaging materials that are supplied to you for shipping.
What to do next:
• To work with another piece of hardware, go to the appropriate section.
• To complete the removal procedure, go to “Completing the parts replacement” on page 175.
114
ThinkServer TD350 User Guide and Hardware Maintenance Manual
Summary of Contents for ThinkServer TD350 70DG
Page 14: ...xii ThinkServer TD350 User Guide and Hardware Maintenance Manual ...
Page 18: ...4 ThinkServer TD350 User Guide and Hardware Maintenance Manual ...
Page 20: ...6 ThinkServer TD350 User Guide and Hardware Maintenance Manual ...
Page 66: ...52 ThinkServer TD350 User Guide and Hardware Maintenance Manual ...
Page 192: ...178 ThinkServer TD350 User Guide and Hardware Maintenance Manual ...
Page 202: ...188 ThinkServer TD350 User Guide and Hardware Maintenance Manual ...
Page 217: ...guidelines 69 Copyright Lenovo 2014 2015 203 ...
Page 218: ...204 ThinkServer TD350 User Guide and Hardware Maintenance Manual ...
Page 219: ......
Page 220: ......


