Attention:
• Read the following section(s) to ensure that you work safely.
–
–
“Installation Guidelines” on page 51
Note:
Depending on the configuration, the following illustration might differ slightly from your backplane.
Watch the procedure
A video of this procedure is available at YouTube:
https://www.youtube.com/playlist?list=PLYV5R7hVcs-
Procedure
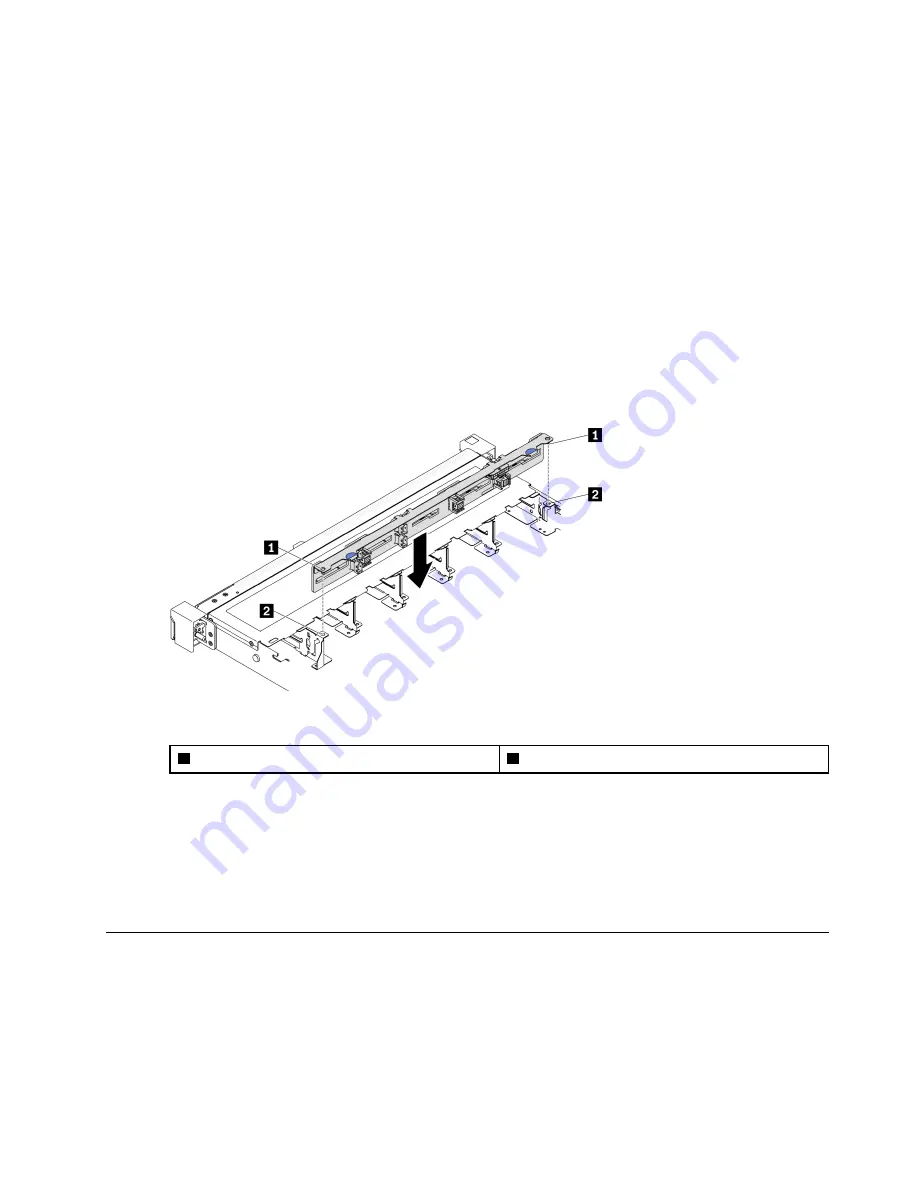
Step 1. Align the two pins on the backplane with the corresponding holes in the chassis.
Step 2. Lower the backplane into the chassis. Ensure that the pins pass through the holes and the
backplane is fully seated in place.
Figure 44. 2.5-inch backplane installation
1
Pins
2
Corresponding holes
After you finish
1. Connect the cables to the backplane. See
“Backplane and backplate cable routing” on page 41
2. Install the top cover. See
“Install the top cover” on page 134
3. Install all drives and drive fillers into the drive bays. See
“Install a hot-swap drive” on page 73
.
4. Complete the parts replacement. See
“Complete the parts replacement” on page 140
2.5-inch drive replacement from 3.5-inch drive bay
Use this information to remove and install a 2.5-inch drive from a 3.5-inch drive bay.
The EMI integrity and cooling of the server are protected by having all drive bays covered or occupied. The
number of the installed drives in your server varies depending on the server model. The vacant bays are
occupied by dummy trays. When you install a drive, save the removed dummy tray from the drive bay in case
you later remove the drive and need the dummy tray to cover the place.
.
Hardware replacement procedures
55
Summary of Contents for 7D7Q
Page 1: ...ThinkSystem SR250 V2 Maintenance Manual Machine Types 7D7Q and 7D7R ...
Page 8: ...vi ThinkSystem SR250 V2 Maintenance Manual ...
Page 20: ...12 ThinkSystem SR250 V2 Maintenance Manual ...
Page 42: ...34 ThinkSystem SR250 V2 Maintenance Manual ...
Page 176: ...168 ThinkSystem SR250 V2 Maintenance Manual ...
Page 180: ...172 ThinkSystem SR250 V2 Maintenance Manual ...
Page 183: ......
Page 184: ......


