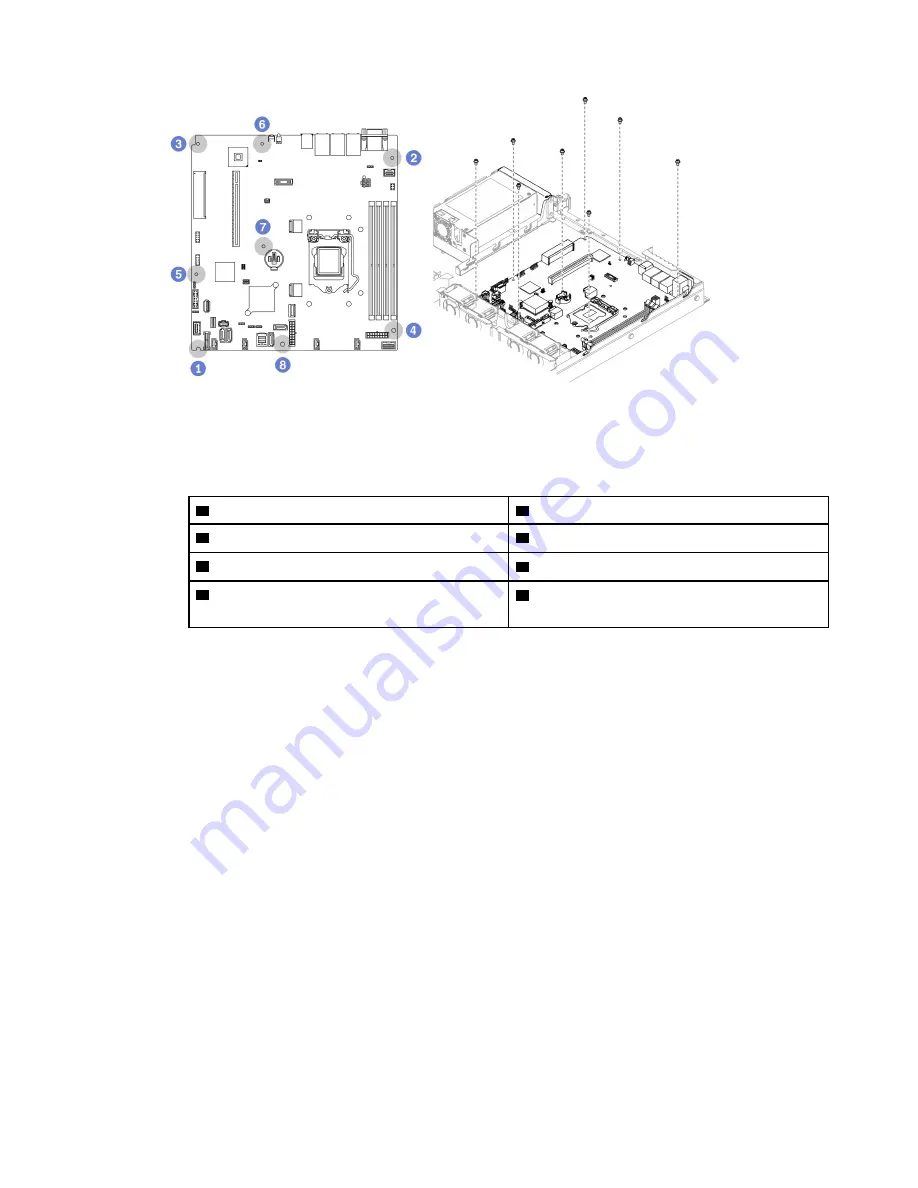
Figure 119. System-board screws location
Notes:
• The order and locations of screws installation :
1
the lower left side
5
near front USB 3.0 / 2.0 header
2
the upper right side
6
near NMI button
3
the upper left side
7
near the CMOS battery
4
the lower right side
8
between the SATA connectors and the
system power connector
• For reference, the torque which is required for the screws to be fully tightened or removed is 5.0
+/- 0.5 lb-in.
After you finish
1. Install the processor. See
“Install the processor” on page 115
2. Install the heat sink. See
“Install the heat sink” on page 87
3. Install the memory modules. See
“Install a memory module” on page 91
.
4. Connect the front operator panel cables to the system board. See
“Front panel cable routing” on page
5. Connect the fan cables to the system board by pressing it down until it clicks. See
6. Connect the backplate or the backplane cables to the system board. See
7. Install the PCIe riser assembly. See
“Install the PCIe riser assembly” on page 101
8. Install the PCIe adapter to PCIe slot 3. See
“Install the PCIe adapter (Slot 3)” on page 98
.
9. Install the air baffle. See
“Install the air baffle” on page 64
10. Install the top cover. See
“Install the top cover” on page 134
11. Complete the parts replacement. See
“Complete the parts replacement” on page 140
12. Reconnect power cords and all external cables.
.
Hardware replacement procedures
127
Summary of Contents for 7D7Q
Page 1: ...ThinkSystem SR250 V2 Maintenance Manual Machine Types 7D7Q and 7D7R ...
Page 8: ...vi ThinkSystem SR250 V2 Maintenance Manual ...
Page 20: ...12 ThinkSystem SR250 V2 Maintenance Manual ...
Page 42: ...34 ThinkSystem SR250 V2 Maintenance Manual ...
Page 176: ...168 ThinkSystem SR250 V2 Maintenance Manual ...
Page 180: ...172 ThinkSystem SR250 V2 Maintenance Manual ...
Page 183: ......
Page 184: ......


