


User’s Manual
8
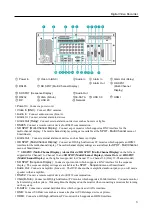
– System shutdown:
Shuts down the system.
System Status:
Displays user ID, date and time, the remaining hard disk space and the type of hard disk usage.
Clicking the right mouse button allows you to change the time. If you change the time, the SmartGuard program
restarts and recording stops during the time.
Utility Buttons
–
(
Secondary Live Screen On/Off): Clicking the button displays a camera screen to an additional connected
monitor (secondary monitor). It is not supported for secondary monitor that has less than 1024 x 768.
–
(
(Panic Recording)
:
Starts recording video from all cameras\ regardless of the recording schedule. It may be
used when you want to record manually during monitoring. Clicking the button again releases the panic recording.
Recording speed for the panic recording is the same as that of the time-lapse recording.
–
(Manual Alarm Output)
:
In general, the alarm out is activated automatically when any event is detected if
the event is associated with alarm out. However, the user can activate all the alarm out manually by clicking this
button while it is released or deactivate all the alarm out by clicking this button while it is pressed.
–
(Auto Sequencing)
:
Starts sequencing the cameras in order. Clicking the button again releases the auto
sequencing. Clicking the arrow button at the bottom-right allows you to change a sequence dwell time.
–
(SmartSearch)
:
Runs the SmartSearch program. This function will be disabled during dual display.
PTZ Control Panel:
Displays a PTZ control buttons. Refer to the
Alarm Control Panel:
Displays alarm control buttons. You can check the alarm status and control the alarm out.
The user can activate or inactivate alarm out manually by clicking the button when it is released or pressed. You
can change the alarm out setting values at the
ALERT
–
Alarm Out
menu of SmartGuard.
Screen Mode Buttons:
Click the desired screen mode. Double clicking the left mouse button over a camera screen
displays video from the camera in the single-screen mode and double clicking the left mouse button again returns to the
previous screen mode. You can change the camera arrangement manually for each screen mode. Refer to
section (p. 8) for details.
Camera Buttons:
Clicking an individual camera button displays video from the camera.
Log Panel:
Displays system log list.
POS Panel:
Displays text-in data from a text in device.
Screen Group Edit
You can change the camera arrangement manually for each screen mode. In case of secondary live screen, camera
arrangement is maintained even if screen mode is changed.
Changing the location of two channels on the monitoring screen: Clicking a camera screen and dragging it over another
camera screen switches the location of the two camera screens.
Changing the location of the channel hidden from the mongering screen: Clicking a camera button of the hidden channel
and dragging it over a camera screen on the monitoring screen switches the location of the hidden channel and the
previously displayed channel on the camera screen. This is not supported for the secondary live screen.
Instant Play
It allows you to play back video on the camera screen.
Instant play
:
Allows you to play back recently recorded video if there are any video
recorded.
Remote watch
:
Allows you to watch live video of another DVR.
Remote instant play
:
Allows you to play back recently recorded video of another DVR.
Fisheye Dewaraping
Click on the right mouse button and select Fisheye Dewarping from the context menu.
Summary of Contents for ID391H
Page 1: ......
Page 2: ......
Page 6: ...User s Manual iv ...
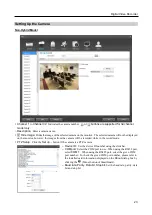
Page 38: ...User s Manual 30 Setting Up the Alert Non Hybrid Model ...
Page 39: ...Digital Video Recorder 31 Hybrid Model ...
Page 46: ...User s Manual 38 Setting Up the Event Non Hybrid Model ...
Page 56: ...User s Manual 48 Recording Setup You can set up recording for each camera BNC Cameras ...
Page 86: ...User s Manual 78 ...
Page 92: ...User s Manual 84 ...
Page 94: ...User s Manual 86 ...


