Digital Video Recorder
3
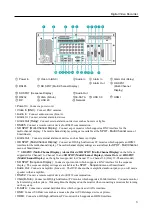
①
Power In
②
Video In (BNC)
③
Audio In
④
Alarm In
⑤
Alarm Out (Relay)
⑥
RS485
⑦
SD SPOT (Multi-Channel Display)
⑧
Alarm Out
⑨
HD SPOT
(Multi-Channel
Display)
⑩
SD SPOT (Sequence Display)
⑪
Audio Out
⑫
RS232
⑬
VGA (D-Sub)
⑭
E-SATA
⑮
USB 3.0
HDMI
DP
USB 2.0
Network
Power In:
Connect a power cord.
Video In (BNC):
Connect BNC cameras.
Audio In:
Connect audio sources (Line-in).
Alarm In:
Connect external alarm-in devices.
Alarm Out (Relay):
Connect external alarm-out devices such as buzzers or lights.
RS485:
Connect a remote control device for RS485 communication.
SD SPOT (Multi-Channel Display):
Connect a spot monitor which supports a BNC interface for the
multi-channel display. The multi-channel display settings are available at the
SPOT
–
Multi Channel
menu of
SmartGuard.
Alarm Out :
Connect external alarm-out devices such as buzzers or lights.
HD SPOT (Multi-Channel Display):
Connect an HD (high-definition) PC monitor which supports an HDMI
interface for the multi-channel display. The multi-channel display settings are available at the
SPOT
–
Multi Channel
menu of SmartGuard.
SD SPOT (Multi-Channel Display), Alarm Out
and
HD SPOT (Multi-Channel Display)
on the left are
supported for Channel 1 to Channel 16 and
SD SPOT (Multi-Channel Display), Alarm Out
and
HD SPOT
(Multi-Channel Display)
on the right are supported for Channel 17 to Channel 32. (Only 32-Channel model)
SD SPOT (Sequence Display):
Connect a spot monitor which supports a BNC interface for the sequence
display. The sequence display settings are available at the
SPOT
–
Sequence
menu of SmartGuard.
Audio Out:
Connect an amplifier (Line-out). The DVR does not have amplified audio output, so you will need a
speaker with an amplifier.
RS232:
Connect a remote control device for RS232 communication.
VGA (D-Sub):
Connect an HD (high-definition) PC monitor which supports a D-Sub interface. Connect a monitor
before turning on the system. Video might not be displayed on the monitor when connecting a monitor after turning
on the system.
E-SATA:
Connect an external hard disk drive which supports an eSATA interface.
USB:
Connect USB devices such as a mouse, keyboard, USB storage device or printer.
HDMI:
Connect an HD (high-definition) PC monitor which supports an HDMI interface.
Summary of Contents for ID391H
Page 1: ......
Page 2: ......
Page 6: ...User s Manual iv ...
Page 38: ...User s Manual 30 Setting Up the Alert Non Hybrid Model ...
Page 39: ...Digital Video Recorder 31 Hybrid Model ...
Page 46: ...User s Manual 38 Setting Up the Event Non Hybrid Model ...
Page 56: ...User s Manual 48 Recording Setup You can set up recording for each camera BNC Cameras ...
Page 86: ...User s Manual 78 ...
Page 92: ...User s Manual 84 ...
Page 94: ...User s Manual 86 ...


