background image

8

CV41 Vehicle Mount Computer (Windows CE) User Guide

8. Press the 

Power

 button on the CV41 to turn on the CV41.

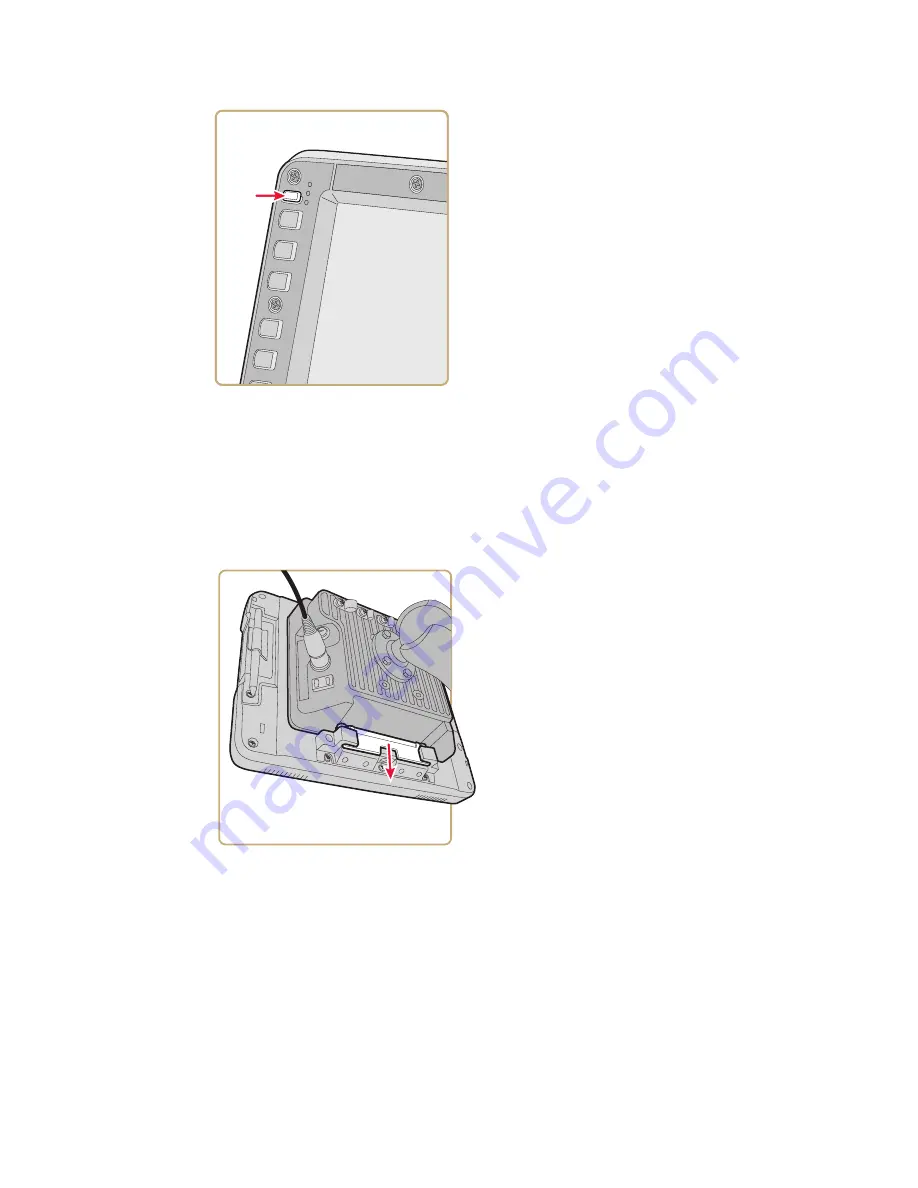
Remove the CV41 from the Smart Dock

The CV41 can easily be moved from one vehicle equipped with the smart dock to 
another. 

1. Press and hold the 

Power

 button on the CV41 until the computer turns off.

2. Pull down on the red quick release handle.

3. Pull the bottom of the CV41 away from the smart dock. 

4. Lift the CV41 away from the dock.

Summary of Contents for Intermec CV41

Page 1: ...User Guide CV41 Vehicle Mounted Computer Windows CE 6 0 CV41C ...

Page 2: ... language without the prior written consent of HII Copyright 2012 2018 Honeywell International Inc All rights reserved Web Address www honeywellaidc com Microsoft Windows ActiveSync MSN Outlook Windows Mobile the Windows logo and Windows Media are registered trademarks or trademarks of Microsoft Corporation in the United States and or other countries Wi Fi WMM Wi Fi Mutlimedia Wi Fi Protected Acce...

Page 3: ...atures 5 Power Supply Options 6 About the Smart Dock 7 Attach the CV41 to the Smart Dock 7 Remove the CV41 from the Smart Dock 8 Secure the CV41 9 About the LEDs 10 CV41 Accessories 11 About Internal UPS Battery 13 Maximize the Internal UPS Battery Usage 13 About the Backup Battery 14 Insert an SD Card 15 About the Touch Screen 15 Protect the Touch Screen 15 Adjust the Screen Brightness 16 Enable ...

Page 4: ...the Screen 26 Set the Date and Time 26 Sync to a Local Time Server 26 About Applications 27 Applications Available On the Computer 27 Applications You Can Download For the Computer 28 About Features Demo 28 About SmartSystems Foundation 28 Chapter 4 Manage the Computer 29 Manage the Computer in Your Network 30 Manage the Computer Using SmartSystems Foundation 30 Develop and Install Applications 31...

Page 5: ...nfigure Profile Settings With Intermec Settings 41 Restore Default Settings 42 Hide Menu Items in Intermec Settings 43 Use Intermec Settings Remotely With SmartSystems Foundation 43 About Network Communications 43 Configure 802 11a b g Wi Fi Radio Communications 44 Configure Bluetooth Communications 44 Connect to a Bluetooth Scanner 45 Connect to a Bluetooth Printer 46 About Serial and USB Communi...

Page 6: ...ft 55 Enable WPA or WPA2 Personal PSK Security With Microsoft 55 Configure 802 1x Security with Microsoft 56 Configure Static WEP Security With Microsoft 57 Use Open No Security Associations With Microsoft 57 Load a Certificate 57 Chapter 6 Use the Auto On Feature 59 About the Auto On Feature 60 Enable the Auto On Feature 60 Disable the Auto On Feature 60 Chapter 7 Use WWAN and GPS Communications ...

Page 7: ...rating the Computer 74 Call Product Support 74 Find Your Configuration Number 75 Find Your Operating System Version 75 Reset the Computer 75 Cold Boot the Computer 75 Warm Boot the Computer 75 Clean Boot the Computer 76 Disconnect the UPS Battery 76 Replace the Fuse 77 Clean the Computer 77 Appendix A Specifications and Default Settings 47 Physical and Environmental Specifications 48 Physical Dime...

Page 8: ...ts 54 COM 1 and COM 2 Ports 54 USB Port 55 CANBUS Audio Port 55 Power Supply Connector 56 USB Dongle Cable 57 Appendix B Keypads and Keystrokes 59 Standard Characters 60 Appendix C ScanNGo Wi Fi Configuration Bar Codes 65 Radio Configuration Bar Codes 66 2D Configuration Bar Codes 67 1D Configuration Bar Codes 68 Appendix D CV41 Docks 73 Standard Dock 74 Components 74 Enhanced Dock for Off Vehicle...

Page 9: ...cal Support Portal see below provides an easy way to report your problem or ask your question Technical Support Portal www hsmsupportportal com The Technical Support Portal not only allows you to report your problem but it also pro vides immediate solutions to your technical issues by searching our Knowledge Base With the Portal you can submit and track your questions online and send and receive a...

Page 10: ...ITHOUT LIMITATION ANY IMPLIED WARRANTIES OF MERCHANTABILITY OR FITNESS FOR A PARTICULAR PURPOSE OR NON INFRINGEMENT HII S RESPONSIBILITY AND PURCHASER S EXCLUSIVE REMEDY UNDER THIS WAR RANTY IS LIMITED TO THE REPAIR OR REPLACEMENT OF THE DEFECTIVE PRODUCT WITH NEW OR REFURBISHED PARTS IN NO EVENT SHALL HII BE LIABLE FOR INDI RECT INCIDENTAL OR CONSEQUENTIAL DAMAGES AND IN NO EVENT SHALL ANY LIABIL...

Page 11: ...t Computer Windows CE User Guide 3 ABOUT THE COMPUTER This chapter introduces the CV41 Vehicle Mount Computer with Microsoft Windows CE operating system Use this chapter to learn about the basic features and available accessories ...

Page 12: ...al connections are also made on the dock With the CV41 design you can easily remove the CV41 from the smart dock and attach it to another vehicle that is equipped with a dock Note There are two docks available for the CV41 The proper dock must be selected based on intended use The Standard Dock which is used for DC powered i e vehicle mounted applications The Enhanced Dock for Off Vehicle Use for ...

Page 13: ... CV41 Features The CV41 includes these standard features WVGA display with a resolution of 800 x 480 pixels 1 GB of RAM memory CANBUS audio connector USB connector COM2 COM1 Strain relief clamps WWAN antenna plug GPS antenna plug Wi Fi aux antenna plug Wi Fi antenna plug Fuse Power connector Power button Laptop security cable provision Padlock provision ...

Page 14: ...able not included Make sure that the external AC power is properly grounded and provides a maximum of 15 A of overcurrent protection 10 A for 230 V circuits For more informa tion on installing any of these power supply options see the CV41 Vehicle Mounting Kit Reference Guide Note In North America the AC power supply is intended for use with a UL Listed ITE power supply with an output rating of 12...

Page 15: ...purchase the correct accessory cables For more information contact your Honeywell representative Attach the CV41 to the Smart Dock Once you have secured the smart dock and connected it to power attach the CV41 to the smart dock 1 Press and hold the Power button on the CV41 until the computer turns off 2 Locate the protruding lip on the rear of the CV41 3 Place the lip of the CV41 over the top of t...

Page 16: ... CV41 from the Smart Dock The CV41 can easily be moved from one vehicle equipped with the smart dock to another 1 Press and hold the Power button on the CV41 until the computer turns off 2 Pull down on the red quick release handle 3 Pull the bottom of the CV41 away from the smart dock 4 Lift the CV41 away from the dock ...

Page 17: ...ows CE User Guide 9 Secure the CV41 If you do not want users to remove the CV41 from a forklift use either a padlock or a lap top security provision to keep your CV41 safe Padlock Provision Location Laptop Security Provision Location ...

Page 18: ...out the connection and system LEDs Connection LEDs LED State Description WWAN Solid green The CV41 is connected to WWAN Off The CV41 is not connected to WWAN Wi Fi Solid green The CV41 is connected to Wi Fi Off The CV41 is not connected to Wi Fi Bluetooth Solid blue Bluetooth is turned on Off Bluetooth is turned off Wi Fi LED WWAN LED Bluetooth LED ...

Page 19: ...de UPS battery Solid green External power present The UPS battery is charging External power not present The CV41 is off or the UPS battery is not present Solid amber External power present There is no UPS battery present the CV41 is out of charging temperature range a charge timeout has occurred or there is a charging fault External not present UPS battery is supplying power and is discharging Of...

Page 20: ...es not provide satisfactory operating time Audio Cable Use the audio cable to connect a headset to the CV41 Headset Use the headset for a hands free voice solution Touch Screen Protective Film 10 pack Use the protective film to reduce wear and protect the touch screen from being damaged Stylus Kit 5 pack Use the stylus to navigate around the user interface of the CV41 WWAN Adhesive Mount Antenna K...

Page 21: ...r computer turn off times to maximize the internal UPS battery usage The changes you make to these settings are cumulative For example if you set the backlight and screen turn off times to 15 sec and the CV41 turn off times to 5 min the CV41 actually turns off after 5 min and 15 sec Note Disabling the backlight also disables the screen and the CV41 turn off times Conversely disabling the screen tu...

Page 22: ...talled to maintain the time date and CMOS setup information for a minimum of 90 days The Lithium Ion battery is not user replaceable and should last five years before it needs a replacement The backup battery must only be changed by authorized service personnel For more information contact your Honeywell service representative ...

Page 23: ...el and screw to a torque value of 4 to 5 in lbs 6 Reattach the CV41 to the smart dock 7 Press the Power button to resume the CV41 from Suspend mode About the Touch Screen The CV41 comes with an 8 inch color touch screen display with a resolution of 800 x 480 pixels The display also comes with an optional heater to reduce condensation on the external surface of the display when moving between sub f...

Page 24: ...e screen brightness on the CV41 1 On the keypad tap the ALT key to enable the secondary keys 2 Tap F7 to increase brightness or F8 to decrease the brightness 3 Repeat Steps 1 and 2 to increase or decrease brightness Enable the Defroster If your CV41 contains a defroster use it to help reduce condensation on an external sur face when the computer is moving between sub freezing and normal temperatur...

Page 25: ...an purchase antennas to mount on a wall forklift or other flat surface using screws or small patches of adhesive backed hook and loop fas tener material Note If you have the internal 802 11 antenna option you cannot connect an external 802 11 antenna to your CV41 If you are using GPS or WWAN you must connect an external GPS or WWAN antenna 1 Using your own hardware secure the external antenna to a...

Page 26: ...dent a perma nent mounting location may require some experimentation In most fixed installations you should mount the antenna initially in a vertically polarized position with the cable from the antenna parallel to the floor and ceiling For information on purchasing an antenna contact your Honeywell sales representative ...

Page 27: ...erstand how to use the modifier keys and key sequences you can access all of the additional features printed on the keypad overlay There are three modifier keys the orange b key the green Alt key and the Control Ctrl key You want to Press Example Use an orange character or function printed above a key b key LED turns on and then the key with the character or function printed above it LED turns off...

Page 28: ...ock mode To disable Caps Lock When Caps Lock is enabled press the b key and then the key The Shift key LED turns off to show that Caps Lock has been disabled Enable or Disable the Keypad Backlight The computer has a keypad backlight for low light conditions By default the keypad backlight is enabled Disable the keypad to conserve power 1 Tap Start Settings Control Panel Intermec Settings The Inter...

Page 29: ...y is on the keypad backlight is also on Use this section to learn how to set the keypad and display backlight timer 1 Tap Start Control Panel Intermec Settings The Intermec Settings screen appears 2 Tap Device Settings Power Management Battery Power The Battery Power screen appears 3 Select the amount of time you want the backlight timer to stay on 4 Tap OK to save your settings ...

Page 30: ...om the Microsoft website at www microsoft com download To establish a partnership between your CV41 and a PC you need to physically connect your computer to your PC using a standard USB cable and a USB cable adapter To buy the USB cable adapter contact your Honeywell representative 1 Connect the CV41 to the smart dock 2 Secure the USB cable adapter to the smart dock 3 Connect the USB cable to the ...

Page 31: ...HE USER INTERFACE AND APPLICATIONS Use this chapter to learn about the Windows Embedded CE 6 0 user interface and how to interact with the screen You can also use this chapter to learn about the applications on your computer as well as additional applications you can download ...

Page 32: ...ic on the computer to find additional information on Windows CE components Learn the Basic Skills This section describes the basic concepts of using and customizing the vehicle mount computer and Windows CE Use the Touch Screen Use your finger or stylus to navigate around the CV41 user interface Windows CE Tasbar Windows Desktop Action Description Tap Tap the screen once with your stylus or finger...

Page 33: ... want to perform or tap anywhere outside the menu to close the menu with out performing the action Enter Information If you do not use the keypad you can enter information on your vehicle mount com puter in several ways depending on the program you are using Use the input panel to enter information in any program on your computer You can either type using the on screen keyboard or write using Tran...

Page 34: ...rocess 1 Tap Start Settings Control Panel Stylus 2 Select the Calibration tab 3 Tap the Recalibrate button 4 Follow the prompts on the screen to complete the alignment process Set the Date and Time Use this section to learn how to set the date and time for the CV41 Optionally you can sync the date and time to a local time server 1 Tap the clock on the taskbar The Date Time Properties screen appear...

Page 35: ...e Settings to easily configure the computer for a specific use You can choose predefined value for Power settings Tap the Profile Setting you want to use You will see a message that changes are saved and a check mark appears next to your choice Bluetooth Printing Use the Bluetooth Printing application to connect to a Bluetooth printer Bluetooth Scanning Use the Bluetooth Scanning application to co...

Page 36: ...re the key features of your computer You will find applications that demonstrate scanning document imaging image capture printing and GPS functionality Many of the applications that are part of Features Demo also have separate full featured versions that you can download and license for your computer About SmartSystems Foundation SmartSystems is an easy to use software platform that provides IT Ad...

Page 37: ... Guide 29 MANAGE THE COMPUTER Use this chapter to learn how to remotely update configure and monitor your Honey well computers You will also find information on installing and developing software applications as we ll as how to upgrade the system software ...

Page 38: ...onsole displays all SmartSystems enabled computers and peripher als in your network SmartSystems Foundation Console Through the console you can drag and drop configuration bundles operating system updates and firmware upgrades to multiple computers save configuration settings from a single device and deploy those settings to many devices simultaneously remotely change settings on SmartSystems enab...

Page 39: ...f these memory locations on the computer The ObjectStore The optional SD card Depending on available disk space consider installing your application files on the SD card Using a card creates the SD Card folder on the computer The System folder Applications and data in the System folder will persist through a clean boot Install Applications Using SmartSystems Foundation Console You can use the Smar...

Page 40: ... upgrade the operating system Similarly features added to the operating system do not affect the functionality of the SSPB and you can choose to upgrade only the operating system Update the Operating System and Low Level Firmware Use a USB flash drive to upgrade the operating system OS and low level firmware of the CV41 Before you can update your CV41 you need a USB Y Cable a USB flash drive the u...

Page 41: ...rom the Honeywell website Before you can update your CV41 you need SmartSystems Foundation To find the application go to the Technical Support Downloads Portal at www hsmftp honeywell com the SSPB files you want to install These SSPB files are available from the Technical Support Downloads Portal at www hsmftp honeywell com After you locate these items you can update your CV41 using SmartSystems F...

Page 42: ...download the bundle you want to install These bundles are available from the Technical Support Downloads Portal at www hsmftp honeywell com 3 Transfer the bundle file to System directory on the CV41 4 Tap on the file on the CV41 The computer reboots After the computer reboots the bundle files installs When the installation is finished the CV41 reboots once again ...

Page 43: ...er Guide 35 CONFIGURE THE COMPUTER Use this chapter to learn about the available methods for configuring your computer and how to use Intermec Settings You can also use this chapter to learn how to config ure network communications and wireless security ...

Page 44: ...t product that supports the computer and Intermec Settings such as Soti MobiControl or Wavelink Avalanche For more information visit the Device Management page on the Honeywell website You can also configure the computer with configuration bundles that you create using SmartSystems Foundation For more information see the SmartSystems Foundation Online Help Use Intermec Settings on the Computer Use...

Page 45: ... to help find the parameters in Intermec Settings that you want to configure Each table contains the parameters for one of the Intermec Settings Main Menu options If you see next to a menu option there are more screens available in the next level If you see next to a menu option there is only one more screen available ...

Page 46: ...ies Symbology options Scanner settings Bluetooth scanner settings Scanner port settings Decode security BT Configure on Connect Bluetooth configure on connect Communications Options Parameters You Can Configure Device Name Device name 802 11 Radio Security choice Security settings includes Wi Fi settings such as enable disable radio Funk Security Settings Microsoft Security settings IP settings Ce...

Page 47: ...ngs Sounds Sound settings System Component Versions System component versions read only Printer Options Parameters You Can Configure Printer if connected through Bluetooth Printer settings Information memory printer definitions power Bluetooth communications and so on Device Settings Options Parameters You Can Configure Application Options Parameters You Can Configure Intermec Browser Administrati...

Page 48: ...rsion and so on read only Administrator Administrator settings name phone and email Location Location settings country state city campus and detail Information Device Notes read only Device Monitor Options Parameters You Can Configure Device Health Controls Enable health data collection Set rule file location Set data refresh periods Virtual Wedge Options Parameters You Can Configure Enable Virtua...

Page 49: ...apply to the computer to ensure optimal performance in a specific scenario The end user does not need to figure out the right settings because we have already done that work for you Profile Settings is available from the Start Programs menu so you can make it available to the end user for easy configuration Profile Settings Screen Use Intermec Settings to determine the profiles you want the end us...

Page 50: ...or all of the Intermec Settings parameters to their default settings if necessary 1 Navigate to the menu that you want to restore to defaults 2 Tap Menu Restore Menu Defaults 3 When prompted tap Yes to restore the menu default settings 4 If prompted to refresh the computer tap Yes You can restore defaults settings for all parameters 1 Tap Menu Restore All Defaults The applications asks if you are ...

Page 51: ...ter is SmartSystems enabled which lets you open Intermec Settings from the SmartSystems console to remotely configure all of your computers For more infor mation on SmartSystems see Manage the Computer Using SmartSystems Foundation 1 In the SmartSystems console select a computer and right click 2 From the menu select Start Intermec Settings 3 Configure the settings you need to change As you choose...

Page 52: ... check box and tap OK By default the computer uses Funk security and enables DHCP 3 Use Intermec Settings to configure any other parameters you need to use for communication with your network 4 Configure 802 11 security For help see About Wireless Security Configure Bluetooth Communications Your computer is Bluetooth enabled which lets you connect to other Bluetooth devices such as scanners or pri...

Page 53: ...luetooth radio maintains its state through a reboot or cold boot and maintains virtual COM ports But if you clean boot your computer you need to recreate pairings to devices Connect to a Bluetooth Scanner You can connect the computer to an Honeywell Bluetooth scanner such as the SF51 or SR61 1 Tap Start Settings Control Panel Bluetooth Scanning 2 Tap Add Device ...

Page 54: ...p Start Settings Control Panel Bluetooth Printing 2 Tap Search to find a printer or tap Manual to enter a device address Follow the onscreen instructions to select the current wireless printer 3 Optional Tap Print Test Page The printer prints out a test page About Serial and USB Communications Use a serial or USB cable to transmit and receive data from another device through serial or USB communic...

Page 55: ... purchase the correct serial cable to use with the CV41 For more information see the following table 1 Connect the scanner to the COM1 or COM2 port 2 From the Intermec Settings main menu select Tethered Scanner COM 1 or COM 2 3 Tap Scanner Settings Scanner Model Required Cable SR30 6 5 ft 1 9 m cable P N 236 159 002 SR61T Gen 1 6 5 ft 1 9 m cable P N 236 182 001 SR61T Gen 2 6 5 ft 1 9 m cable P N ...

Page 56: ...anner port 6 Check the Enable scanner port check box and tap OK Create an ISP Connection You can create an Internet Service Provider ISP connection to send and receive email messages using Messaging Outlook Email and view web pages using Internet Explorer Mobile You need to get your ISP dial up access telephone number a user name and a password from your ISP 1 Tap Start Settings Control Panel 2 Do...

Page 57: ...COM1 from the Select a modem list 8 Tap Next 9 Enter the access phone number and then tap Finish 10 Double tap on the connection you just created 11 Tap Dial Properties 12 On the Dialing Properties screen configure your dialing properties and tap OK 13 Enter the User name Password and Domain if provided by an ISP or your network administrator 14 Tap Connect ...

Page 58: ...curity The computer provides five types of security for your wireless network Wi Fi Protected Access 2 WPA2 Wi Fi Protected Access WPA 802 1x LEAP WEP This section explains how to configure wireless security on your computer Honeywell recommends that you implement WPA2 security using PSK Personal or 802 1X Enterprise key management as appropriate You must use either Funk or Microsoft security to i...

Page 59: ...let your computer communicate in different networks without having to change all of your security set tings For example you may want to set up one profile for the manufacturing floor and one for the warehouse By default the active profile is Profile 1 Select a Funk Security Profile Use the following procedure to select a Funk security profile 1 Start Intermec Settings 2 Choose Communications 802 1...

Page 60: ...igure WPA PSK or WPA2 PSK with Funk security 1 Make sure the communications and radio parameters on your computer are config ured 2 Make sure Funk is selected as your security choice 3 Start Intermec Settings 4 Choose Communications 802 11 Radio Funk Security 5 Select the profile you want to configure 6 For Association choose WPA or WPA2 7 For 8021x choose None 8 For Pre Shared Key enter the pre s...

Page 61: ...Validate Server Certificate choose Yes c Enter a User Name and Subject Name 11 Save your settings Configure LEAP Security With Funk After you configure the communications and radio parameters on your computer and select Funk as your security choice you can configure LEAP 1 Start Intermec Settings 2 Choose Communications 802 11 Radio Funk 3 Select the profile you want to configure 4 For 8021x choos...

Page 62: ... Transmit key choose the key you want to use for transmitting data 11 Save your settings Use Open No Security Associations with Funk Use the following procedure to configure your computer for open security using Funk 1 Start Intermec Settings 2 Choose Communications 802 11 Radio Funk Security 3 Select the active profile you are using 4 For Association choose Open 5 For Encryption choose None 6 Tap...

Page 63: ...cation choose WPA or WPA2 Data Encryption automatically defaults to TKIP for WPA and AES for WPA2 6 For 802 1x Authentication choose either TLS or PEAP 7 If you choose TLS a Load a user and root certificate on your computer For help see Load a Certificate b Choose Properties The Certificates dialog box appears c Select the certificate you want to use from the list The User Logon dialog box appears...

Page 64: ...d of 802 1x WEP if possible 1 Make sure the communications and radio parameters on your computer are config ured 2 Start Intermec Settings 3 Choose Communications 802 11 Radio Microsoft Security 4 For Infrastructure Mode choose Infrastructure 5 For Network Authentication choose Open 6 For Data Encryption choose WEP 7 For 802 1X Authentication choose TLS or PEAP 8 If you choose TLS a Load a user an...

Page 65: ... Hex keys must be preceded by 0x and contain 5 or 13 hex pairs 8 For Network Key Index select the key you want to use for data transmission 9 Save your settings Use Open No Security Associations With Microsoft Use the following procedure to configure your computer for open security using Micro soft WZC 1 Start Intermec Settings 2 Choose Communications 802 11 Radio Microsoft Security 3 For Network ...

Page 66: ...appears asking if you want to load the root certificate e Tap OK The Enrollment Tool message box appears telling you that the certificate has been added f Tap OK to close the message box 4 To import a certificate chain a Tap the Import PFX tab b Tap Import Certificates to install the selected certificate c In the CertImportUI screen tap the button next to the Select pfx to import text field d Sele...

Page 67: ...CHAPTER 6 CV41 Vehicle Mount Computer Windows CE User Guide 59 USE THE AUTO ON FEATURE You can use the Auto On feature to turn on the CV41 when apply external power to the computer ...

Page 68: ...ernal power is applied For exam ple when the smart dock is powered on and the CV41 is placed into the dock the CV41 is placed into the dock and the vehicle is turned on 1 Tap Start Settings Control Panel Options The Options screen appears 2 Tap the Misc tab 3 Select Enable Auto On and tap OK Disable the Auto On Feature When Auto On is disabled the CV41 is turned off and the ignition input signal i...

Page 69: ... USE WWAN AND GPS COMMUNICATIONS Some configurations of the CV41 come equipped with a WWAN radio With WWAN enabled you can use UMTS or CDMA communications to transmit data through cellu lar wide area networks WANs and use the Global Positioning System Receiver GPS ...

Page 70: ...s the Power button to place the CV41 in Suspend mode 3 Using a small Phillips screwdriver remove the two screws that secure the SIM card access panel 4 Insert the SD card into the SD card slot 5 Reattach the SD card access panel and screw to a torque value of 4 to 5 in lbs 6 Reattach the CV41 to the smart dock 7 Connect an external WWAN antenna For more information see Connect an External Antenna ...

Page 71: ...ll representative can guide you through the process 1 Press the Power button to place the CV41 in Suspend mode 2 Connect an external WWAN antenna For more information see Connect an External Antenna 3 Press the Power button again to turn on the CV41 4 Select Start Programs GobiCM GobiCMExe 5 In Firmware Selection select your wireless carrier and click Update Firmware 6 Select the CDMA tab enter 22...

Page 72: ...Manager 1 Make sure WWAN communications is enabled For more information see Use WWAN and GPS Communications 2 Make sure an external GPS antenna is connected For more information see Connect an External Antenna 3 Select Start Programs GobiCM GobiCMExe 4 Select the GPS tab and tap Start The Gobi Connection Manager shows your current location 5 Tap Stop to finish the test ...

Page 73: ...CHAPTER 8 CV41 Vehicle Mount Computer Windows CE User Guide 65 ENABLE SCREEN BLANKING Enable screen blanking on your computer to turn off the computer screen while your vehicle is in motion ...

Page 74: ...ses when the user presses the accelerator pedal on a vehicle Honeywell does not sell a switch for screen blanking but you can purchase a screen blanking box from Honeywell For more information contact your Honeywell represen tative Install the Hardware for Screen Blanking This section explains how to install the switch to enable screen blanking on your com puter To install the screen blanking box ...

Page 75: ... and enable the switch for screen blanking 1 Using your own mounting hardware secure the switch sensor to the vehicle 2 Connect the serial cable to the switch Make sure that Pin 7 connects to the switch connection and Pin 8 connects to the other terminal 3 Connect the serial cable to the COM1 or COM2 port on your computer Pin Signal Description 1 Not used 2 Not used 3 Not used 4 Not used 5 Not use...

Page 76: ...tings on the vehicle mount computer 1 In Intermec Settings select Device Settings Screen Blanking on Motion 2 In Screen Blanking on Motion select the COM port the custom serial cable is connected to 3 In Screen on delay after motion stops sec enter the amount of time in seconds that you want the display to turn on after the vehicle is stationary 4 Tap OK Screen blanking is enabled ...

Page 77: ...Computer Windows CE User Guide 69 TROUBLESHOOT AND MAINTAIN THE COMPUTER If you encounter any problems while using the computer look in this chapter to find a possible solution You will also find information on routine maintenance ...

Page 78: ... replacing the computer Troubleshoot the Wi Fi Connection Use this troubleshooting table to help solve problems with your 802 11 radio connec tion Problem Solution When you turn on the computer after it was suspended for a while 10 to 15 minutes or longer it can no longer send or receive messages over the network Host may have deactivated or lost current terminal emulation session In a TCP IP dire...

Page 79: ...with the server Ensure the access point is turned on properly configured and has 802 1x security enabled Problem Solution Problem Solution The computer indicates it is not authenticated Make sure that the User Name and Password parameters on the computer must match the user name and password on authentication server You may need to reenter the password on both the computer and authentication serve...

Page 80: ...o delete the events in the list tap Clear Events 4 Tap the Ping tab to run a ping test to the host a In the Host field enter the IP address of the host b From the Repetitions list choose the number of times the computer will ping the host c Tap Ping The graph shows the amount of time it takes for the host to return the ping Tap List to see this information in a list format 5 Tap the RSSI tab to vi...

Page 81: ...canner will not read the bar code label Aim the scanner beam to cross the entire bar code label in one pass Vary the scanning angle Check the quality of the bar code label Scan a bar code label that you know will scan Compare the two bar code labels to see if the bar code quality is too low You may need to replace the label that you cannot scan Make sure the bar code symbology is enabled and confi...

Page 82: ...t work well or read bar code labels very quickly Set the Scanner Model command to the specific attached input device Check enabled bar code symbologies and enable only the symbologies being used Problem Solution Problem Solution You press the Power button and nothing happens Try the following solutions Make sure that power is connected to the computer and that the Power switch on the smart dock is...

Page 83: ...omputer or an application locks up you may need to reset the computer The computer uses the configuration currently saved in flash memory during the boot process There are four ways to reset the computer Cold boot Warm boot Clean boot Disconnect the UPS battery Cold Boot the Computer If the computer seems to be locked up try cold booting it Cold booting the CV41 restarts the computer and RAM is cl...

Page 84: ...the System folder are preserved 1 Tap Start Settings Control Panel Registry 2 Tap the Load Factory Defaults button Disconnect the UPS Battery If the CV41 stops responding or you plan on shipping the CV41 you need to disconnect the UPS battery 1 Remove the CV41 from the smart dock For help see Remove the CV41 from the Smart Dock 2 Using a Phillips head screwdriver remove the two screws that secure ...

Page 85: ... power 3 Using a flathead screwdriver remove the fuse holder from the CV41 4 Replace the fuse 5 Secure the fuse holder back into the CV41 Clean the Computer To keep the computer in good working order you may need to clean the touch screen Clean the touch screen as often as needed for the environment in which you are using the computer To clean the computer use a solution of ammonia and water 1 Pre...

Page 86: ...78 CV41 Vehicle Mount Computer Windows CE User Guide ...

Page 87: ...APPENDIX A CV41 Vehicle Mount Computer Windows CE User Guide 47 SPECIFICATIONS AND DEFAULT SETTINGS ...

Page 88: ...ing 30 C to 60 C 22 F to 148 F Relative humidity Up to 90 non condensing at 40 C 104 F with extended temperatures up to 100 Water and dust IP66 ESD 15 kV Vibration MIL STD 810F composite wheeled vehicles Crash SAE J 1455 Input power DC input voltage 10 to 60 VDC Input current 4 6 A Input fuse 10 A time delay External power supply Internal power supply 10 60 VDC AC adapter 90 240 VAC DC power suppl...

Page 89: ... 1 GB total mappable memory with 512 MB as system memory in Windows CE Integrated radio 802 11a b g Interfaces USB 2 0 host port USB 1 1 client port two RS 232 COM ports a CANBUS audio port DC power input and ignition input and RF antenna ports for Wi Fi WWAN and GPS Antennas Dual internal antennas or optional external antennas Removable storage Secure Digital Operating system Microsoft Windows CE...

Page 90: ...O Disable CanadaPost Disable Codabar Disable Codablock A Disable Codablock F Disable Code 11 Disable Code 39 Enable Code 93 Disable Code 128 GS1 128 Enable Code 128 GS1 128 GS1 128 identifier DataMatrix Enable DutchPost Disable EAN UPC Enable UPC A UPC E EAN 8 EAN 13 GS1 Composite Disable GS1 DataBar Expanded Disable GS1 DataBar Limited Disable GS1 DataBar Omni Directional Disable JapanPost Disabl...

Page 91: ...n Off After Good Read Enable One shot Number of Good Read Beeps One Scanner Port Settings Default Value Baud Rate 57600 Decode Security Settings Default Value Consecutive Data Validation 0 Identical Consecutive Timeout 300 ms Different Consecutive Timeout 0 Center Decoding Disable Center Decoding Tolerance 0 Scanner Settings Default Value Scanner Model SR Intermec Scanner Trigger Mode Level Aimer ...

Page 92: ...er Certificates False Import Pac Files False Radio Bands Indeterminate Allow Security Changes Enable Bluetooth Setting Default Value Bluetooth Power On Backlight Setting Default Value Keypad Backlight Enable Screen Setting Default Value Screen Heater Enabled Screen Heater Turns Off at 0 C Keypad Setting Default Value Caps Lock on Reboot Disabled Battery Power Setting Default Value Backlight Turns ...

Page 93: ...creen Settings Default Value Brightness High Screen Blanking On Motion Disable Screen On Delay After Motion Stops sec 1 0 Sound Setting Default Value Beeper and Voice 15 Headset Beeper 0 Screen Taps Off Key Clicks Off Battery Power Setting Default Value Core Messaging Service Setting Default Value Associated Server IP Null Broadcast Name INTERMEC Port 62241 Keep Alive Ping Interval 30 Seconds Devi...

Page 94: ...xternal bar code scanner or it can be configured to provide RI RFID Settings Default Value Enable RFID Service Off Virtual Wedge Settings Default Value Virtual Wedge Enable Virtual Wedge Method Adapt to Application Barcode Scanner Grid Null Label Encoding Code Page 1252 D ANSI Win3 1 US Pin Signal Description 1 DCD Data carrier detect input 2 RXD Receive data input 3 TXD Transmit data output 4 DTR...

Page 95: ...SN client data signal 4 USB_H1_PWR USB host 1 5 V output power 5 GND Common ground 6 GND Common ground 7 USB_H1_D USB host 1 data signal 8 USB_H1_D USB host 1 data signal 9 USBC_VBUS USB client 5 V detect from attached host 5 9 6 1 Pin Signal Description 1 CAN reserved 2 CAN_L CAN_L bus line dominant low 3 CAN_GND CAN ground 4 CAN reserved 5 GND Optional ground 6 Audio return Headset return 7 Audi...

Page 96: ...ed internally to the conductive chassis of the computer The CV41 internal power supply can accept DC input voltages in the range of 10 to 60 VDC 12 CAN_SHLD 13 CAN_H CAN_H bus line dominant high 14 CAN reserved 15 CAN_V Optional CAN external power supply Pin Signal Description Pin Signal Description 1 V In 10 60 nominal DC input 2 V In 10 60 nominal DC input 3 V In Input 4 V In Input 5 GND Chassis...

Page 97: ...nd 2 USBC_D USB client data signal 3 USBC_D_ USN client data signal 4 USB_H1_PWR USB host 5 V output power 5 GND Common ground 6 GND Common ground 7 USB_H1_D USB host 1 data signal 8 USB_H1_D USB host 1 data signal 9 USBC_VBUS USB client 5 V detect from attached host Pin Signal Description 1 5V_USB USB power current limited 2 USB2N_A USB D D9 male connector USB client connector USB hos connecto 9 ...

Page 98: ...dows CE User Guide 3 EUSB2PA_A USB D 4 DGND USB power return Shell CGND Chassis ground Pin Signal Description 1 V In 12 to 48 V nominal DC input 2 V In 12 to 48 V nominal DC input 3 V In Input 4 V In Input Pin Signal Description 1 2 3 4 ...

Page 99: ...APPENDIX B CV41 Vehicle Mount Computer Windows CE User Guide 59 KEYPADS AND KEYSTROKES ...

Page 100: ... with the keypad If there is no sequence of keystrokes for a particular character or function it is only available through the soft input panel SIP which you can access by tapping the keyboard icon on the touch screen To Enter Keypad a A b B c C d D e E f F g G h H i I j J k K l L m M n N o O p P q Q r R s S t T u U v V w W x X y Y z Z To Enter Keypad F1 F2 F3 F4 F5 F6 F7 ...

Page 101: ... F21 Alt F22 Alt F23 Alt F24 Alt To Enter Keypad asterisk b at symbol b W pound b ampersand b percentage b colon b D semicolon b F comma b J dollar b R exclamation b Q question mark b L hyphen or minus b 5 period or b K plus b 8 apostrophe b H equals b 2 _ underscore b M caret b u greater than b V less than b C To Enter Keypad ...

Page 102: ...lde b s backslash b S forward slash b A quotes b G Insert b 4 Delete b 6 broken vertical bar b grave b Forward Tab j Backspace Up Arrow u Down Arrow d Left Arrow l Right Arrow r CapsLock b Enter e ok Alt o Shift Space s Start Windows or b Esc Alt Alt Ctrl Ctrl Intermec Dashboard To Enter Keypad Attention Alt A Autolog Alt S Clear Alt 6 Duplicate Alt D EEOF Alt W Erase Alt E To Enter Keypad ...

Page 103: ...p b 3 Hex Alt I Home Alt H Keypad Alt K Menu Alt M Mode Alt O New Line Alt N Next Screen b 9 PA1 Alt T PA2 Alt Y PA3 Alt U Page Alt u Print Alt P Previous Screen b 7 Remove Alt R Reset Alt Return Alt e Roll Down Alt 5 Roll Up Alt 8 Select Alt Z System Request Alt Q View Down b d View Up b u To Enter Keypad ...

Page 104: ...64 CV41 Vehicle Mount Computer Windows CE User Guide ...

Page 105: ...NDIX C CV41 Vehicle Mount Computer Windows CE User Guide 65 SCANNGO WI FI CONFIGURATION BAR CODES You can use the ScanNGo Wi Fi configuration bar codes to quickly configure the 802 11 radio in your computer ...

Page 106: ...codes you will still need to use Intermec Settings or another configuration program to set network specific settings on your computer and to configure the wireless security Note If you are using Microsoft security you can only use the 1D configuration bar codes The following ScanNGo bar codes were created using SmartSystems Foundation For more information on SmartSystems Foundation see Manage the ...

Page 107: ... 2D imager 1 Scan the appropriate bar code from the table and wait for the program to start 2 Follow any instructions on the device 2D Imager Radio Configuration Bar Codes When You Want To Scan This Bar Code Set all communication settings to defaults Wi Fi WWAN if applicable Enable Wi Fi set Funk security to defaults ...

Page 108: ...ar code from the table and wait for the program to start 2 Scan the 1 9 bar code 3 Scan the rest of the bar codes in any order 4 Follow any instructions on the device 1D Imager Radio Configuration Bar Codes When You Want To Scan This Bar Code Set all communication settings to defaults Wi Fi WWAN if applicable Enable Wi Fi set Funk security to defaults ...

Page 109: ...ter Windows CE User Guide 69 Set all communication settings to defaults Wi Fi WWAN if applicable Enable Wi Fi set Funk security to defaults 1D Imager Radio Configuration Bar Codes Continued When You Want To Scan This Bar Code ...

Page 110: ...uter Windows CE User Guide Set all communication settings to defaults Wi Fi WWAN if applicable Enable Wi Fi set Microsoft security to defaults 1D Imager Radio Configuration Bar Codes Continued When You Want To Scan This Bar Code ...

Page 111: ...er Windows CE User Guide 71 Set all communication settings to defaults Wi Fi WWAN if applicable Enable Wi Fi set Microsoft security defaults 1D Imager Radio Configuration Bar Codes Continued When You Want To Scan This Bar Code ...

Page 112: ...72 CV41 Vehicle Mount Computer Windows CE User Guide ...

Page 113: ...APPENDIX D CV41 Vehicle Mount Computer Windows CE User Guide 73 CV41 DOCKS This chapter details the different docks available for the CV41 Standard Dock Enhanced Dock for Off Vehicle Use ...

Page 114: ...1 and COM2 USB Ports USB port provides host and client connections via an adapter cable This port also supports Honeywell external keyboards Ethernet N A CANbus CANbus connection via an adapter cable Audio Headset connection via an adapter cable Screen Blanking Supported via COM1 and COM2 connectors Ignition Control Supported Strain Relief Clamps Fuse Power Connector Power Switch RAM Ball COM 1 CO...

Page 115: ...port also supports Honeywell external keyboards USB2 port provides two USB host ports via an adapter cable Direct USB host connection on top of dock Ethernet RJ 45 Ethernet connection on top of dock not supported CANbus CANbus connection via an adapter cable Audio Headset connection via an adapter cable Screen Blanking Supported via COM1 and COM2 connectors Ignition Control Supported Strain Relief...

Page 116: ... Computer Windows CE User Guide Components Top Only the Enhanced Dock has these connectors on the top The connectors are located behind water tight plugs Note The Ethernet port is not supported on the CV41 USB Host Ethernet ...

Page 117: ...CV41 Vehicle Mount Computer Windows CE User Guide 77 ...

Page 118: ... Honeywell 9680 Old Bailes Road Fort Mill SC 29707 www honeywellaidc com CV41 CE UG Rev A 6 18 ...

Reviews: