


8 Channel 2.4 GHz Aircraft Computer Radio System
8 Channel 2.4 GHz Aircraft Computer Radio System
Section 6: Heli Programming Menu
Section 6: Heli Programming Menu
92
93
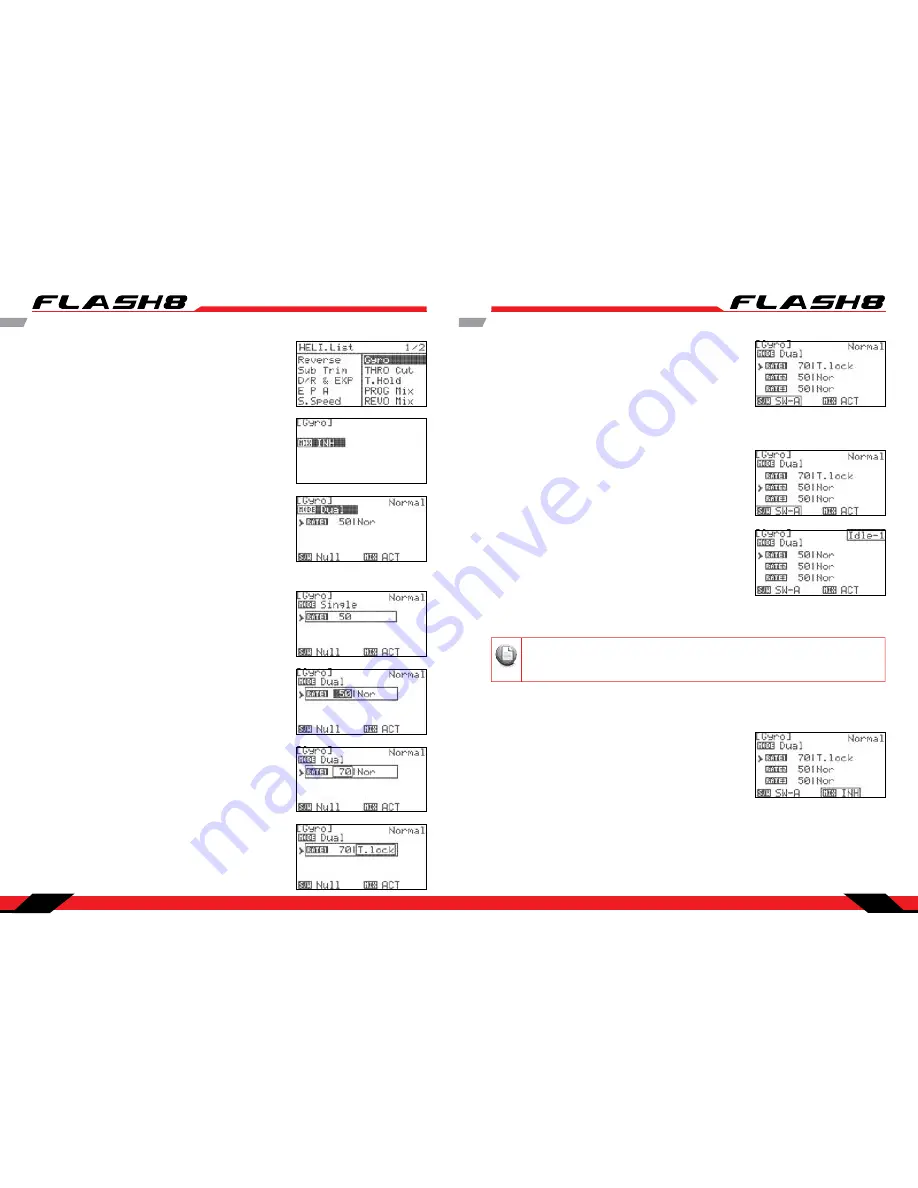
Gyro cont.
1. From the Model menu, rotate the jog dial to highlight “GYRO”
and press the jog dial once to enter the activation menu.
2. Press the jog dial again to activate the menu.
3. Rotate the jog dial to select ACT (activate), then press the jog
dial to confirm your selection and activate the GYRO menu.
4. Scroll to the “MODE” field and press the jog button to activate
the menu.
5. Rotate the jog dial to select “Single” or “Dual” to denote
whether your gyro is a single-rate or dual-rate unit. Consult the
gyro manufacturer’s instructions if you are not sure. Press the
jog dial to confirm your selection.
a. If you choose “Single”:
- Scroll to the “RATE1” field and press the jog button to activate
the menu.
- Rotate the jog dial to dial in the desired amount of gyro gain
(consult the gyro manufacturer’s instructions for guidance).
b. If you choose “Dual”:
- Scroll to the “RATE1” field and press the jog button to activate
the menu.
- Scroll to highlight the value field and press the jog dial to
activate the menu.
- Rotate the jog dial to dial in the desired amount of gyro gain
(consult the gyro manufacturer’s instructions for guidance).
- Rotate the jog dial to highlight the function field (“Nor” or
“T.lock”) and press the jog dial to activate the menu.
- Rotate the jog dial to select “Nor” (normal) or “T.lock” (throttle
lock). Throttle lock is used for bench testing the gyro rate
sensitivity.
Gyro cont.
6. Scroll to highlight “S/W” and press the jog dial to activate the
switch menu.
7. Rotate the jog dial to select a switch to activate the camber
mix. Press the jog dial to confirm your selection.
a. If you choose the “NULL” option, the set gyro rate will remain
active at all times for this model.
b. If you choose a switch:
- The current switch position will be displayed in the top right
field of the display as “0”, “1”, or “2”.
- Repeat step 5a or 5b as applicable to define gyro rate for every
switch position.
If you are using multiple flight conditions, you must define gyro values for each flight condition.
The top field of the Gyro menu allows you to select the desired flight condition. Alternately, you
may select the desired flight condition using the assigned F.Cond switch.
Warning
Note
Tip
Tip
Tip
Caution
9. Press the Back button to return to the Model Function menu.
To disable the Gyro:
1. Scroll to highlight the “MIX” field in the Gyro menu and press
the jog dial to activate the menu.
2. Select “INH” (inhibit) and press the jog dial to confirm your
selection.
3. Press the Back button to return to the Model Function menu.
8. To set up the Gyro in accordance with a Flight Condition
− The upper right field of the menu displays which flight
condition is currently active and will be programmed.
− Scroll to the Flight Condition field and press the jog dial to
activate the menu.
− Choose the desired flight condition and press the jog dial to
confirm your selection.


