Probes
LOGIQ V2/LOGIQ V1
–
User Guide
1-55
Direction 5610736-100
Rev. 9
Connecting the Probe (continued)
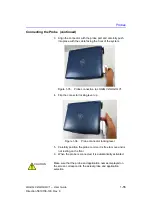
3. Align the connector with the probe port and carefully push
into place with the cable facing the front of the system.
Figure 1-35. Probe connection to LOGIQ V2/LOGIQ V1
4. Flip the connector locking lever up.
Figure 1-36. Probe connector locking lever
5. Carefully position the probe cord so it is free to move and is
not resting on the floor.
6. When the probe is connected, it is automatically activated.
CAUTION
Make sure that the probe and application names displayed on
the screen correspond to the actual probe and application
selection.
Summary of Contents for LOGIQ V2
Page 8: ...i 6 LOGIQ V2 LOGIQ V1 User Guide Direction 5610736 100 Rev 9...
Page 92: ...Getting Started 1 80 LOGIQ V2 LOGIQ V1 User Guide Direction 5610736 100 Rev 9...
Page 242: ...After the Exam is Over 3 80 LOGIQ V2 LOGIQ V1 User Guide Direction 5610736 100 Rev 9...
Page 288: ...Safety 4 46 LOGIQ V2 LOGIQ V1 User Guide Direction 5610736 100 Rev 9...
Page 380: ...Index 4 LOGIQ V2 LOGIQ V1 User Guide Direction 5610736 100 Rev 9...
Page 381: ......

