background image


G1000/DA 40 System Maintenance Manual 

Page 7-5 

190-00303-03 

Revision 6 

7.2 

GMA 1347 Audio Panel 

Original GMA 1347 Reinstalled 

No software/configuration loading or testing is required if the removed GMA 1347 is re-installed.  
Continue to the final return-to-service checks in Section 8. 

New GMA 1347 Installed 

If a new GMA 1347 (new serial number) is installed, the correct software and configuration files must be 
loaded to the unit.   

7.2.1  GMA 1347 Software Loading 

1.


Insert the correct G1000/DA 40 SW Loader Card (see Appendix A) into the top slot of the PFD. 

2.


Start the G1000 system in Configuration mode. 

3.


At the PFD, go to the Software Upload page using the FMS knob. 

4.


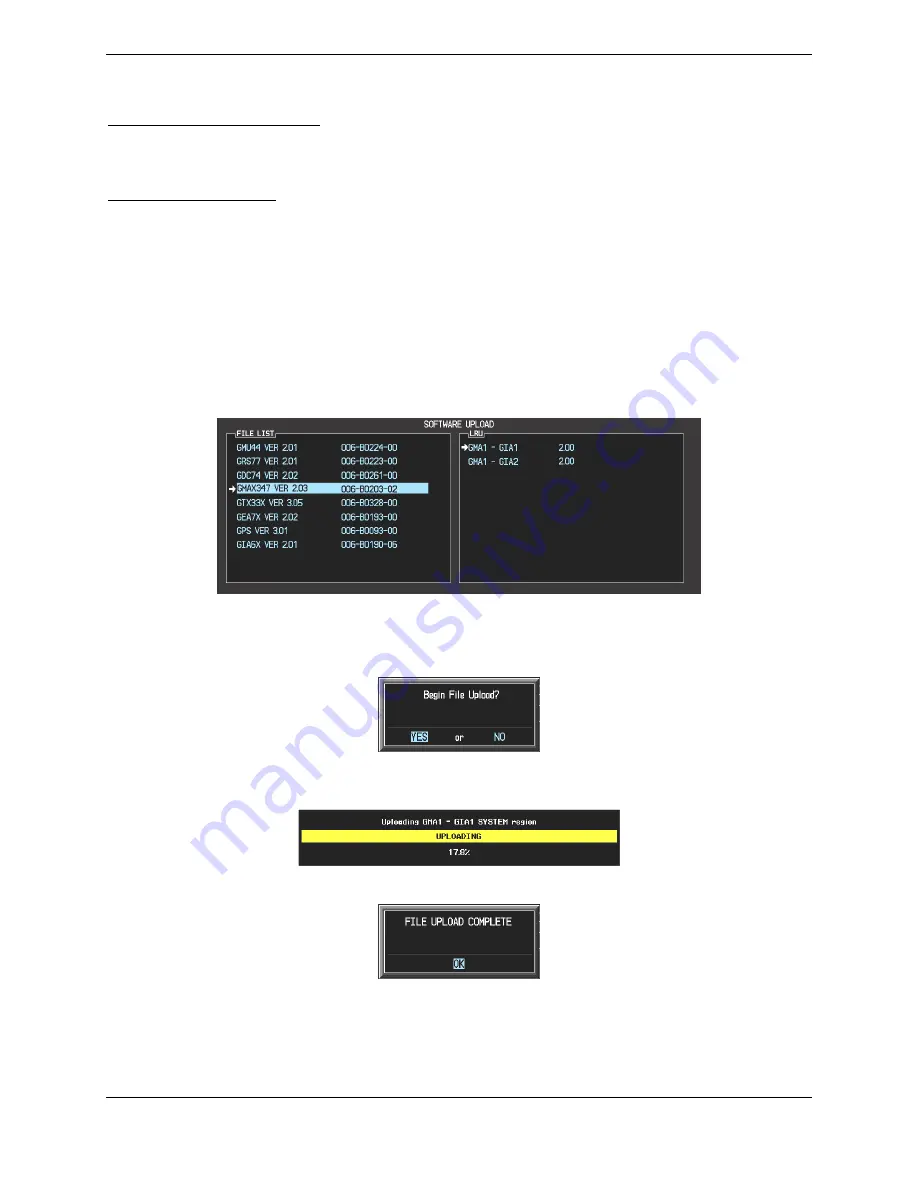
Highlight the GMA software file.  Ensure that both paths to the GMA through GIA1 and GIA 2 
appear in the LRU field as shown: 


5.


Press the LRU softkey.  Select the GMA1 - GIA1 data path to load software.  Press the LOAD 
softkey. 

6.


Select YES and press the ENT key to acknowledge the following prompt: 


7.


The software for the GMA 1347 Audio Panel begins to load.  Monitor the upload status as it 
progresses: 


8.


After the file finishes loading, press ENT to acknowledge the following prompt: 


9.


Check the SUMMARY field to ensure the load is ‘COMPLETE’.   

10.


Continue to the GMA 1347 Configuration procedure. 

Summary of Contents for Diamond DA40

Page 1: ...190 00303 03 January 2007 Revision 6 G1000 System Maintenance Manual Diamond DA 40...

Page 2: ...e and provided further that any unauthorized commercial distribution of this manual or any revision hereto is strictly prohibited Garmin International Inc 1200 E 151st Street Olathe KS 66062 USA Telep...

Page 3: ...ls known to the State of California to cause cancer birth defects or reproductive harm This Notice is being provided in accordance with California s Proposition 65 If you have any questions or would l...

Page 4: ...Page ii G1000 DA40 System Maintenance Manual Revision 6 190 00303 03 This page intentionally left blank...

Page 5: ...RVIEW 3 5 3 5 CONFIGURATION MODE NAVIGATION 3 11 4 G1000 CONTINUED AIRWORTHINESS 4 1 AIRWORTHINESS LIMITATIONS 4 1 4 2 SERVICING INFORMATION 4 1 4 3 ON CONDITION SERVICING 4 1 4 4 MAINTENANCE REQUIREM...

Page 6: ...S GMU 44 MAGNETOMETER 7 25 7 8 SOFTWARE CONFIGURATION TROUBLESHOOTING 7 34 8 SYSTEM RETURN TO SERVICE PROCEDURE 8 1 GPS FAILURE TEST 8 1 8 2 GIA FAILURE TEST 8 2 8 3 DISPLAY FAILURE TEST 8 2 8 4 AHRS...

Page 7: ...HT Probe 2 21 Figure 2 23 EGT Probe 2 21 Figure 2 24 Alternator Current Sensor Installation 2 22 Figure 2 25 Flight Instrumentation Interface 2 23 Figure 2 26 G1000 Engine Airframe Interface 2 24 Figu...

Page 8: ...mocouple 6 7 Figure 7 1 G1000 Normal Mode Check 7 4 Figure 7 2 G1000 Reversionary Mode Check 7 4 Figure 7 3 Marker Beacon Symbology 7 7 Figure 7 4 GPS Signal Status 7 11 Figure 7 5 G1000 Engine Airfra...

Page 9: ...e Diamond DA 40 An overview of the G1000 system interface is also provided Section 3 G1000 Control Operation Presents basic control and operation information specifically tailored to maintenance pract...

Page 10: ...nstrumentation Systems HIRF High Intensity Radiated Fields HSDB High Speed Data Bus Ethernet IAU Integrated Avionics Unit ICS Inter Com System LRU Line Replaceable Unit MFD Multi Function Flight Displ...

Page 11: ...the scope of this document Table 1 2 Reference Documents Document Garmin Part Number G1000 DA 40 Master Drawing List 005 C0004 00 G1000 DA 40 Required Equipment List 005 00149 28 G1000 DA 40 Install...

Page 12: ...Page 1 4 G1000 DA40 System Maintenance Manual Revision 6 190 00303 03 This page intentionally left blank...

Page 13: ...Configuration is determined by wiring harness Both displays provide control and display of nearly all functions of the G1000 integrated cockpit system The displays are located side by side with the G...

Page 14: ...Page 2 2 G1000 DA40 System Maintenance Manual Revision 6 190 00303 03 Figure 2 1 G1000 DA 40 Panel Installation...

Page 15: ...ing equipment Existing KAP 140 Flight Control System GIA 2 Existing VOR LOC Glideslope Antenna System Existing VHF COM 1 2 Antennas Existing GPS 1 2 Antennas 2 1 4 GEA 71 Engine Airframe Unit The Garm...

Page 16: ...Page 2 4 G1000 DA40 System Maintenance Manual Revision 6 190 00303 03 Figure 2 2 DA40 Panel Rear View...

Page 17: ...lly behind the instrument panel and is fastened to a sheetmetal rack Power is received from the Essential bus The GDC 74A connects to existing pitot static ports as shown in Figure 2 2 and Figure 2 6...

Page 18: ...e G1000 system The unit is mounted remotely in the baggage compartment to the starboard side of the remote avionics enclosure see Figure 2 4 and Figure 2 6 Power is received from the Essential bus The...

Page 19: ...er The GMU 44 provides horizontal and vertical magnetic field information to the GRS 77 AHRS This allows heading to be calculated and provides assistance during AHRS alignment The GMU 44 is mounted be...

Page 20: ...Page 2 8 G1000 DA40 System Maintenance Manual Revision 6 190 00303 03 2 2 Equipment Locations GDC 74A GDC 74A Figure 2 6 G1000 in DA 40 Equipment Locations...

Page 21: ...nclosure is installed as shown in Figure 2 7 The assembly is grounded to an existing grounding station using a field fabricated aluminum ground strap Two braided grounding straps are also attached to...

Page 22: ...Page 2 10 G1000 DA40 System Maintenance Manual Revision 6 190 00303 03 Figure 2 7 Remote Avionics Enclosure Cont...

Page 23: ...tor Only equipment deemed essential for safe flight is connected to this bus Main Aircraft Bus The Main bus receives power from the aircraft battery when tied to the Essential bus After the aircraft e...

Page 24: ...instrument panel near the circuit breakers Voltage suppressors help protect the avionics electrical equipment against the effects of lighting strike One voltage suppressor is connected to the load si...

Page 25: ...which is mounted to the front of the remote avionics enclosure see Figure 2 7 and Figure 2 10 The dimensions for the mounting block are provided in Figure 2 11 Power leads for the AHRS and both GIAs a...

Page 26: ...Page 2 14 G1000 DA40 System Maintenance Manual Revision 6 190 00303 03 Figure 2 12 Component Wiring Diagram...

Page 27: ...lemented to maintain adequate lightning protection for the aircraft See Section 4 Table 4 1 for exact maintenance requirements and associated intervals A 1000 hour visual inspection of all G1000 equip...

Page 28: ...de necessary ground reference to shielding and or transducers A single 16 gauge wire is connected locally to the airframe Additional spider wires 24 gauge are used to connect shield grounds The assemb...

Page 29: ...apter fittings are installed as shown in Figure 2 14 Figure 2 14 MAP Sensor 2 7 2 Oil Pressure A Kulite pressure sensor measures oil pressure The sensor oil pressure hose and fittings are installed as...

Page 30: ...sure A Kulite pressure sensor is used to measure fuel pressure The sensor fuel hose O rings and associated fittings are installed as shown in Figure 2 17 Figure 2 17 Fuel Pressure Sensor 2 7 5 Tachome...

Page 31: ...Shadin fuel flow sensor is used to measure fuel flow The fuel flow sensor fuel hose assembly is surrounded by a fire resistant sleeve as detailed in Figure 2 19 and Figure 2 20 The fuel flow fire sle...

Page 32: ...Page 2 20 G1000 DA40 System Maintenance Manual Revision 6 190 00303 03 Figure 2 20 Fuel Flow Assembled Figure 2 21 Fuel Flow Bracket...

Page 33: ...nder head temperatures A sensor is installed in each cylinder head An example is shown in Figure 2 22 Figure 2 22 CHT Probe 2 7 8 Exhaust Gas Temperature Thermocouples Four thermocouples are used to m...

Page 34: ...evision 6 190 00303 03 2 7 9 Alternator Current Sensor A current sensor is used to measure alternator current output The sensor is installed behind the circuit breaker panel as shown in Figure 2 24 Fi...

Page 35: ...on the PFD data is displayed on the MFD in reversionary mode only Primary data outputs from the GRS and GDC are sent directly to the PFD via ARINC 429 Secondary data paths connect the GRS and GDC to t...

Page 36: ...4 Analog data is received from the transducers and is converted to digital signal by the GEA 71 Digital information is then sent through the primary RS 485 serial path to the 1 GIA 63 From the GIA dat...

Page 37: ...GMA 1347 Audio Panel GPS information is sent to the GRS 77 AHRS and both displays for processing assistance The GTX 33 Mode S Transponder communicates with both GIAs Transponder data is sent from the...

Page 38: ...Page 2 26 G1000 DA40 System Maintenance Manual Revision 6 190 00303 03 This page intentionally left blank...

Page 39: ...ystick Navigation Systems Controls Flight Management System FMS Knob Multi Function Softkeys Numbered 1 12 left to right NAV Frequency Toggle Key NAV Frequency Tuner Knob Heading Bug Selector NAV Volu...

Page 40: ...o change the contents of a highlighted data field rotate the small FMS knob This action either brings up an options menu for the particular field or in some cases allows the operator to enter data for...

Page 41: ...HRS GDC 74A Air Data Computer No 1 GIA 63 Integrated Avionics Unit GEA 71 Engine Airframe Unit GTX 33 Mode S Transponder 2 Turn on the DA 40 avionics switch The following G1000 equipment is powered on...

Page 42: ...ual reversionary mode also allows the operator to force the system into reversionary mode in situations where the system does not automatically enter reversionary mode A large red button on the GMA 13...

Page 43: ...G1000 Configuration Manual Garmin part number 190 00303 04 3 4 1 Loader Card Interface The G1000 DA 40 SW Loader Card interface exists to provide a means of loading software and configuration files to...

Page 44: ...is file configues GMA 1347 audio and serial communication settings GTX1 This file configures GTX 33 transponder and serial communications settings GEA1 This file configures GEA 71 engine airframe para...

Page 45: ...ge The G1000 system is designed to store all configuration settings in various places so that the configuration is retained in the aircraft during maintenance of units Figure 3 7 and Figure 3 8 illust...

Page 46: ...SET Refers to a setting or group of settings that reside in PFD Internal Memory and or the Master Configuration Module ACTIVE Refers to an active setting or parameter currently being used by the LRU...

Page 47: ...ET columns do not match the ACTIVE columns The inequality between SET and ACTIVE indicates a configuration mismatch By pressing the SET ACTV softkey this copies the SET column to the LRU unit s config...

Page 48: ...e changed the technician receives on screen prompts and or confirmations such as those shown in Figure 3 11 Section 7 and Appendix B show other prompts encountered during the configuration process Fig...

Page 49: ...1 a user can navigate through different pages and page groups in the Configuration Mode For complete description and breakdown of each page refer to the G1000 Configuration manual Garmin part number 1...

Page 50: ...Page 3 12 G1000 DA40 System Maintenance Manual Revision 6 190 00303 03 This page intentionally left blank...

Page 51: ...twisting each fuse holder cap counter clockwise removing each fuse and replacing with a new fuse For detailed drawings see Section 2 5 There are no other maintenance airworthiness limitations associa...

Page 52: ...ix A The beginning of Section 6 provides instructions to check the software part number and version of each LRU before removing a unit Procedures in Section 7 require the same check after LRU replacem...

Page 53: ...cording to Title 14 CFR 91 411 and 91 413 as well as Part 43 Appendix F See Section 7 5 3 1000 Hours or 2 Years See Section 6 6 for removal replacement On Condition Pitot Static Leak Test See Section...

Page 54: ...ion Perform a visual inspection following the procedure given in Section 4 5 1000 Hours Electrical Bonding Test Perform a bonding resistance check of all G1000 equipment as described in Section 4 6 10...

Page 55: ...CDU fans for accumulation of dirt and other damage Remove excess dirt as required b Ensure that both fans are operational GDU 1040 MFD PFD a Remove the MFD and PFD as described in Section 6 b Inspect...

Page 56: ...efer to Figure 2 5 and Figure 2 6 for the following inspection GMU 44 a Remove the three Phillips screws holding the GMU access plate to the wing b Carefully lower the assembly and inspect the GMU 44...

Page 57: ...ead of the voltmeter to the same point Ensure that the voltmeter and power supply probes do not touch so as not to induce contact resistance 2 Touch negative lead of power supply to each of the test p...

Page 58: ...M Use proper precautions when handling fuel Ensure that the aircraft is grounded correctly and that there is adequate ventilation Each time the G1000 system is powered down it is imperative that the s...

Page 59: ...t 1 Sub Tanks and record the readings in the following tables The CAL VAL values should fall between 1 and 0 as shown in the following examples LEFT 1 SUB TANK Calibrated Value CAL VAL Range Actual Us...

Page 60: ...ewise if the left tank failed press the L FULL softkey 5 Drain the failed fuel tank s 6 Add 0 5 gallons unusable fuel to the failed tank s 7 Observe the CAL VAL indications for the failed tank s and r...

Page 61: ...ield model which is updated once every five years The update is expected to be available from Garmin in each of the following years 2005 2010 2015 and every five years thereafter so long as the GRS 77...

Page 62: ...Page 4 12 G1000 DA40 System Maintenance Manual Revision 6 190 00303 03 This page intentionally left blank...

Page 63: ...eral indications that the G1000 presents to the pilot or technician showing overall system condition A course of action should be determined based on the information presented on the display This sect...

Page 64: ...he Alert window displays alert text messages Up to 64 prioritized alerts can be displayed in the Alert window Pressing the ALERTS softkey displays the Alerts window Pressing the ALERTS softkey again r...

Page 65: ...the aircraft that may require pilot intervention A caution alert is accompanied by an annunciation in the Annunciation Window Caution alert text appearing in the Annunciation Window is yellow A cauti...

Page 66: ...unciates the failure with a large red X as shown in Figure 5 6 No 1 GIA 63 No 2 GIA 63 No 1 GIA 63 No 2 GIA 63 Attitude GRS 77 AHRS Heading GRS 77 or GMU 44 GDC 74A Air Data Computer GTP 59 OAT Probe...

Page 67: ...3rd AUX page Check corresponding GPS antenna and cable Check Ethernet interconnect from PFD to GIA1 or MFD to GIA2 Switch GIA1 and GIA2 to verify location of problem 9 If problem follows unit replace...

Page 68: ...RS 77 HDG FAIL GRS 77 GMU 44 Replace the GMU 44 with a known good unit 9 If problem persists replace defective GRS 77 GRS 77 GMU 44 If this message persists perform AHRS calibration procedures as desc...

Page 69: ...lace defective GEA 71 CHT Probes 4 Check CHT probe GEA wiring Replace CHT probe Refer to Figure 2 22 If all 4 CHT indicators are flagged check the following Replace backshell thermocouple and or confi...

Page 70: ...eshoot fuel pump and associated fuel systems per DA 40 Airplane Maintenance Manual instructions STARTER ENGD Starter is engaged Prepare to start aircraft engine DOOR OPEN Canopy and or rear door is no...

Page 71: ...m follows unit replace defective unit Keypad bezel will not track dimmer bus Check keyboard lighting settings on the Main Lighting page Switch MFD and PFD 9 If problem follows unit replace defective u...

Page 72: ...rain datacard is inserted properly Replace terrain datacard Replace the PFD DB MISMATCH Aviation database version mismatch Xtalk is off The system has found the Jeppesen aviation database cycles in th...

Page 73: ...PFD and MFD per instructions in Section 7 1 2 Check Ethernet interconnect Replace PFD with a known good unit to verify location of problem 9 If problem persists replace MFD 9 If problem does not persi...

Page 74: ...e system has detected a GMA 1347 configuration mismatch See Section 7 2 2 for GMA 1347 Configuration Loading procedure 5 6 1 GMA Redundant Paths Failure Message Cause Solutions BACKUP PATH Audio panel...

Page 75: ...on 6 3 9 If problem persists replace defective GMA per Section 6 3 5 7 2 NAV Symptom Recommended Action Weak NAV receiver Check NAV antenna coupler and cabling Switch GIA1 and GIA2 to identify whether...

Page 76: ...cle its operation Check push to talk switch s and wiring Check GIA1 GMA 1347 interconnect Switch GIA1 and GIA2 to identify whether the unit or connectors wiring is at fault Both GIAs must be configure...

Page 77: ...be configured when swapped see Section 7 3 2 9 If problem follows the unit replace GIA1 9 If problem persists continue to troubleshoot remote transfer switch wiring COM2 RMT XFR COM2 remote transfer...

Page 78: ...er switch and wiring Switch GIA1 and GIA2 to identify whether the unit or connectors wiring is at fault Both GIAs must be configured when swapped see Section 7 3 9 If problem follows unit replace GIA1...

Page 79: ...Solution MANIFEST GPS1 software mismatch Communication Halted The system has detected an incorrect software version loaded in GIA1 See Section 7 3 1 for GIA 63 Software Loading procedure MANIFEST GPS2...

Page 80: ...e range Check Avionics Fan for proper operation Replace GIA2 If problem persists contact Garmin 5 8 6 GIA Configuration Alerts Failure Message Cause Solution MANIFEST GIA1 software mismatch Communicat...

Page 81: ...ation Procedure 5 9 2 GEA Redundant Paths Failure Message Cause Solutions BACKUP PATH EIS using backup data path The GEA 71 is using a backup RS 485 data path Check RS 485 configuration settings at th...

Page 82: ...X 33 Configuration Procedure 5 10 2 GTX Redundant Paths Failure Message Cause Solutions BACKUP PATH Transponder using backup data path The GTX 33 is using a backup RS 232 data path Check RS 232 config...

Page 83: ...0 DA 40 AFMS AHRS TAS AHRS not receiving airspeed The GRS 77 is not receiving airspeed from the GDC 74A Check GRS GDC interconnect AHRS GPS AHRS not receiving GPS information The GRS 77 is not receivi...

Page 84: ...IA as described in Section 7 Check wiring Replace PFD1 with a known good unit to verify location of problem 9 If problem persists replace the GRS 77 9 If problem does not persist replace PFD1 GRS 77 A...

Page 85: ...s at GDU and GIA page groups 9 If configuration is not correct reconfigure GIA or GDU as described in Section 7 Check wiring Replace PFD1 with a known good unit to verify location of problem 9 If prob...

Page 86: ...Page 5 24 G1000 DA40 System Maintenance Manual Revision 6 190 00303 03 This page intentionally left blank...

Page 87: ...A To check an LRU software part number and or version 1 Start the G1000 system in configuration mode as described in Section 3 3 2 The System Status page shows a list of LRUs in the LRU window Activat...

Page 88: ...display in the panel cutout Do not use excessive force while inserting the display 4 Once seated rotate all four turn fasteners clockwise to lock the display to the panel 5 Configure and test the MFD...

Page 89: ...eg track 3 Press down on the GIA 63 hand to lock the unit into the rack 4 Lock the handle to the GIA 63 body using the Philips screw 5 Configure and test the GIA 63 s according to Section 7 3 6 4 GEA...

Page 90: ...r Removal 1 Gain access to the space behind the instrument panel by removing the panel cover 2 Disconnect the pitot static plumbing from the rear of the unit Disconnect the single connector 3 Loosen e...

Page 91: ...the Phillips thumbscrews 3 Visually inspect the connectors to ensure there are no bent or damaged pins Repair any damage Connect the connector to the GRS 77 4 Calibrate and test the GRS 77 according t...

Page 92: ...dule 1 4 Assembly of the connector is the reverse of disassembly If the GRS 77 AHRS Configuration Module is replaced All three GRS 77 GMU 44 calibration procedures must be performed Proceed to Section...

Page 93: ...he backshell 5 Unscrew thermocouple from boss on backshell Extract the thermocouple pins from the connector Replacement 1 Crimp pins item 2 onto each of the thermocouple wires item 1 Ensure that pre s...

Page 94: ...Page 6 8 G1000 DA40 System Maintenance Manual Revision 6 190 00303 03 This page intentionally left blank...

Page 95: ...and configuration files must be loaded to the unit 7 1 1 PFD MFD Software Loading 1 Apply power to the G1000 system by turning the master switch on The ground power unit may now be powered up if desi...

Page 96: ...d When the upload is finished press the ENT key to acknowledge the following confirmation 8 Highlight SYSTEM in the FILE LIST field and repeat steps 5 through 7 9 Highlight MANIFEST in the FILE LIST f...

Page 97: ...on database update SD card into the top slot of the PFD 3 Apply power to the PFD The following prompt is displayed in the upper left corner of the PFD 4 Press the ENT key to confirm the database updat...

Page 98: ...utes of power up For MFD Check that the engine instrument fields are valid Figure 7 1 G1000 Normal Mode Check 3 Push the red display reversion button on the GMA 1347 Verify both displays enter reversi...

Page 99: ...into the top slot of the PFD 2 Start the G1000 system in Configuration mode 3 At the PFD go to the Software Upload page using the FMS knob 4 Highlight the GMA software file Ensure that both paths to...

Page 100: ...n the FILE LIST field 5 Press the LOAD softkey 6 Select YES and press the ENT key to acknowledge the following prompt 7 Monitor the status of the upload When the upload is finished press the ENT key t...

Page 101: ...2 Press the SPKR key and verify that the selected audio is heard over the speaker Failsafe Operation Check 1 Turn the GMA 1347 off by pulling the AUDIO circuit breaker This directs all COM 1 phone au...

Page 102: ...63 s Installed If a new GIA 63 new serial number is installed the correct software and configuration files must be loaded to the unit Continue to the GIA 63 Software Loading procedure 7 3 1 GIA 63 Sof...

Page 103: ...pear in the LRU field as shown 11 Press the LOAD softkey 12 Select YES and press the ENT key to acknowledge the following prompt 13 The software for GPS1 begins to load GPS2 software loads immediately...

Page 104: ...the Configuration Upload page using the FMS knob 4 Activate the cursor and highlight GIA1 in the FILE LIST field 5 Press the LOAD softkey 6 Select YES and press ENT to acknowledge the following prompt...

Page 105: ...o the GIA 63 Test procedure 7 3 3 GIA 63 Test GPS Signal Acquisition Figure 7 4 GPS Signal Status The GIA 63 units should normally acquire a 3D GPS navigation solution within 5 to 10 minutes of startu...

Page 106: ...eat steps 5 and 6 and re transmit while monitoring GPS 2 signal levels on the MFD 8 Repeat steps 4 through 7 for each of the following frequencies 121 175 MHz 121 200 MHz 131 250 MHz 131 275 MHz 131 3...

Page 107: ...HSI source by using the CDI softkey The PFD HSI does not show a course deviation bar unless a valid VHF NAV frequency is tuned Simulate a VOR signal on radial 000 with a course width of 20 Verify ful...

Page 108: ...into top slot of PFD 2 Start the G1000 system in Configuration mode 3 Go to the Software Upload page using the FMS knob 4 Highlight the GEA software file Ensure that both paths to the GEA 71 through G...

Page 109: ...he FILE LIST field 5 Press the LOAD softkey 6 Select YES and press the ENT key to acknowledge the following prompt 7 Monitor the status of the upload When the upload is finished press the ENT key to a...

Page 110: ...riate EIS group System Lean or Default observe the following sensor indications see Figure 7 5 Sensor Reading with Aircraft Engine OFF Oil Pressure Approximately 0 and Low Oil Pressure Annunciation Sy...

Page 111: ...ard see Appendix A into top slot of PFD 2 Start the G1000 system in Configuration mode 3 Go to the Software Upload page using the FMS knob 4 Highlight the GTX software file Ensure that both paths to t...

Page 112: ...nd highlight GTX 1 in the FILE LIST field 5 Press the LOAD softkey 6 Select YES and press the ENT key to acknowledge the following prompt 7 Monitor the status of the upload When the upload is finished...

Page 113: ...d ACTIVE columns 14 Activate the cursor and highlight the ADDRESS field Use the small large FMS knobs to enter the aircraft registration number 15 Once the correct registration number is entered press...

Page 114: ...al check on the transponder The integrated transponder altitude reporting system must be verified in accordance with Title 14 of the Code of Federal Regulations CFR 91 411 and 91 413 This test require...

Page 115: ...ng 1 Insert the correct G1000 DA 40 SW Loader Card see Appendix A into top slot of PFD 2 Start the G1000 system in Configuration mode 3 Go to the Software Upload page using the FMS knob 4 Highlight th...

Page 116: ...7 Monitor the status of the upload When the upload is finished press the ENT key to acknowledge the following confirmation 8 View the SUMMARY field and ensure that all items are complete then de acti...

Page 117: ...r INITIALIZING SYSTEM appears in the upper left corner of the PFD CAUTION Configuration mode contains certain pages and settings that are critical to aircraft operation and safety These pages are prot...

Page 118: ...lerance knots 50 5 0 80 3 5 100 2 0 120 2 0 150 2 0 Static Port Vertical Speed Rate of Climb Test 1 Command ramp tester to change the altitude at the rates shown in the table below 2 Wait for ramp tes...

Page 119: ...equired Continue to the GRS GMU Calibration section New GMU 44 is Installed If the GMU 44 was replaced with a new unit new serial number then software must be loaded Continue to the GMU 44 Software Lo...

Page 120: ...prompt 9 Check the SUMMARY field to ensure the load is COMPLETE 10 Go to the System Status page 11 Activate the cursor and highlight GRS1 GIA1 then GRS1 GIA2 and finally GRS1 FPGA in the LRU window 1...

Page 121: ...AD softkey 6 Select YES and press the ENT key to acknowledge the following prompt 7 The software for the GMU 44 Magnetometer begins to load Monitor the upload status as it progresses 8 After the files...

Page 122: ...oosened None Required Continue to GRS GMU Test section GRS 77 AHRS was removed and or replaced The mounting tray WAS removed and or mounting tray bolts WERE loosened X X X GRS 77 AHRS Configuration Mo...

Page 123: ...each step is completed or confirmed e When the CALIBRATE field is blinking press the ENT button to begin the procedure f After several seconds a new checklist appears in the lower half of the PFD Pres...

Page 124: ...OMPASS ROSE OR EQUIVALENT 1 Start both displays in normal mode 2 Start the aircraft engine following the procedures in the G1000 DA40 Airplane Flight Manual Supplement 3 After aircraft engine startup...

Page 125: ...erences to complete the approximate 30 turn Instead of using the PFD instruction to turn as a real time indication of when to turn simply judge the 30 5 turn increments of the aircraft by using the co...

Page 126: ...t required prior to this procedure 1 Start both displays in normal mode 2 Start the aircraft engine following the procedures in the G1000 DA40 Airplane Flight Manual Supplement 3 After aircraft engine...

Page 127: ...this procedure If failures are indicated the engine run up test may be repeated once or at most twice If the test does not pass after three attempts then the installation should not be considered reli...

Page 128: ...oad fails Ensure that criteria listed in 7 8 1 are fulfilled for the applicable situation Ensure that LRU is reporting data on System Status page LRU is ONLINE Check data path wiring as needed Retry c...

Page 129: ...in top slot of PFD PFD and MFD must be powered on PFD and MFD must have correct software Load Software Configuration files to GIA 63s G1000 DA 40 SW Loader Card must be inserted in top slot of PFD G10...

Page 130: ......

Page 131: ...fy loss of signal on MFD AUX page 3 5 Check for desired results 6 Remove shroud from the GIA2 GPS antenna GPS Failure For each of the specified GPS failure conditions the following shall remain valid...

Page 132: ...1 COM2 NAV2 fields flag invalid 9 GPS CDI flags INTEG on PFD 9 NAV1 NAV2 CDI loses deviation bar 9 XPDR field flags invalid on PFD 9 Engine Instrument field flags invalid on MFD 9 All AHRS ADC fields...

Page 133: ...r from GIA2 3 Check for desired results 4 Restore power to the PFD and GIA2 The following shall occur on the MFD when power is removed from the PFD and GIA2 9 MFD switches to reversion mode 9 Attitude...

Page 134: ...f the COM transmitter and receiver at the extents of the ground facility s service volume FAA AC 23 8A 8 5 2 VOR ILS Tests Select a VOR channel within a 40 nautical mile range Listen to the VOR audio...

Page 135: ...GTX 33 Mode S Transponder 011 00779 00 006 B0172 XX 3 06 GEA 71 Engine Airframe Unit 011 00831 00 006 B0193 01 2 03 GDC 74A Air Data Computer 011 00882 00 006 B0261 01 006 C0055 00 2 03 1 05 GMU 44 Ma...

Page 136: ...e 316 773 6194 Fax 316 773 1115 www kulite com 1 Oil Pressure Hose AE3660001E0112 1 Fuel Pressure Hose AE3660001E0066 1 Manifold Pressure Hose AE3660121B0195 Eaton Aerospace Aeroquip Engineered System...

Page 137: ...G1000 DA40 System Maintenance Manual Page A 3 190 00303 03 Revision 6 A 4 Parts List...

Page 138: ...G1000 DA40 System Maintenance Manual Revision 6 190 00303 03 Page A 4...

Page 139: ...G1000 DA40 System Maintenance Manual Page A 5 190 00303 03 Revision 6 A 5 Weight Balance The GDL 69 69A are shown as provisions only NOTE...

Page 140: ...G1000 DA40 System Maintenance Manual Revision 6 190 00303 03 Page A 6 This page intentionally left blank...

Page 141: ...overview of the entire software configuration sequence for the G1000 system It should be noted that in some cases not all LRU software versions are updated at the same time LRUs with unchanged S W ver...

Page 142: ...MFD and PFD circuit breakers 2 Start the PFD in configuration mode by holding down the ENT key and closing the PFD circuit breaker Hold the ENT key until the words are displayed in the upper left corn...

Page 143: ...e ENT key 5 Press the ENT key to acknowledge the following prompt 6 The following screen is displayed 7 New software is loaded to the MFD When complete the MFD starts in configuration mode 8 Remove th...

Page 144: ...following prompt 5 Monitor the status of the upload When the upload is finished press the ENT key to acknowledge the following confirmation 6 Highlight SYSTEM in the FILE LIST field and repeat steps...

Page 145: ...in the LRU field as shown 3 Press the LOAD softkey 4 Select YES and press ENT to acknowledge the following prompt 5 The software for GIA1 begins to load GIA2 software loads immediately after GIA1 sof...

Page 146: ...LOAD softkey 10 Select YES and press the ENT key to acknowledge the following prompt 11 The software for GPS1 begins to load GPS2 software loads immediately after GPS1 software finishes loading Monito...

Page 147: ...n the FILE LIST field 3 Press the LOAD softkey 4 Select YES and press ENT to acknowledge the following prompt 5 Monitor the status of the upload When the upload is finished press the ENT key to acknow...

Page 148: ...ough GIA1 and GIA 2 appear in the LRU field as shown 2 Press the LRU softkey Select the GMA1 GIA1 data path to load software Press the LOAD softkey 3 Select YES and press the ENT key to acknowledge th...

Page 149: ...ath appears in the LRU field as shown 2 Press the LOAD softkey 3 Select YES and press the ENT key to acknowledge the following prompt 4 The software for the GDC 74A Air Data Computer begins to load Mo...

Page 150: ...h appears in the LRU field as shown 2 Press the LOAD softkey 3 Select YES and press the ENT key to acknowledge the following prompt 4 The software for the GRS 77 AHRS begins to load Monitor the upload...

Page 151: ...in the LRU field as shown 2 Press the LOAD softkey 3 Select YES and press the ENT key to acknowledge the following prompt 4 The software for the GMU 44 Magnetometer begins to load Monitor the upload s...

Page 152: ...field as shown 2 Press the LRU softkey Select the GTX1 GIA1 data path to load software Press the LOAD softkey 3 Select YES and press the ENT key to acknowledge the following prompt 4 The software for...

Page 153: ...ress the LRU softkey Select the GEA GIA1 data path to load software Press the LOAD softkey 3 Select YES and press the ENT key to acknowledge the following prompt 4 The software for the GEA 71 Engine A...

Page 154: ...OAD COMPLETE prompt b GTX1 i Press the LOAD softkey ii Press ENT at the START CONFIGURATION UPLOAD prompt iii Press ENT at the CONFIGURATION UPLOAD COMPLETE prompt c GEA1 i Press the LOAD softkey ii P...

Page 155: ...he information in Appendix A MFD1 PFD1 GIA1 GIA2 GPS1 GPS2 GRS1 GIA1 GRS1 GIA2 GRS1 FPGA GMU1 GMU1 FPGA GDC1 GIA1 GDC1 FPGA GTX1 GIA1 GTX1 GIA2 GEA1 GIA1 GEA1 GIA2 GMA1 GIA1 GMA1 GIA2 3 De activate th...

Page 156: ...ove the aviation database update SD Card from the PFD 6 Power the G1000 system down 7 Repeat steps 1 through 4 for the MFD The MFD and PFD aviation databases are now updated 8 Confirm that the correct...

Reviews: