22
EN
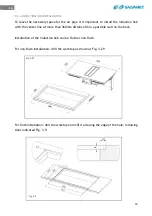
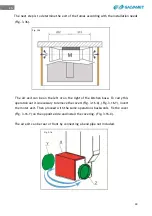
At this point reassemble the angular cover in the rearmost position so as to cover
the gap left by the new connection and screw the seven screws indicated in Fig.
3.27.
Once the new joint is mounted the dimensions after complete installation will be the
ones shown at Fig. 3.28
Fig. 3.28
Fig. 3.27
Summary of Contents for KompaKOne
Page 1: ...IT KompaKOne ISTRUZIONI PER L USO E LA MANUTENZIONE 230 240Vac 50Hz 395 479 6 ...
Page 2: ...2 IT ...
Page 75: ...75 IT ...
Page 77: ...EN KompaKOne INSTALLATION OPERATING AND MAINTENANCE GUIDE 230 240Vac 50Hz 395 480 6 ...
Page 78: ...2 EN ...
Page 153: ...DE KompaKOne BEDIENUNGS UND WARTUNGSANLEITUNG 230 240Vac 50Hz 395 481 6 ...
Page 154: ...2 DE ...
Page 227: ...75 DE ...
Page 229: ...ES KompaKOne INSTRUCCIONES DE USO Y MANTENIMIENTO 230 240Vac 50Hz 395 482 6 ...
Page 230: ...2 ES ...
Page 256: ...28 ES Fig 3 19 ...
Page 305: ...FR KompaKOne MANUEL D EMPLOI ET D ENTRETIEN 230 240Vac 50Hz 395 497 6 ...
Page 306: ...2 FR ...
Page 379: ...75 FR ...


