


38
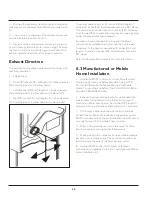
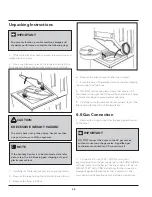
6.2.6 Exhaust System
Requirements
Use only 4 inches (102 mm) diameter (minimum) rigid
or flexible metal duct and approved vent hood, which
has a swing-out damper(s) that opens when the dryer is
in operation mode. When the dryer stops, the dampers
automatically close to prevent drafts and the entrance of
insects and rodents. To avoid restricting the outlet, maintain
a minimum of 12 inches (30.5 cm) clearance between the
vent hood and the ground or any other obstruction.
The following are the specific requirements for proper and
safe operation of your dryer.
If your product is made up of plastic duct or metal foil duct,
replace it with a rigid or semi-rigid metal duct. Also, ensure
the duct is free of any lint, prior to installing the dryer duct.
The dryer must be connected to an exhaust outdoors.
Regularly inspect the outdoor exhaust opening and remove
any accumulation of lint around the outdoor exhaust
opening and in the surrounding area.
WARNING
FIRE HAZARD
Failure to follow these instructions can create
excessive drying times and fire hazards.
WARNING
FIRE HAZARD
Do not install a clothes dryer with flexible plastic
or metal foil venting materials. Flexible venting
materials are known to collapse, get easily crushed
and trap lint. These conditions will obstruct air flow in
the clothes dryer and increase the risk of fire.
WARNING
FIRE HAZARD
A clothes dryer must be exhausted outdoors. Do
not exhaust dryer into a chimney, a wall, a ceiling,
an attic, a crawl space or any concealed space of
a building. A clothes dryer produces combustible
lint. If the dryer is not exhausted outdoors, some
fine lint will be expelled into the laundry area. An
accumulation of lint in any area of the home can
create a health and fire hazard.
WARNING
FIRE HAZARD
• Do not allow combustible materials (for example:
clothing, draperies / curtains, paper) to come
in contact with the exhaust system. The dryer
MUST NOT be exhausted into a chimney, a wall,
a ceiling, or any concealed space of a building
which can accumulate lint, resulting in a fire
hazard.
• Do not screen the exhaust ends of the vent
system, or use any screws, rivets or other
fasteners that extend into the duct to assemble
the exhaust system. Lint can get caught in the
screen, on the screws or rivets, clogging the duct
work and creating a fire hazard as well as increase
the time of drying. Use an approved vent hood
to terminate the duct outdoors and seal all joints
with a metal foil tape. Install all male duct pipe
fittings downstream with the flow of the air.
Summary of Contents for FFLE3911QW
Page 1: ...Publication 5995666392 October 2015 Technical Service Manual Laundry Center ...
Page 2: ...I ...
Page 9: ...8 3 Product Features ...
Page 14: ...13 5 1 FFLE3911QW 5 1 1 Upper Cabinet Drum Heater 5 Exploded View and List of Parts ...
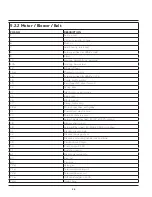
Page 17: ...16 5 1 2 Motor Blower Belt ...
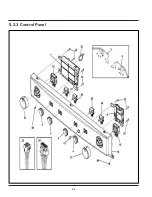
Page 19: ...18 5 1 3 Control Panel ...
Page 21: ...20 5 2 FFLG4033QW 5 2 1 Upper Cabinet Drum Heater ...
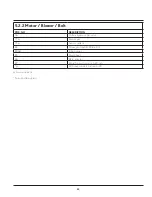
Page 24: ...23 5 2 2 Motor Blower Belt ...
Page 27: ...26 5 2 3 Control Panel ...
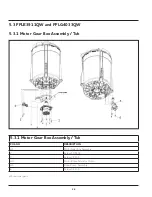
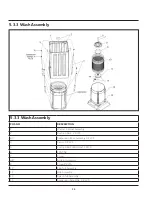
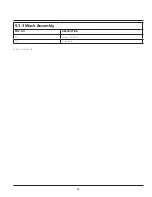
Page 32: ...31 5 3 3 Wash Assembly POS NO DESCRIPTION 14 Screw 2 PLCS 15 Lock Hub Functional parts ...
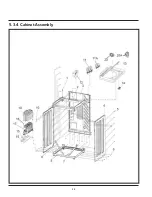
Page 33: ...32 5 3 4 Cabinet Assembly ...
Page 69: ...68 User Interface of Laundry Center FFLG4033QW ...
Page 76: ...75 8 6 Wiring Diagram FFLE3911QW Electric Dryer Model ...
Page 77: ...76 8 7 Wiring Diagram FFLG4033QW Gas Dryer Model ...
Page 78: ...77 8 8 Wiring Diagram FFLE3911QW and FFLG4033QW Washer Model ...
Page 91: ...90 Wiring Diagram FFLE3911QW Wiring Diagram FFLG4033QW ...
Page 125: ...124 ...
Page 161: ...160 ...
Page 165: ...164 ...
Page 168: ...167 ...
Page 170: ...169 ...
Page 179: ...178 ...
Page 181: ...180 ...
Page 183: ...182 ...