


46
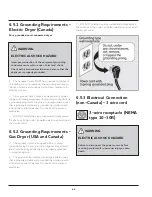
5. Disconnect the internal (WHITE) dryer harness ground
wire from the (GREEN) ground screw next to the terminal
block.
6. Attach the ground (GREEN) power cord wire to the
cabinet with the ground (GREEN) screw. Tighten the screw
securely.
7. Move the internal dryer harness ground (WHITE) wire
to the terminal block and attach it with the neutral (WHITE)
power cord wire conductor to the center SILVER colored
terminal on the terminal block. Tighten the screw securely.
8. Attach the RED and BLACK power cord conductors to
the outer BRASS colored terminals on the terminal block.
Tighten both the screws securely.
9. Follow the manufacturer’s guidelines for firmly securing
the strain relief and power cord.
10. Reinstall the terminal block cover.
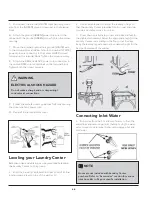
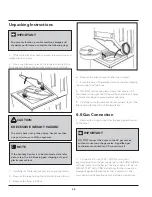
Leveling your Laundry Center
Excessive noise and vibration can be prevented by leveling
the Laundry Center on the ground.
1. With the Laundry Center within 4 feet (1 m) of its final
location, place a level on top of the washer lid.
2. Use adjustable pliers to adjust the leveling of legs so
that the Laundry Center is levelled front-to-rear and side-
to-side, and stable corner-to-corner.
3. Press down on alternate corners and sides and feel for
the slightest movement. Adjust the appropriate leg(s) so the
Laundry Center rests solidly on the floor on all four legs.
Keep the leveling leg extension at a minimum height for the
best performance of the washer.
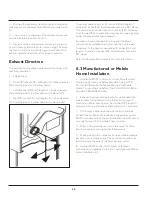
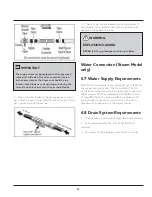
Connecting Inlet Water
1. Run water from the hot and cold faucets to flush the
water lines and remove particles thatmight clog the water
valve screens to determine the faucets supplying hot and
cold water.
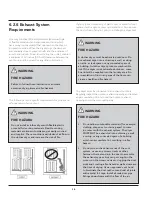
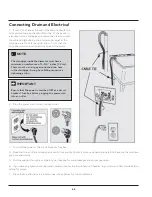
WARNING
ELECTRICAL SHOCK HAZARD
Do not make a sharp bend or crimp wiring /
conductor at connections.
NOTE
Hoses are not included with Laundry Center
purchase. Refer to “Accessories” section for various
inlet hose kits to fit your specific installation.
Summary of Contents for FFLE3911QW
Page 1: ...Publication 5995666392 October 2015 Technical Service Manual Laundry Center ...
Page 2: ...I ...
Page 9: ...8 3 Product Features ...
Page 14: ...13 5 1 FFLE3911QW 5 1 1 Upper Cabinet Drum Heater 5 Exploded View and List of Parts ...
Page 17: ...16 5 1 2 Motor Blower Belt ...
Page 19: ...18 5 1 3 Control Panel ...
Page 21: ...20 5 2 FFLG4033QW 5 2 1 Upper Cabinet Drum Heater ...
Page 24: ...23 5 2 2 Motor Blower Belt ...
Page 27: ...26 5 2 3 Control Panel ...
Page 32: ...31 5 3 3 Wash Assembly POS NO DESCRIPTION 14 Screw 2 PLCS 15 Lock Hub Functional parts ...
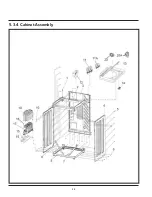
Page 33: ...32 5 3 4 Cabinet Assembly ...
Page 69: ...68 User Interface of Laundry Center FFLG4033QW ...
Page 76: ...75 8 6 Wiring Diagram FFLE3911QW Electric Dryer Model ...
Page 77: ...76 8 7 Wiring Diagram FFLG4033QW Gas Dryer Model ...
Page 78: ...77 8 8 Wiring Diagram FFLE3911QW and FFLG4033QW Washer Model ...
Page 91: ...90 Wiring Diagram FFLE3911QW Wiring Diagram FFLG4033QW ...
Page 125: ...124 ...
Page 161: ...160 ...
Page 165: ...164 ...
Page 168: ...167 ...
Page 170: ...169 ...
Page 179: ...178 ...
Page 181: ...180 ...
Page 183: ...182 ...


