


Foundry Switch and Router Installation and Configuration Guide
15 - 20
December 2000
USING THE WEB MANAGEMENT INTERFACE
To assign an IP address and mask to a router interface:
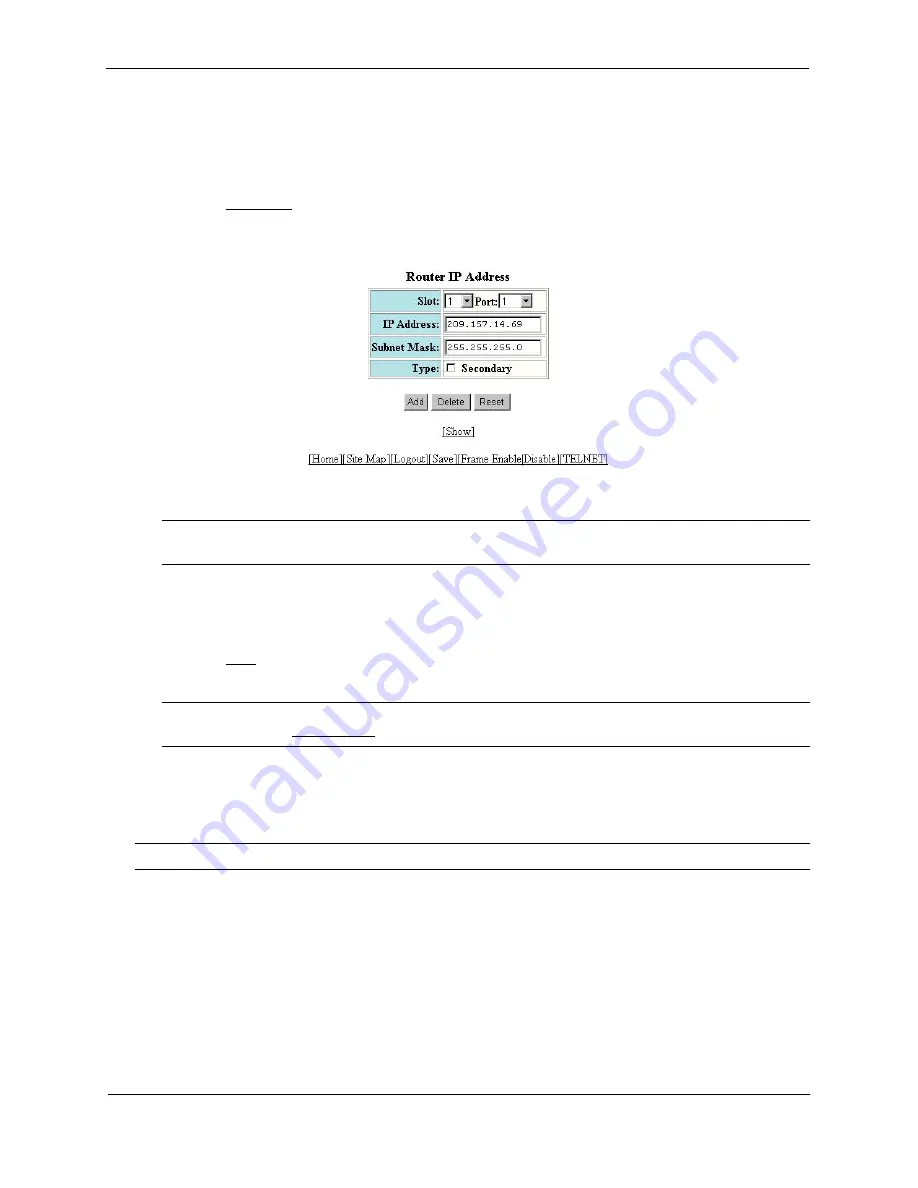
1.
Log on to the device using a valid user name and password for read-write access. The System configuration
dialog is displayed.
2.
Select the IP Address link. The IP addresses already configured on the device are listed in a table. Select
Add IP Address to display the following panel.
3.
Select the port (and slot if applicable) on which you want to configure the address.
NOTE:
This example shows the panel for configuring an address on a Layer 3 Switch. On a Layer 2 Switch,
the IP address is global and applies to all the Layer 2 Switch’s ports. Thus, you do not need to select a port.
4.
Enter the IP address and network mask.
5.
If the port already has an IP address configured, select the Secondary checkbox.
6.
Click the Add button to save the change to the device’s running-config file.
7.
Select the Save link at the bottom of the dialog. Select Yes when prompted to save the configuration change
to the startup-config file on the device’s flash memory.
NOTE:
You also can access the dialog for saving configuration changes by clicking on Command in the tree
view, then clicking on Save to Flash.
Assigning an IP Address to a POS Port
Assigning an IP address to a POS port is similar to assigning an IP address to an Ethernet port.
NOTE:
To configure other Layer 3 parameters for POS ports, see “Configuring POS Interfaces” on page 6-5.
USING THE CLI
To add an IP address to POS interface 2/1, enter the following commands:
BigIron(config)# interface pos 2/1
BigIron(config-posif-2/1)# ip address 209.157.22.26/24
BigIron(config-posif-2/1)# write memory
Syntax:
[no] ip address <ip-addr> <ip-mask> [secondary]
or
Syntax:
[no] ip address <ip-addr>/<mask-bits> [secondary]
Summary of Contents for Switch and Router
Page 2: ...December 2000 Copyright 2000 by Foundry Networks Inc ...
Page 26: ...Foundry Switch and Router Installation and Configuration Guide xxvi December 2000 ...
Page 64: ...Foundry Switch and Router Installation and Configuration Guide 2 34 December 2000 ...
Page 162: ...Foundry Switch and Router Installation and Configuration Guide 5 38 December 2000 ...
Page 196: ...Foundry Switch and Router Installation and Configuration Guide 6 34 December 2000 ...
Page 208: ...Foundry Switch and Router Installation and Configuration Guide 7 12 December 2000 ...
Page 236: ...Foundry Switch and Router Installation and Configuration Guide 8 28 December 2000 ...
Page 258: ...Foundry Switch and Router Installation and Configuration Guide 9 22 December 2000 ...
Page 420: ...Foundry Switch and Router Installation and Configuration Guide 13 32 December 2000 ...
Page 442: ...Foundry Switch and Router Installation and Configuration Guide 14 22 December 2000 ...
Page 554: ...Foundry Switch and Router Installation and Configuration Guide 15 112 December 2000 ...
Page 574: ...Foundry Switch and Router Installation and Configuration Guide 16 20 December 2000 ...
Page 626: ...Foundry Switch and Router Installation and Configuration Guide 17 52 December 2000 ...
Page 682: ...Foundry Switch and Router Installation and Configuration Guide 18 56 December 2000 ...
Page 826: ...Foundry Switch and Router Installation and Configuration Guide 20 20 December 2000 ...
Page 994: ...Foundry Switch and Router Installation and Configuration Guide 26 10 December 2000 ...
Page 1004: ...Foundry Switch and Router Installation and Configuration Guide B 6 December 2000 ...
Page 1044: ...Foundry Switch and Router Installation and Configuration Guide C 40 December 2000 ...
Page 1048: ...Foundry Switch and Router Installation and Configuration Guide D 4 December 2000 ...
Page 1070: ...Foundry Switch and Router Installation and Configuration Guide Index 18 December 2000 ...


