


Click “OK”.
Setting has been completed.
Open the dial-up shortcut icon automatically created
on the desktop; the connection starts. After
confirming that the connection starts, you can activate the Internet
browser or mail browser for transmission. (See page 475)
●
To make the optimization valid, restart the personal computer.
9
472
Data
Transmission
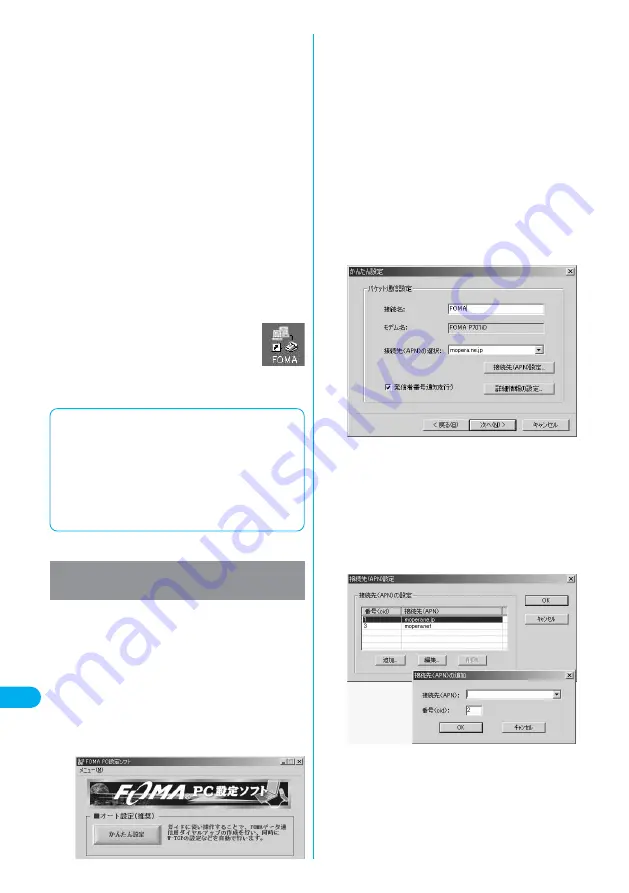
Enter an access point name.
You can specify any name for the currently created connection.
Enter a plain name in the “
接続名
(Access point name)” field.
●
You cannot enter the following half-pitch symbols:
¥
, /, :,
*
, ?, !, <, >, |, and ”.
●
In the “
接続先
(APN)
の選択
[Select an access point name
(APN)]” field, “mopera.ne.jp” is displayed as the default. Go to the
“
接続先
(APN)
設定
[Set an access point name (APN)]” screen.
5
Click “
接続先
(APN)
設定
[Set an access point
name (APN)]”.
“mopera.ne.jp” is registered in “cid1” and “mopera.net” is registered
in “cid3” at purchase. Click “
追加
(Add)”, then enter the correct
access point name (APN) for FOMA packet transmission on the “
接
続先
(APN)
の追加
[Add an access point name (APN)]” screen.
Click “OK”.
●
For a provider access point name (APN), contact the relevant provider.
●
The “
パケット通信設定
(Packet transmission setting)” screen
returns. Select an access point name (APN) you specified newly.
If it is good, click “OK”.
6
Click “
詳細情報の設定
(Set detailed
information)”.
The screen for specifying “IP
アドレス
(IP address)” and “
ネームサーバ
ー
(name server)” appears. When entering dial-up information for the
provider you have subscribed or Intranet LAN system, specify
addresses according to the entry instruction messages, then click “OK”.
7
Click “
次へ
(Next)”.
8
Select “
パケット通信
(Packet transmission)”,
then click “
次へ
(Next)”.
Confirm that “
パケット通信
(Packet transmission)” is checked, then
click “
次へ
(Next)”.
2
Select “
その他
(Others)”, then click “
次へ
(Next)”.
Confirm that “
その他
(Others)” is checked, then click “
次へ
(Next)”.
3
Click “OK”.
●
The system obtains the access point name (APN) setting from the
FOMA phone connected to the personal computer. Wait for a while.
4
Click “
かんたん設定
(Easy setting)”.
1
■
Using the packet transmission
The high-speed packet transmission service is charged according to
the amount of data you sent and received; so, you can carry out data
transmission without taking care of the transmission time. This
service enables the maximum download speed: 384 kbps and
maximum upload speed: 64 kbps (except some models). These baud
rates vary depending on the transmission environment and
congestion state. Note that a transmission fee becomes expensive if
you use a large amount of data, for example, you browse sites having
many images or download data.
The packet transmission is charged according to the
amount of data you sent and received, regardless of the
transmission time and distance. (Maximum download
speed: 384 kbps, Maximum upload speed: 64 kbps)
The operation below explains how to use a provider
other than mopera U or mopera. To use a provider other
than mopera, you may need to separately apply a
contract with the provider.
Using a provider other than mopera U or
mopera as an access point
Click “
次へ
(Next)”.
If the access point is mopera U or mopera, you can leave the
“
ユーザ名
(user name)” and “
パスワード
(password)” fields blank.
●
For Windows
®
XP and Windows
®
2000 Professional, select “
すべ
てのユーザー
(All users)” or “
自分のみ
(Only myself)”.
If you do not know which you should select, select “
すべてのユー
ザー
(All users)”. (Default)
With Windows
®
Me and Windows
®
98, the menu for selecting
available users does not appear.
6
Select “
最適化を行う
(Optimize)”, then click
“
次へ
(Next)”.
Confirm that “
最適化を行う
(Optimize)” is checked, then click “
次へ
(Next)”.
●
If optimized already, the confirmation display to optimize does
not appear.
7
Confirm the set information, then click “
完了
(Finish)”.
The set contents are listed on the screen. Confirm that there is no
problem on the set contents, then click “
完了
(Finish)”.
●
To change the set contents, click “
戻る
(Back)”.
●
If “
デスクトップにダイアルアップのショートカットを作成する
(Create a dial-up shortcut on the desktop)” is checked, a dial-up
shortcut will be created on the desktop.
8
Summary of Contents for FOMA P701iD
Page 98: ...96...
Page 339: ...i channel What is i channel 338 Using i channel 340 Using Detailed Functions 341 337...
Page 344: ...342...
Page 460: ...458...
Page 502: ...500...


