


463
Data
Transmission
Set up the access point
When using the FOMA
PC setup software
(See page 468)
When setting up
manually
(See pages 479 and 491)
Packet transmission
64K data transmission
■
Attached “FOMA P701iD CD-ROM”
When connecting the FOMA phone to your personal computer via the
FOMA USB Cable (option) for packet transmission, install the
“P701iD transmission setup files (driver)” from the attached “FOMA
P701iD CD-ROM” into the personal computer. You are advised to
install “FOMA PC
設定ソフト
(FOMA PC setup software)” for
establishing APN or connecting to the Dial-up service.
See pages 464 to 467 for how to install the “P701iD transmission
setup files (driver)”.
See page 468 for how to install the “FOMA PC
設定ソフト
(FOMA PC
setup software)”.
The following outline shows a preparation flow for
packet transmission, 64K data transmission, and data
transfer (OBEX).
Data transfer (OBEX)
USB connection
Infrared rays
Connect
See page 475 or 489
Carry out data transfer (OBEX)
For USB
connection
(See page 539)
※
For infrared
rays
(See page 404)
Preparation Flow for Data Transmission
Install the P701iD transmission setup files
Windows
®
XP··············································p.464
Windows
®
2000 Professional ····················p.464
Windows
®
Me··············································p.465
Windows
®
98 ··············································p.466
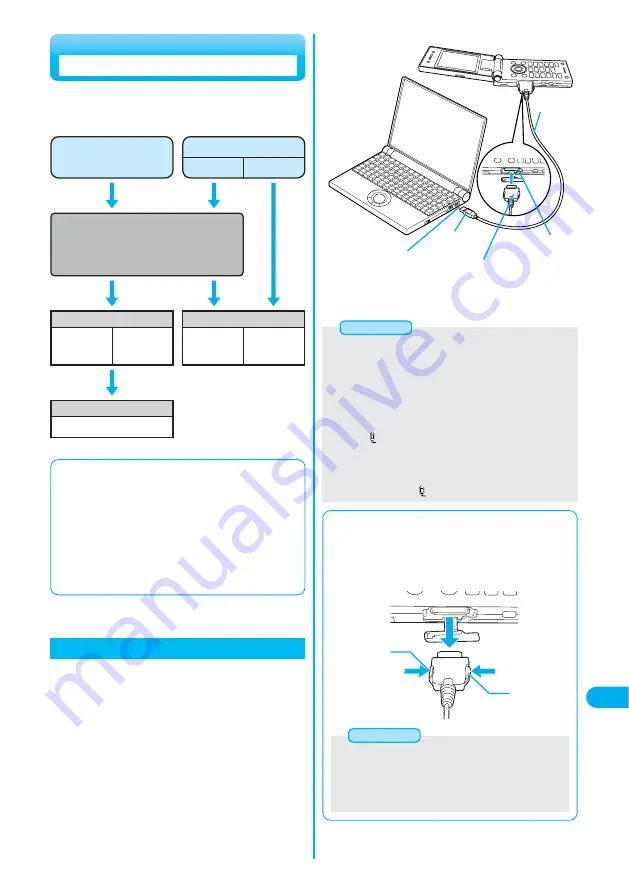
Connecting the FOMA Phone to a PC
Connect the USB connector of the FOMA
USB Cable to the USB terminal of the
personal computer.
2
The following operation explains how to connect the
FOMA USB Cable (option).
●
Set “USB mode setting” to “Communication mode” before
you connect the FOMA USB Cable. (See page 403)
Check the direction of the connector terminal
of the FOMA phone, then straight insert the
external connector of the FOMA USB Cable
until it clicks.
1
●
Do not forcibly insert the FOMA USB Cable. Insert each connector in
the correct direction at the correct angle; otherwise, you will fail
connection. When the direction and angle are correct, you can insert a
connector smoothly without the strong force. If you fail to insert a
connector, check its shape and direction once more without inserting
a connector forcibly.
●
Purchase a dedicated FOMA USB Cable. (The USB Cable for
personal computers cannot be used because the shape of the
connector differs.)
●
Symbol “
” appears on the FOMA phone when the FOMA phone
recognizes the connection with the personal computer after you install
the transmission setup files for packet transmission or 64K data
transmission. Before you install the transmission setup files, the
FOMA phone does not recognize the connection with the personal
computer, and symbol “
” does not appear.
Information
Personal
computer
USB terminal
FOMA phone
FOMA USB
Cable
USB connector
Connector
terminal
External connector
(Face up “DoCoMo” logo
of the connector for
insertion)
■
Removing
1. While holding down the release buttons of the external
connector of the FOMA USB Cable, straight pull out the
connector.
2. Pull out the FOMA USB Cable from the USB terminal of the
personal computer.
Release button
Release button
●
Do not disconnect the FOMA USB Cable forcibly. Malfunction
may result.
●
Do not perform connection and disconnection of the FOMA USB
Cable in succession.
Once you connect the cable, wait for a while, then perform
disconnections and vice versa.
Information
※
To perform data transfer via the
USB Cable, install the data link
software.
Summary of Contents for FOMA P701iD
Page 98: ...96...
Page 339: ...i channel What is i channel 338 Using i channel 340 Using Detailed Functions 341 337...
Page 344: ...342...
Page 460: ...458...
Page 502: ...500...


