A-10
CLM Laminator
5.
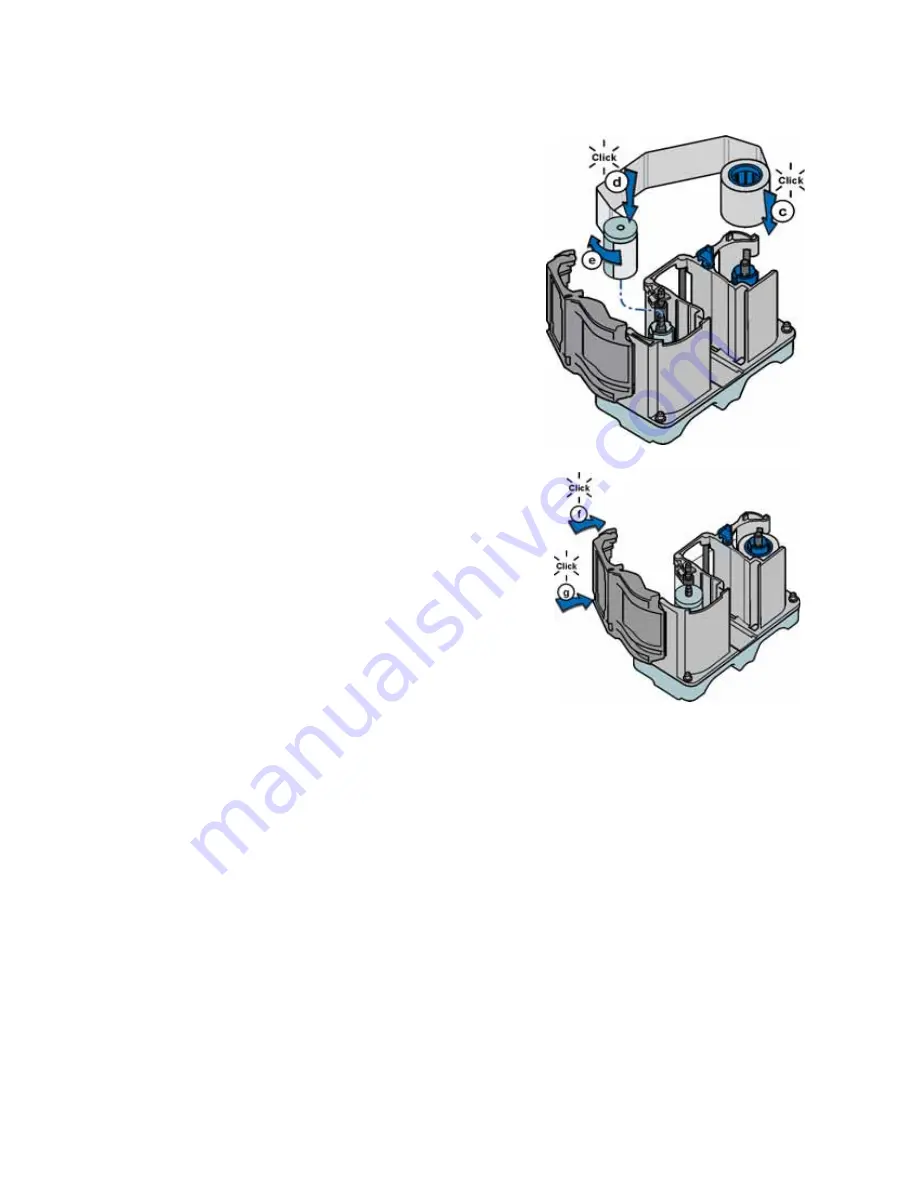
Load
the
new
roll
of
laminator
overlay
material.
A.
Put
the
blue
supply
spool
on
the
blue
supply
spindle
of
the
cartridge
(c).
The
overlay
supply
roll
can
go
on
only
one
way
and
only
fits
on
the
correct
spindle.
B.
Put
the
empty
silver
take
‐
up
spool
on
the
silver
take
‐
up
spindle
(d).
C.
Turn
the
take
‐
up
spool
clockwise
to
remove
slack
from
the
material (e).
The
overlay
material
loads
in
an
S
‐
shape.
Make
sure
that
the
overlay
material
is
between
the
guides
on
both
the
take
‐
up
and
supply
sides
of
the
cartridge.
6.
Close
the
laminator
cartridge
gate (f).
Push
it
in
until
the
latch
clicks
in
place (g).
Make
sure
that
the
overlay
material
is
not
pinched
by
the
cartridge
gate.
7.
Replace
the
loaded
laminator
cartridge
in
the
printer.
8.
Remove
the
L2
(orange)
cartridge,
if
installed,
from
the
laminator.
9.
Repeat
steps
3
through
7
to
load
the
overlay
onto
the
L2
cartridge.
10.
Close
and
lock
the
laminator
access
door.
Summary of Contents for CD800
Page 1: ...Datacard CD800 Card Printer User s Guide March 2014 Part No 527443 001 Rev A ...
Page 8: ...viii ...
Page 14: ...xiv ...
Page 16: ...2 Introduction ...
Page 25: ...CD800 Card Printer User s Guide 11 ...
Page 26: ...12 About the Printer ...
Page 42: ...28 Printing Cards ...
Page 54: ...40 System Maintenance ...
Page 114: ...A 16 CLM Laminator ...


