background image

0ALJ-0CX

When a Problem Cannot Be Solved

If you cannot solve a problem by referring to the information in this chapter, contact your local authorized Canon dealer or the Canon
help line.

IMPORTANT

Do not disassemble or repair the machine yourself

If you disassemble or repair the machine yourself, it may not be covered by warranty.

When Contacting Canon

When contacting us, have the following information ready:

Product name (MF8580Cdw / MF8550Cdn / MF8540Cdn / MF8280Cw / MF8230Cn)

Dealer where you purchased the machine

Details about your problem (such as what you did and what happened as a result)

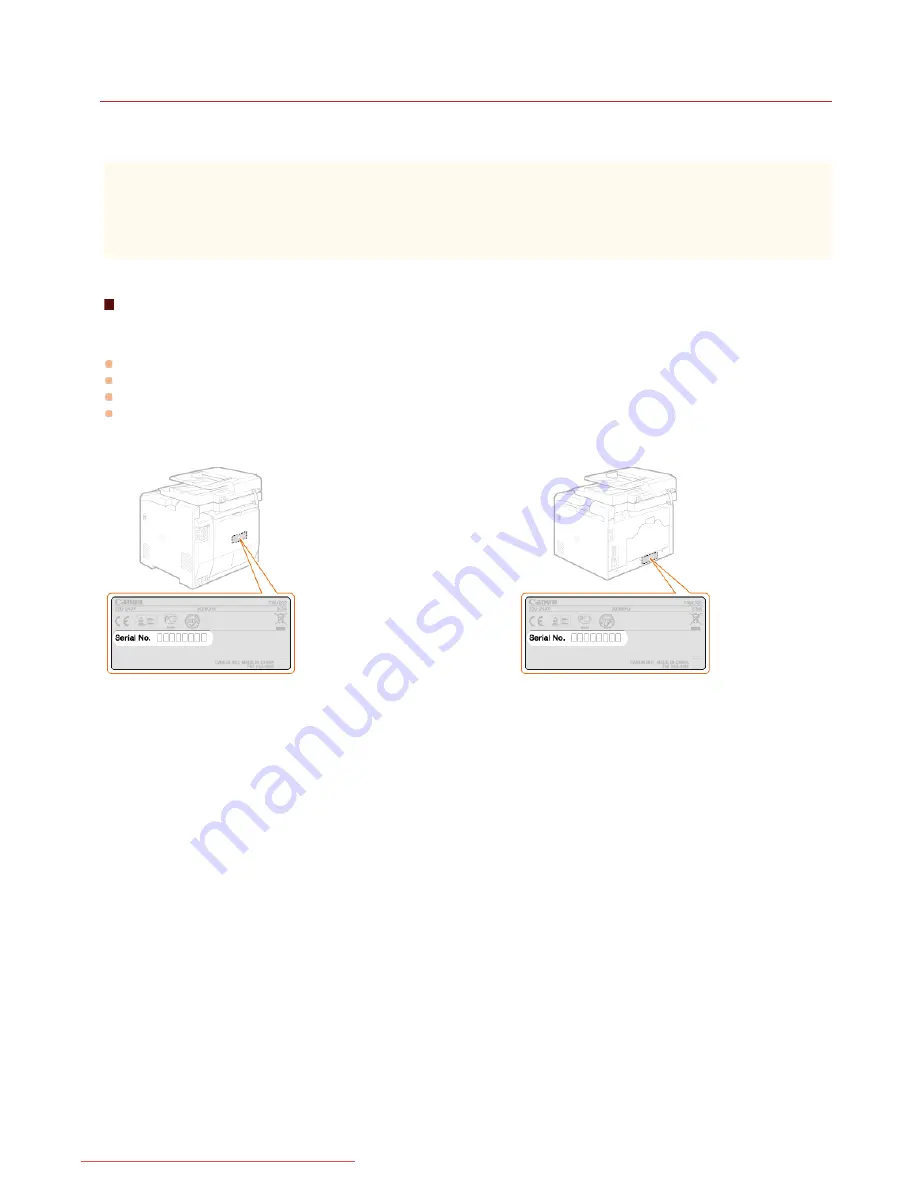
Serial number (eight alphanumeric characters long, found on the label on the back side of the machine)

MF8580Cdw / MF8550Cdn / MF8540Cdn

MF8280Cw / MF8230Cn

㻡㻤㻠㻌㻛㻌㻢㻣㻢

Downloaded from ManualsPrinter.com Manuals

Summary of Contents for Color imageCLASS MF8580Cdw

Page 1: ...Downloaded from ManualsPrinter com Manuals...

Page 2: ...Unit Name 45 Selecting the Receive Mode 47 Connecting the Telephone Line 49 Basic Operations 51 Parts and Their Functions 53 Front Side 54 Back Side 56 Interior 57 Manual Feed Slot 58 Paper Drawer 59...

Page 3: ...30 Faxing 131 Sending Faxes 133 Canceling Sending Faxes 136 Various Fax Settings 137 Adjusting Resolution 138 Adjusting Density 139 Adjusting Sharpness 140 Scanning 2 Sided Documents MF8580Cdw MF8550C...

Page 4: ...aving Toner 216 Combining and Printing Multiple Documents 217 Configuring Printer Settings on the Machine 220 Printing a Document Secured by a PIN Secure Print MF8580Cdw MF8550Cdn MF8540Cdn Only 221 P...

Page 5: ...Destinations 312 Specifying Destinations in an LDAP Server E mail 313 Changing Default Settings 316 Checking Log for Sent Documents E mail Shared Folder MF8580Cdw MF8550Cdn MF8540Cdn Only 318 Network...

Page 6: ...hine s Functions 417 Restricting Access to Address Book and Sending Functions MF8580Cdw MF8550Cdn MF8540Cdn MF8280Cw Only 418 Setting a PIN for Address Book 419 Limiting Available Destinations 420 Pro...

Page 7: ...Problems 576 Faxing Telephone Problems MF8580Cdw MF8550Cdn MF8280Cw Only 577 When You Cannot Print Properly 578 Printing Results Are Not Satisfactory 579 Paper Creases or Curls 582 Paper Is Fed Incor...

Page 8: ...ficiency 626 Going Digital 628 So Much More 630 Specifications 632 Machine Specifications 633 Paper Drawer Specifications Optional MF8580Cdw MF8550Cdn MF8540Cdn Only 635 Wireless LAN Specifications MF...

Page 9: ...ng this machine read this chapter and follow the instructions to properly use this machine Do not perform any operations not described in this manual Canon will not be responsible for any damages resu...

Page 10: ...d resulting in a fire or electrical shock Do not use near any medical equipment Radiowaves emitted from this machine may interfere with medical equipment which may cause a malfunction and result in se...

Page 11: ...to the ambient temperature and humidity for at least two hours before use When the room where the machine is installed is heated rapidly When the machine is moved from a cool or dry location to a hot...

Page 12: ...or electrical shock Do not wrap the power cord or tie it in a knot as this may result in a fire or electrical shock Insert the power plug completely into the AC power outlet Failure to do so may resul...

Page 13: ...u are using a cardiac pacemaker This machine generates a low level magnetic flux If you use a cardiac pacemaker and feel abnormalities please move away from this machine and consult your physician imm...

Page 14: ...the laser beam should escape and enter your eyes exposure may cause damage to your eyes IMPORTANT When transporting the machine To prevent damage to the machine during transport perform the following...

Page 15: ...es paint thinners or other flammable substances Do not use tissue paper or paper towels If these substances come into contact with electrical parts inside the machine they may generate static electric...

Page 16: ...ater and consult a physician Use caution so that toner does not come into contact with your skin If it should wash with soap and cold water If there is any irritation on your skin consult a physician...

Page 17: ...ty Locations subject to dramatic changes in temperature and humidity where condensation may easily occur Locations with a large amount of dust Locations within the reach of children Be careful of coun...

Page 18: ...g section Step 1 Checking Supplied Accessories Step 2 Removing Packing Materials Step 3 Preparing Toner Cartridges Step 4 Loading Paper Step 5 Installing the Handset Optional MF8580Cdw MF8550Cdn MF828...

Page 19: ...Step 9 Configuring Initial Settings for Fax Functions MF8580Cdw MF8550Cdn MF8280Cw Only Downloaded from ManualsPrinter com Manuals...

Page 20: ...er The machine Toner cartridge s Power cord Getting Started Shortcut key label MF8580Cdw MF8550Cdn MF8540Cdn Only User Software CD ROM Multi lingual User Manual CD MF8580Cdw MF8550Cdn MF8280Cw Only Te...

Page 21: ...artridge 718 Black Starter 1 200 sheets Canon Cartridge 718 Yellow Starter Canon Cartridge 718 Magenta Starter Canon Cartridge 718 Cyan Starter Composite Y Yellow M Magenta and C Cyan 1 400 sheets MF8...

Page 22: ...tware if required The manuals listed below are included with the machine Refer to them as necessary Getting Started Read this manual first It describes basic setup procedures from removing the packing...

Page 23: ...ll the optional paper drawer Drawer 2 before moving the machine For details on how to install the paper drawer see the installation manual included with the optional paper drawer Check the installatio...

Page 24: ...dn MF8280Cw MF8230Cn Fully open the rear cover MF8580Cdw MF8550Cdn MF8540Cdn MF8280Cw MF8230Cn Remove the tape and packing materials MF8580Cdw MF8550Cdn MF8540Cdn MF8280Cw MF8230Cn 3 4 Downloaded from...

Page 25: ...cking materials Gently close the feeder NOTE Make sure that all the packing materials have been removed from the machine MF8580Cdw MF8550Cdn MF8540Cdn MF8280Cw MF8230Cn Continue to Preparing Toner Car...

Page 26: ...imately 50 cm There is a toner cartridge for each of the four colors Remove the sealing tape from each toner cartridge IMPORTANT When pulling out the sealing tape If the sealing tape remains inside th...

Page 27: ...NOTE Make sure that all four strips of sealing tape have been removed from the machine Continue to Loading Paper Downloaded from ManualsPrinter com Manuals...

Page 28: ...aper Size and Type Pull out the paper drawer IMPORTANT Make sure to hold the paper drawer with both hands and pull it out gently Otherwise you may damage the paper drawer by dropping it if it slides o...

Page 29: ...paper IMPORTANT Align the paper guides securely against the edges of the paper Paper guides that are too loose or too tight can cause misfeeds or paper jams Insert the paper drawer into the machine C...

Page 30: ...t installing Remove the two covers Insert the plugs with pins into the holes on the handset cradle NOTE Do not fully insert the pins into the plugs at this point Insert the plugs with the cradle into...

Page 31: ...ar handset cable to the handset jack Attach the four handset cable clamps Run the handset cable through the clamps and close them Continue to Connecting the Power Cord 6 7 8 Downloaded from ManualsPri...

Page 32: ...able yet Wait until you install the software to connect the USB cable Make sure that the machine is turned OFF Plug the female end of the power cord into the power socket on the back of the machine Pl...

Page 33: ...e back cover then remove the protective sheet message is shown on the display remove the packing materials under the rear cover Removing Packing Materials Use to select your UTC time zone and press NO...

Page 34: ...mage is printed 3 Open the feeder after the screen displayed during printing disappears 4 Place the adjustment image on the platen glass with the print side face down Place the adjustment image so tha...

Page 35: ...f you are using MF8580Cdw MF8550Cdn MF8280Cw use to select No and press and then proceed to Configuring Initial Settings for Fax Functions MF8580Cdw MF8550Cdn MF8280Cw Only the machine Has a paper jam...

Page 36: ...nnect via wireless LAN later use to select No and press and then proceed to Configuring Initial Settings for Fax Functions MF8580Cdw MF8550Cdn MF8280Cw Only to configure the fax settings Use a LAN cab...

Page 37: ...contact your manufacturer The operating systems listed below are compatible with the included software such as the drivers which are used for connecting the machine to a computer For information about...

Page 38: ...ction manuals included with the devices you are using or contact the device manufacturers Have the network settings been completed on the computer If the network has not been set up properly you will...

Page 39: ...Guide After installing the software continue to Configuring Initial Settings for Fax Functions MF8580Cdw MF8550Cdn MF8280Cw Only NOTE If the Remote UI screen is not displayed Make sure that the machin...

Page 40: ...Check the device and network settings Has the LAN cable been properly connected to the computer and router For more information see the instruction manuals included with the devices you are using or c...

Page 41: ...tings for Fax Functions MF8580Cdw MF8550Cdn MF8280Cw Only after installing the software If you are using MF8540Cdn MF8230Cn the settings for connecting to a computer are complete NOTE If the Remote UI...

Page 42: ...ll the string to remove the cap Connect the USB cable Connect the flat end to the USB port on the computer Connect the square end to the USB port on the machine NOTE If the dialog box prompting you to...

Page 43: ...uits your intended use and then follow the on screen instructions to configure the settings For more information about a particular step click on the link to go to the corresponding section Step 1 Dec...

Page 44: ...h fax and telephone Use answering machine Answering Machine Connect your answering machine Callers can record a message if they call while you are away from the telephone The machine automatically rec...

Page 45: ...ive mode is set to Auto Later when you want to configure the fax settings display the fax setup screen by pressing Fax Settings Fax Setup Guide Press Next Enter the fax number using the numeric keys E...

Page 46: ...Continue to Selecting the Receive Mode LINKS Sending Faxes Downloaded from ManualsPrinter com Manuals...

Page 47: ...name has been registered Registering the Fax Number and Unit Name Select the receive mode that suits your intended use Use to select Yes or No and press to select the receive mode NOTE You may be able...

Page 48: ...LINKS Receiving Faxes Downloaded from ManualsPrinter com Manuals...

Page 49: ...optional handset connect it to the handset jack Notice for Connecting the Telephone Line This product includes the Telephone Line Cord and Adapter to connect the telephone line Depending on your coun...

Page 50: ...ne line type is automatically set If the machine does not automatically set the type of telephone line Follow the procedure below to set the type of telephone line If you are not sure of the type of p...

Page 51: ...for entering the Department ID and PIN is displayed Logging on to the Machine Placing Documents This section describes how to place documents on the platen glass and in the feeder Placing Documents L...

Page 52: ...escribes how to adjust the volume of various machine sounds such as those produced when fax sending is complete or when an error occurs Adjusting the Volume Entering Sleep Mode This section describes...

Page 53: ...he machine used for such basic operations as placing documents loading paper and replacing the toner cartridges this section also describes the keys on the operation panel and display Read this sectio...

Page 54: ...rtridges Clearing Jams Paper drawer Load the type of paper you frequently use into the paper drawer Loading Paper in the Paper Drawer Power switch Turns the power ON or OFF To restart the machine turn...

Page 55: ...feeder Placing Documents USB memory port You can connect a USB memory device to the machine and directly print the data from the USB memory device Documents scanned by using the machine can also be s...

Page 56: ...ing the machine to a telephone line Connecting the Telephone Line External telephone jack MF8580Cdw MF8550Cdn MF8280Cw only Connect your telephone or answering machine Connecting the Telephone Line Re...

Page 57: ...r cartridge tray Install the toner cartridges Load the Y yellow M magenta C cyan and K black toner cartridges in the slots from the rear to the front respectively How to Replace Toner Cartridges LINKS...

Page 58: ...oaded paper to ensure that paper is fed straight into the machine Paper tray MF8580Cdw MF8550Cdn MF8540Cdn only Pull out the paper tray when loading paper Tray extension MF8580Cdw MF8550Cdn MF8540Cdn...

Page 59: ...ons to release the locks and slide the paper guides Lock release lever for extending the paper drawer When loading Legal size paper the paper drawer needs to be extended Press this lever to release th...

Page 60: ...egister or edit destinations in the Address Book Registering in the Address Book MF8580Cdw MF8550Cdn MF8540Cdn MF8280Cw Only Coded Dial key MF8580Cdw MF8550Cdn MF8540Cdn MF8280Cw only Press to use cod...

Page 61: ...r information Also view the screen when specifying the settings of the machine Display Menu key Press to start specifying many of the settings for the machine such as Timer Settings or Preferences Set...

Page 62: ...ddition if you press this key when you start printing images from a USB memory device printouts are printed in black and white key Press to switch the type of text that is entered Press to use tone di...

Page 63: ...er where you want to save the scanned data or whether to scan the document as a color PDF or as a JPEG Then place the document and simply press or to start scanning The scanned document is stored in t...

Page 64: ...40Cdn MF8280Cw Only Select Paper Screen When you press Select Paper Settings to select the paper to copy or print on the Select Paper screen is displayed Select the paper on the screen Also for exampl...

Page 65: ...ears Device Status Displays the status of the machine such as the amount of paper or toner remaining Paper Information Displays whether paper is loaded in each paper source Remaining Toner Displays th...

Page 66: ...runs out or the toner level is low The display alternates between showing the normal screen and the message When an Error Message Appears When an Error Occurs In some cases when an error occurs instr...

Page 67: ...ct Department ID or Manager ID 2 Enter a number of up to seven digits using the numeric keys and press Apply If no PIN is registered proceed to step 3 Enter the PIN 1 Select PIN 2 Enter a number of up...

Page 68: ...aper jams Do not place the following types of documents in the feeder as this may cause paper jams Wrinkled or creased paper Carbon paper or carbon backed paper Curled or rolled paper Coated paper Tor...

Page 69: ...the actual document width Pull out the tray extension when loading large documents to prevent them from drooping over the edge of the feeder Fan the document stack and align the edges Fan the documen...

Page 70: ...an the document IMPORTANT Align the document guides securely against the edges of the document Document guides that are too loose or too tight can cause misfeeds or paper jam While documents are being...

Page 71: ...m Plain 3 Recycled paper 60 to 74 g m Recycled Color paper 60 to 74 g m Color Heavy paper 86 to 119 g m Heavy 1 120 to 128 g m Heavy 2 129 to 163 g m Heavy 3 Envelope Envelope Coated paper 100 to 110...

Page 72: ...If you experience any of the following problems after specifying either of these two settings specify the other setting Paper that is output curls Afterimages appear on the blank area Toner is not fu...

Page 73: ...the operation panel or around the paper output area There is nothing unusual about any of these occurrences which occur when the heat generated from fixing toner on the paper causes moisture in the pa...

Page 74: ...Pull out the paper drawer IMPORTANT Make sure to hold the paper drawer with both hands and pull it out gently Otherwise you may damage the paper drawer by dropping it if it slides out too easily Slid...

Page 75: ...to Specifying Paper Size and Type in the Paper Drawer IMPORTANT When changing the paper size or type The factory default settings for paper size and type are A4 and Plain 2 respectively If you load a...

Page 76: ...Paper Downloaded from ManualsPrinter com Manuals...

Page 77: ...trait orientation as shown in the illustrations below MF8580Cdw MF8550Cdn MF8540Cdn MF8280Cw MF8230Cn IMPORTANT Make sure to insert the paper drawer The machine only prints when the paper drawer is in...

Page 78: ...ges of the paper Slide the paper guides inward until they are aligned securely against the edges of the paper IMPORTANT Align the paper guides securely against the edges of the paper Paper guides that...

Page 79: ...curely against the edges of the paper IMPORTANT Align the paper guides securely against the edges of the paper Paper guides that are too loose or too tight can cause misfeeds or paper jams Insert the...

Page 80: ...er drawer or manual feed slot see Loading Paper in the Paper Drawer or Loading Paper in the Manual Feed Slot Follow the procedure below to prepare the envelopes before loading NOTE On the MF8280Cw MF8...

Page 81: ...e with the flap is toward the left side as shown in the illustration Load the envelopes Monarch COM10 DL or ISO C5 in portrait orientation with the short edge toward the machine with the non glued sid...

Page 82: ...aper in the paper drawer or manual feed slot see Loading Paper in the Paper Drawer or Loading Paper in the Manual Feed Slot Load the paper with the logo side the side to print the document face up IMP...

Page 83: ...ad each time you perform 1 sided and 2 sided printing However if Switch Paper Feed Method is set to Print Side Priority the facing that you use for loading preprinted paper for 2 sided printing logo s...

Page 84: ...h the paper that is loaded Make sure to change the paper settings when you load the paper that is different from the previously loaded paper IMPORTANT If the setting does not match the size and type o...

Page 85: ...select Paper Settings and press Select Drawer 1 or Drawer 2 and press Drawer 2 is displayed only when the optional paper drawer drawer 2 is installed MF8580Cdw MF8550Cdn MF8540Cdn only Select the pap...

Page 86: ...as the default setting When the default setting is registered however the screen shown above is not displayed To display the screen select Off for Register Default Settings Registering Default Paper...

Page 87: ...Select the paper type and press LINKS Loading Paper in the Manual Feed Slot Paper 2 Downloaded from ManualsPrinter com Manuals...

Page 88: ...ferent paper size or type without changing the paper settings the machine may not print properly To avoid this problem disable the default setting by selecting Off in step 3 and then load the paper Pr...

Page 89: ...Slot Paper Select X and press Input the length of the X side using or the numeric keys and press Apply 3 Specify the length of the Y longer side Select Y and press Input the length of the Y side and...

Page 90: ...s If paper sizes 1 to 3 have already been registered either change or delete the setting to continue The procedures for changing and deleting these settings are described below Changing a setting 1 Se...

Page 91: ...selecting the paper size for the paper drawer On the screen to specify the size of the paper that is loaded in the paper drawers the registered paper sizes are displayed Specifying Paper Size and Typ...

Page 92: ...feed slot From the screen you can select one of the displayed sizes as the default paper size for the manual feed slot Registering Default Paper Settings for the Manual Feed Slot LINKS Loading Paper...

Page 93: ...You can also enter the value directly using the numeric keys when the numeric key icon is displayed in the top left corner of the screen as shown below Entering Text NOTE The numbers in parentheses be...

Page 94: ...esponding multi function keys For example when describing instructions for selecting Background on the screen shown above the phrase Press Background is used instead of Press the left multi function k...

Page 95: ...n Be Entered The text that can be entered using the numeric keys and are listed below Key A a 12 _ 1 ABC abc 2 DEF def 3 GHI ghi 4 JKL jkl 5 MNO mno 6 PQRS pqrs 7 TUV tuv 8 WXYZ wxyz 9 Not available 0...

Page 96: ...repeatedly until the letter a is selected 5 Press repeatedly until the letter n is selected 6 Press repeatedly until the letter o is selected 7 Press repeatedly until the letter n is selected 8 Press...

Page 97: ...You can send faxes or e mails to multiple destinations at the same time You can register up to 199 destinations 100 destinations for e mails for a group Groups can also be registered in Favorites Reg...

Page 98: ...MF8550Cdn MF8540Cdn MF8280Cw Only Select Name and press Registering Name is optional If you register Name the destination can be searched alphabetically Enter the name using the numeric keys and press...

Page 99: ...e item you want to edit press perform editing and then press Apply Press Apply Deleting a Registered Destination Press or Press Use to select the tab containing the destination you want to delete Use...

Page 100: ...rver installed you can register destinations searched from the server in the Address Book You need to specify the settings for connecting to an LDAP server beforehand Registering LDAP Servers MF8580Cd...

Page 101: ...orrect PIN using the numeric keys and press Setting a PIN for Address Book Select the item you want to edit press perform editing and then press Apply Press Apply Deleting a Registered Destination Pre...

Page 102: ...avorites Select Favorites to register the group as Favorites Select Group and press Select Name and press Registering Name is optional If you register Name the destination can be searched alphabetical...

Page 103: ...the correct PIN using the numeric keys and press Setting a PIN for Address Book Select the item you want to edit press perform editing and then press Apply Press Apply Deleting a Group Press or Press...

Page 104: ...RX Done Tone Sound produced when fax receiving is complete Scanning Done Tone Sound produced when fax document scanning is complete Entry Tone Sound produced each time a key on the operation panel is...

Page 105: ...een is displayed When a job is waiting to be scanned to a USB memory device or to a computer When an error message is displayed on the screen There are some exceptions The machine sometimes enters sle...

Page 106: ...the hook Downloaded from ManualsPrinter com Manuals...

Page 107: ...hine may automatically shut down even if you are operating the machine from the Remote UI or from the Send Function Setting Tool A malfunction may occur particularly if the machine shuts down while da...

Page 108: ...Reducing Erasing Dark Borders and Frame Lines Erase Frame Collating Copies by Page Selecting Document Type Adjusting Density Adjusting Color Balance Adjusting Sharpness 2 Sided Copying MF8580Cdw MF85...

Page 109: ...Copying starts If you want to cancel copying press Cancel Yes Canceling Copies When placing documents in the feeder in step 1 The document is automatically scanned When placing documents on the plate...

Page 110: ...f the page The edges of the document might not be copied For more information about the scan margins see Scan Area TIPS If you always want to make copies with the same settings Changing Default Settin...

Page 111: ...the paper source Specifying Paper Size and Type Loading Paper Paper Select the paper source MF8580Cdw MF8550Cdn MF8540Cdn MF8280Cw MF8230Cn Selects the paper loaded in the manual feed slot Selects th...

Page 112: ...when is pressed Documents have been scanned and are waiting to be printed Use to select the copy document to cancel Use Status Monitor to cancel Status Monitor Copy Print Job Job Status Select the co...

Page 113: ...LINKS Basic Copy Operations Downloaded from ManualsPrinter com Manuals...

Page 114: ...lecting Document Type Adjusting Density Adjusting Color Balance Adjusting Sharpness 2 Sided Copying MF8580Cdw MF8550Cdn MF8540Cdn Only Copying Multiple Documents onto One Sheet 2 on 1 4 on 1 Using the...

Page 115: ...custom copy ratio in increments of 1 Copy Ratio Select the copy ratio Custom Ratio Use or the numeric keys to enter the copy ratio and press Apply You can set any copy ratio from 25 to 400 in 1 incre...

Page 116: ...iority to copy speed or image quality Printed Image Suitable when copying documents that contain printed photos such as magazines or pamphlets Text Suitable when copying documents that only contain te...

Page 117: ...n paper such as a newspaper so that the text and images on the opposite side of the page are not visible in the copy Density Adjust the density Apply Decreases the density Increases the density Adjust...

Page 118: ...LINKS Basic Copy Operations Adjusting Color Balance Adjusting Sharpness Downloaded from ManualsPrinter com Manuals...

Page 119: ...ly Apply Makes the selected color lighter Makes the selected color darker Example If you want to make a copy with colors that more closely match the original Example If you want to make a copy with br...

Page 120: ...e of magazine photos Sharpness Adjust the sharpness Apply Decreases the sharpness resulting in a softer image Example If you want to improve the appearance of magazine photos Increases the image sharp...

Page 121: ...Using the Paper Save Copy Key 2 Sided Select the type of 2 sided copying Types of 2 sided copying The illustration below shows the types of 2 sided copying 1 Sided 2 Sided 2 Sided 2 Sided 2 Sided 1 Si...

Page 122: ...e original binding type Select the binding type for the finished copy which is different from that of the original document This setting enables you to align the direction of the output paper When a 2...

Page 123: ...documents onto one page margins may be created in the copied image TIPS Using the key enables you to combine 2 sided copying and 2 on 1 4 on 1 Using the Paper Save Copy Key N on 1 Select 2 on 1 or 4 o...

Page 124: ...edges of the document might not be copied if you increase it Paper Save Copy is not available when using Erase Frame 2 Sided 2 on 1 4 on 1 or ID Card Copy When you copy multiple documents onto one pa...

Page 125: ...opying a driver s license or ID card NOTE ID Card Copy is available with A4 Letter size paper or larger Copy Ratio is automatically set to 100 ID Card Copy is not available when using Erase Frame Pape...

Page 126: ...s NOTE The width of the frame to erase is increased or decreased relative to the Copy Ratio setting Erase Frame is not available when using Paper Save Copy 2 on 1 4 on 1 or ID Card Copy Erase Frame On...

Page 127: ...e and not collated For example if you are making three copies of a five page document the printouts will be arranged in the following page order 1 1 1 2 2 2 3 3 3 4 4 4 5 5 5 On The copies are grouped...

Page 128: ...e them whenever you need them NOTE The machine comes pre configured with factory default settings Setting Menu List You can change and register the default settings according to your needs Change the...

Page 129: ...ns that you perform frequently you can eliminate the need to configure the same settings every time you make copies Copy Settings Change Default Settings Select the setting Change the default value of...

Page 130: ...Register Select each setting and set the value Apply Yes Mode 1 to Mode 4 Register frequently used combinations of copy settings as one of the modes To edit the settings for a mode that has already be...

Page 131: ...580Cdw MF8550Cdn MF8280Cw Only You need to register destinations in the Address Book before using this feature Registering in the Address Book MF8580Cdw MF8550Cdn MF8540Cdn MF8280Cw Only Using Basic O...

Page 132: ...nations Simultaneously Sequential Broadcast Storing Received Faxes into Memory Memory Reception Forwarding Received Faxes Receiving Fax Information Services Sending Faxes Directly from Your Computer S...

Page 133: ...dress Book see Specifying Destinations for Faxes NOTE When Confirm Entered Fax Number is set to On a screen appears that prompts you to enter the destination again Checking Destinations before Sending...

Page 134: ...rea code and the fax number 4 Select Pause to insert a pause at the end of the fax number as necessary and press The waiting time inserted here is fixed to 10 seconds This time cannot be changed 5 Pre...

Page 135: ...is off the hook Off Hook Alarm If you want to check the dial tone before sending to avoid sending to wrong destinations Check Dial Tone Before Sending LINKS Canceling Sending Faxes Sending and Receivi...

Page 136: ...be processed Use to select the document to cancel Use Status Monitor to cancel Status Monitor TX Job Job Status Select the fax document on the TX Job Status Log screen Cancel Yes Fax details The numb...

Page 137: ...e to suit your needs for example when you want to adjust density or enhance the clarity of an image Adjusting Resolution Adjusting Density Adjusting Sharpness Scanning 2 Sided Documents MF8580Cdw MF85...

Page 138: ...ution 200 x 100 dpi Normal Suitable for documents that contain text only 200 x 200 dpi Fine Suitable for documents that contain fine text 200 x 200 dpi Photo Suitable for documents that contain photog...

Page 139: ...the density of the fax if the text or images in a document are too light or dark Density Adjust the density Apply Decreases the density Increases the density LINKS Sending Faxes Adjusting Sharpness D...

Page 140: ...mprove the appearance of magazine photos Sharpness Adjust the sharpness Apply Decreases the sharpness resulting in a softer image Example If you want to improve the appearance of magazine photos Incre...

Page 141: ...ly when the documents are placed on the platen glass or when the machine is set to Manual Sending 2 Sided Original Select Book Type or Calendar Type Book Type Select for documents whose images on the...

Page 142: ...ying from Address Book Fax Specifying Previously Used Destinations Fax Specifying Destinations in an LDAP Server Fax TIPS for Enhancing Security If you want to limit available destinations to ones fro...

Page 143: ...ecified NOTE When Confirm Entered Fax Number is set to On a screen appears that prompts you to enter the destination again Displaying the Screen for Confirming the Fax Number MF8580Cdw MF8550Cdn MF828...

Page 144: ...E If you want to easily and quickly delete destinations without displaying a list of destinations Before selecting Confirm Edit Destination in step 1 you can press to toggle the destinations you speci...

Page 145: ...ect Specify from Address Book on the screen and press Use to select a tab All Displays all the destinations registered in the Address Book For the marks beside the destinations see the explanations be...

Page 146: ...ation you want to delete and press 3 Press Clear Dest select Yes and press If you specified destinations in Group Dial in step 2 Number of Destinations is displayed on the screen Selecting this item a...

Page 147: ...ultiple destinations Repeat steps 2 and 3 Up to 181 destinations can be specified To specify any additional destinations with the numeric keys use to select Specify Next Destination New on the screen...

Page 148: ...LINKS Sending Faxes Sending Faxes to Multiple Destinations Simultaneously Sequential Broadcast Downloaded from ManualsPrinter com Manuals...

Page 149: ...ables this feature Limiting Available Destinations The destinations in Manual Sending are not available for this feature Making a Call before Sending Faxes Manual Sending NOTE When you specify a desti...

Page 150: ...ct the LDAP server you are using and press Select the search criteria and press Personal names fax numbers e mail addresses organization names and department names are available criteria for searching...

Page 151: ...pply Registering LDAP Servers MF8580Cdw MF8550Cdn MF8540Cdn MF8280Cw Only Select a destination and press Apply Up to 10 destinations can be specified To search for a destination using other search cri...

Page 152: ...ct Yes and press NOTE If you want to easily and quickly delete destinations without displaying a list of destinations Before selecting Confirm Edit Destination in step 1 you can press to toggle the de...

Page 153: ...equently you can eliminate the need to configure the same settings every time you send faxes Fax Settings TX Function Settings Change Default Settings Select the setting Change the default value of th...

Page 154: ...the handset before the answering machine starts recording a message you can talk with the caller NOTE You need to connect your answering machine to the machine beforehand Set the answering machine to...

Page 155: ...rt receiving the fax When an incoming call rings pick up the telephone handset If you hear a beep enter the ID number for Remote Reception with the telephone Specify the following three settings as ne...

Page 156: ...lt You can change this number as necessary Remote RX Hang up the handset LINKS Sending and Receiving Faxes According to Your Purposes Checking Status and Log for Sent and Received Documents 3 Download...

Page 157: ...es Making a Call before Sending Faxes Manual Sending Sending Faxes to Multiple Destinations Simultaneously Sequential Broadcast Storing Received Faxes into Memory Memory Reception Forwarding Received...

Page 158: ...Documents The machine cannot automatically scan both sides of the documents in Manual Sending When the document is placed on the platen glass only one page can be sent Press Specify the scanning setti...

Page 159: ...Reject Sequential Broadcast you cannot use this feature Prohibiting Sequential Broadcasting MF8580Cdw MF8550Cdn MF8280Cw Only NOTE You need to register destinations in the Address Book before using th...

Page 160: ...egister a password of up to seven digits To register a password use the numeric keys to enter a password and press Apply Enter the same numbers again for confirmation and press Apply This password is...

Page 161: ...sender fax numbers and number of pages sent and then delete unnecessary documents Press Status Monitor Use to select RX Job and press Select Job Status and press Select the document you want to check...

Page 162: ...LINKS Receiving Faxes Checking Status and Log for Sent and Received Documents Downloaded from ManualsPrinter com Manuals...

Page 163: ...Documents are converted into PDF files when the destinations that are specified for forwarding are e mail addresses or shared folders NOTE Available destinations for forwarding are limited to the dest...

Page 164: ...documents in memory are not deleted even after they are forwarded the same documents can be forwarded multiple times Press Status Monitor Use to select RX Job and press Select Job Status and press Se...

Page 165: ...ructions on how to use the Address Book see Specifying from Address Book Fax If you want to check the documents to be forwarded for yourself you can set the machine to print the documents whenever the...

Page 166: ...When Error Occurs Printing Resending Deleting Documents Stored in Memory Press Status Monitor Use to select Fax Forwarding Errors and press Select the document you want to check and press To print th...

Page 167: ...Sent and Received Documents 1 Press Print Forward 2 Select Forward and press 3 Select the forwarding destination from the Address Book and press For instructions on how to use the Address Book see Sp...

Page 168: ...he optional handset is connected to the machine you can pick up the handset instead of pressing Hook When you hear a dial tone dial the information service When the recorded message of the information...

Page 169: ...LINKS Receiving Faxes Downloaded from ManualsPrinter com Manuals...

Page 170: ...ogs for sent and received documents To check the statuses for sent and received documents 1 Select Job Status and press 2 Select the document whose status you want to check and press TX Job Status RX...

Page 171: ...cause it was canceled or there was some error Details Displays detailed information about the document selected from the list NOTE If the Result column shows a three digit number This number represent...

Page 172: ...and installing the fax driver on your computer MF Driver Installation Guide before using this feature About the Fax Driver Help Clicking Help on the fax driver screen displays the Help screen On this...

Page 173: ...ktop to take care of it is displayed move to the desktop and proceed to step 3 From the Sending Settings tab enter Destination Name and Fax Number and click Add to Destination List If you need to spec...

Page 174: ...Attach a cover sheet to the document as necessary Attaching Cover Sheets to PC Faxes Click OK to send the document 4 5 Downloaded from ManualsPrinter com Manuals...

Page 175: ...n For more information see the instruction manual for the application you are using Select your fax driver and click Print Click the Cover Sheet tab and specify each setting Cover Sheet Attachment Sel...

Page 176: ...Logo tab is selected With without logos or signatures Select Print with Logo or Print with Signature if you want to include logos or signatures on the cover sheet Have the bitmap files for logos or s...

Page 177: ...ect click OK To modify the contents perform the steps from 3 again The specified cover sheet is attached to the fax when the fax is sent Include Number of Sheets to Send Select this check box if you w...

Page 178: ...Excel can be imported into the machine or the Address Book data can be exported to a file for use on other fax machines or applications NOTE You cannot use the Address Book if you do not have permiss...

Page 179: ...You can select and combine registered group destinations and register them as separate group destinations You cannot use the Address Book if you do not have permission to access the folder where the A...

Page 180: ...add explanations of the uses for the fax numbers such as Home or Office enter them in Description Notes Enter comments as necessary Open the printer folder Displaying the Printer Folder Right click y...

Page 181: ...rson Displays single destinations Group Displays group destinations All Displays all the destinations registered in the Address Book Available Destinations Select the destinations to register in Group...

Page 182: ...access the folder or change the save location of the Address Book Changing Location to Save Address Book Data Open a document in an application and display the print dialog box How to display the pri...

Page 183: ...To specify multiple destinations repeat steps 3 and 4 Downloaded from ManualsPrinter com Manuals...

Page 184: ...Save Address Book Data NOTE You cannot use the Address Book if you do not have permission to access the folder where the Address Book is saved Log on as a user who has permission to access the folder...

Page 185: ...layed in Address Book Open the printer folder Displaying the Printer Folder Right click your fax icon and click Printing preferences Click the Edit Address Book tab Export Exporting Address Book Data...

Page 186: ...ation click Help on the fax driver screen Specify the location to save the file the file name and the file format and then click Save For a CSV file specify the separators used in the file The Address...

Page 187: ...e an Address Book click New or if you want to copy the existing Address Book to the specified folder click Copy The Address Book is created or copied NOTE If an Address Book already exists in the fold...

Page 188: ...Downloaded from ManualsPrinter com Manuals...

Page 189: ...nting from a Computer Printing from USB Memory USB Print You can print JPEG and TIFF image files stored in a USB memory device by connecting it directly to the machine Using this function you can prin...

Page 190: ...e or version of the printer driver you are using the printer driver screens in this manual may differ from your screens If you are using the MF8580Cdw MF8550Cdn MF8540Cdn you can use the PCL5c and PCL...

Page 191: ...rint setting screens and specify the print settings as necessary Various Print Settings NOTE For the MF8580Cdw MF8550Cdn MF8540Cdn the default setting is for 2 sided printing Change the setting as nec...

Page 192: ...Server 2012 Display the charm bar to the right of the screen and tap or click Devices the machine you are using Print When you print in this way you can only use some of the print settings If the mes...

Page 193: ...lick See what s printing or double click the icon of the printer driver for the machine Select the document you want to cancel and click Document Cancel Click Yes Printing of the selected document is...

Page 194: ...nt to cancel Use Status Monitor to cancel Status Monitor Copy Print Job Job Status Select the document on the Copy Print Job Status screen Cancel Yes NOTE Several pages may be output after you cancel...

Page 195: ...ccurred Press Status Monitor Use to select Copy Print Job and press Check the print statuses or logs To check the print statuses 1 Select Job Status and press 2 Select the document whose status you wa...

Page 196: ...eled or there was some error Details Displays detailed information about the document selected from the list The displayed document name or user name may not reflect the actual document or user name N...

Page 197: ...dw MF8550Cdn MF8540Cdn Only Collating Printouts by Page Printing Multiple Pages onto One Sheet Printing Posters Printing Booklet MF8580Cdw MF8550Cdn MF8540Cdn Only Printing Borders Printing Dates and...

Page 198: ...tab Select the document size in Page Size Select the paper size in Output Size OK Specifying Print Ratio in Increments of 1 Basic Settings tab Select the Manual Scaling check box Enter the print ratio...

Page 199: ...LINKS Printing a Document Downloaded from ManualsPrinter com Manuals...

Page 200: ...n OK 1 sided 2 sided Booklet Printing Select 1 sided Printing or 2 sided Printing NOTE For Booklet Printing see Printing Booklet MF8580Cdw MF8550Cdn MF8540Cdn Only Binding Location Specify the positio...

Page 201: ...LINKS Printing a Document Printing Multiple Pages onto One Sheet Printing Booklet MF8580Cdw MF8550Cdn MF8540Cdn Only Downloaded from ManualsPrinter com Manuals...

Page 202: ...ts are grouped into complete sets in sequential page order For example if you are printing three copies of a five page document the printouts will be arranged in the following page order 1 2 3 4 5 1 2...

Page 203: ...e Order select the page distribution layout OK Page Layout Select the number of pages to print onto a single sheet from 1 on 1 to 16 on 1 For example to print 16 pages onto a single sheet select 16 on...

Page 204: ...mple Poster 2 x 2 OK There are four size settings Poster 1 x 2 Poster 2 x 2 Poster 3 x 3 and Poster 4 x 4 NOTE Poster size settings cannot be selected when 2 sided printing is enabled Select 1 sided P...

Page 205: ...Printing Select Booklet Printing NOTE For 1 sided Printing and 2 sided Printing see Switching 1 Sided and 2 Sided Printing MF8580Cdw MF8550Cdn MF8540Cdn Only Booklet The screen below is displayed Boo...

Page 206: ...Gutter check box and specify the margin width in Booklet Gutter LINKS Printing a Document Downloaded from ManualsPrinter com Manuals...

Page 207: ...gins of printouts Page Setup tab Click Page Options Select the border type in Edging OK OK Edging Select the border type Preview Displays a preview with the selected border LINKS Printing a Document P...

Page 208: ...the print date Print User Name Specify the position to print the user name logon name for the computer used to print the document Print Page Number Specify the position to print the page number Chang...

Page 209: ...k box to display the list of the watermarks in the Watermark Name drop down list Select a watermark from the menu Edit Watermark Displays the screen to create or edit watermarks Add Click to create a...

Page 210: ...LINKS Printing a Document Printing Borders Printing Dates and Page Numbers Downloaded from ManualsPrinter com Manuals...

Page 211: ...the color mode is automatically switched page by page To Specify the Detailed Color Settings You can also specify the detailed color settings such as color adjustment and color matching Quality tab S...

Page 212: ...LINKS Printing a Document NOTE For more information click Help on the printer driver screen Downloaded from ManualsPrinter com Manuals...

Page 213: ...a paper source has been selected it turns purple on the illustration of the machine displayed on your computer screen Printing Specific Pages onto Different Paper You can print specific pages of a doc...

Page 214: ...ast Also specify which paper should be used for the cover and the body pages You can select this option when you select Booklet Printing in 1 sided 2 sided Booklet Printing in the Basic Settings tab P...

Page 215: ...l print quality General A versatile option that is suitable when printing most documents Publications Suitable when printing documents that have a mix of photo images charts and graphs Graphics Suitab...

Page 216: ...Select the document type for which you want to enable the toner save setting Advanced Settings A screen with settings is displayed Click Toner Save and select On from the drop down list on the bottom...

Page 217: ...ent in an application and display the print dialog box How to display the print dialog box differs for each application For more information see the instruction manual for the application you are usin...

Page 218: ...nt Preview Displays a preview of the document to be printed Document List Print Settings Click the Document List tab to display the documents added in steps 1 to 4 You can remove documents by selectin...

Page 219: ...lable than when using the ordinary printing method On the Document Name list select the combined document print job you want to print and click Printing starts For instructions on how to cancel printi...

Page 220: ...verride Select Off or On Off Does not perform paper size substitution Printing stops and an error message is displayed when the machine runs out of the paper that has been specified On Performs paper...

Page 221: ...nted until the correct PIN is entered on the operation panel of the machine This function is called Secure Print and the document that is protected by a PIN is called a secured document Using Secure P...

Page 222: ...printer folder Displaying the Printer Folder Right click your printer icon and click Printer properties or Properties Click the Device Settings tab and make sure that the Allow Use of Secured Print ch...

Page 223: ...pplication For more information see the instruction manual for the application you are using Select the printer driver for the machine and click Preferences or Properties Select Secured Print in Outpu...

Page 224: ...ter up to 32 alphanumeric characters for a new document name User Name If you specified the user name in step 3 The specified user name is displayed If you did not specify the user name in step 3 The...

Page 225: ...rint Memory Usage You can change the valid time period for secured documents Changing the Valid Time Period for Secured Documents Press NOTE You cannot proceed to the next step if the Remote Scanner s...

Page 226: ...Settings and press Select On and press NOTE Disabling Secure Print Select Off press and restart the machine Specify how long the machine holds secured documents and press Apply Use or the numeric key...

Page 227: ...n the printer driver screen and you can skip the operations to specify the print settings and print immediately Register the combination of the 2 on 1 and 2 sided Printing settings as a Profile and se...

Page 228: ...register as a profile and click Add Click the Basic Settings Page Setup Finishing Paper Source or Quality tabs to specify the print settings on each screen as necessary Various Print Settings Enter a...

Page 229: ...ttings of the selected profile You can change the settings of a selected profile In addition the changed settings can be registered as another profile LINKS Printing a Document Downloaded from Manuals...

Page 230: ...printer driver screen and you can eliminate the need to configure the same settings every time you make prints IMPORTANT To perform the following procedure log on to your computer with an administrat...

Page 231: ...FAT32 memory capacity up to 32 GB IMPORTANT Do not use non standard USB memory devices You may not be able to print the images properly in some USB memory devices Do not connect anything other than a...

Page 232: ...Back or NOTE Folders and files lower than the third directory are not displayed When you move to another folder the previous file selections will be cleared To select all files 1 Press All Items 2 Se...

Page 233: ...hod and press 3 Select the display method and press Details Displays file names and dates NOTE You can set whether to display abbreviated file names File Name Display Format Images Displays previews T...

Page 234: ...me Descending files are sorted based on the modification dates and time of the files Specify the number of copies from 1 to 99 Use or the numeric keys to enter a quantity and press Apply Select the pa...

Page 235: ...s are opened horizontally when bound Calendar Type Prints images in such a way that the printed pages are opened vertically when bound NOTE 2 Sided may not be available with some sizes or types of pap...

Page 236: ...clearly You can adjust the brightness of printouts Use to adjust the brightness and press Apply Prints images darker Prints images brighter NOTE You can adjust the brightness of TIFF files only when...

Page 237: ...press 4 Select Remove Memory Media and press Wait until the message The memory media can be safely removed is displayed 5 Disconnect the USB memory device TIPS If you always want to print with the sa...

Page 238: ...hat you perform frequently you can eliminate the need to specify the same settings every time you make prints Memory Media Print Settings Change Default Settings Select the setting Change the default...

Page 239: ...ecting a printer directly to the Web For example if you want to print an e mail or files that are attached to an e mail you can print just by using Gmail for mobile You will find your printouts when y...

Page 240: ...Department ID Management is enabled make sure that the machine is configured to enable printing from a computer even when no Department ID and PIN are entered Blocking Jobs When Department ID Is Unkn...

Page 241: ...Print Click Edit select the Use Cloud Printing check box click OK and then restart the machine To reregister the machine To reregister the machine if the owner of the machine has changed or for other...

Page 242: ...Follow the on screen instructions to register the machine LINKS Printing with Google Cloud Print 6 Downloaded from ManualsPrinter com Manuals...

Page 243: ...ed MF8580Cdw MF8550Cdn MF8540Cdn only Specify whether to make 1 sided or 2 sided printouts Binding Location Specify the position to bind the printouts opening horizontally or vertically with a binding...

Page 244: ...g Wireless LAN Settings and Information MF8580Cdw MF8280Cw Only From the application on your Apple device tap to display the menu options From the drop down list tap Print Select this machine from Pri...

Page 245: ...h are displayed Select this machine in this step Specify the print settings as necessary Presets Specify the print settings by selecting a preset setting from the drop down list Copies Specify the num...

Page 246: ...e is configured to enable printing from a computer even when no department ID and password are entered Blocking Jobs When Department ID Is Unknown You can register information including the name of th...

Page 247: ...ter Name and Location are reflected in the following settings respectively Printer Name can also be set in mDNS Name IPv4 Settings Location can also be set in Location Device Information Settings Rest...

Page 248: ...r iPad iPhone iPod touch Macintosh Mac OS and OS X are trademarks of Apple Inc registered in the U S and other countries AirPrint and the AirPrint logo are trademarks of Apple Inc Downloaded from Manu...

Page 249: ...system and the version of the scanner driver or applications you are using the screens in this manual may differ from your screens Scanning from the Machine You can scan and save documents to your com...

Page 250: ...y Register by following the procedure below This procedure is not required if the machine and your computer are connected via USB IMPORTANT The scan function is not available if the machine and your c...

Page 251: ...uter and press This screen is not displayed if only a computer is connected to the machine via USB Select the scan type Scan type Color Resolution File format Color Scan Color 300 dpi PDF searchable H...

Page 252: ...ine more easily If you have regularly used preferences such as scanning in color or black and white or a pre determined computer where scanned documents will be saved specifying these settings each ti...

Page 253: ...red folders You can accomplish these functions directly from the machine Scanning Documents Directly to USB Memory Sending Documents as E mails Directly from the Machine MF8580Cdw MF8550Cdn MF8540Cdn...

Page 254: ...ss Use to select Scan Settings and press Select Shortcut Key Settings Register Select Scan PC1 or Scan PC2 and press Select the key to which you want to register settings Select the type of connection...

Page 255: ...ter Documents are scanned in black and white only with no intermediate shades of gray NOTE To change settings You can change settings from MF Toolbox Configuring Scan Settings in MF Toolbox Checking t...

Page 256: ...ed data is saved to the Pictures or My Pictures folder A subfolder named with the scanning date is created and the data is saved to that folder To change the save destination see Configuring Storing S...

Page 257: ...h the machine that enables you to scan documents or images to a computer You can forward the scanned data to a specified application or attach it to an e mail message Scanning Using an Application You...

Page 258: ...y attach it to an e mail later OCR Characters in the document are extracted as text data through OCR optical character recognition processing You can edit the extracted data by using an OCR software S...

Page 259: ...dark or the color tone is different from that in the original you can configure advanced scan settings with ScanGear MF Place the document again select the Display the Scanner Driver check box on the...

Page 260: ...f Settings check box If you selected PDF in step 1 select the Confirm the Scanned Image check box Click Start Scanning starts To cancel click Cancel The scanned images are displayed as thumbnails on t...

Page 261: ...existing PDF file to which you want to add the newly scanned document data The data is added to the existing file as additional pages Click Save or Forward The scanned data is saved to a folder on a...

Page 262: ...using the operation panel of the machine MF Toolbox starts You can specify whether you want to automatically close the MF Toolbox screen when you finish scanning LINKS Configuring Scan Settings in MF...

Page 263: ...xternal Applications to Forward Scanned Data Configure the scan settings such as the original document size color mode and resolution Select Source Select a setting based on whether you place your doc...

Page 264: ...ng print material is reduced It takes more time to scan when using this setting than when using Color Upper Limit of Attached File This item is displayed when Mail is selected for the type of scan Sca...

Page 265: ...is converted into a TIFF image PDF A PDF file is created If you scan a multi page document these pages are merged into one PDF file PDF Single Page A one page PDF file is created for each page of the...

Page 266: ...ed Image to is switched to Create PDF File Based On In this case specify an existing PDF file to which you want to add the newly scanned document data The data is added to the existing file as additio...

Page 267: ...ing its icon here if it is not an e mail application NOTE Supported e mail applications Microsoft Outlook Express Microsoft Outlook Microsoft Exchange EUDORA Netscape Messenger Windows Mail Becky Ver...

Page 268: ...cond or subsequent documents may not be scanned or an error message may be displayed depending on the application In such a case place and scan one document at a time Press Use to select Remote Scanne...

Page 269: ...Configuring Scan Settings in ScanGear MF Downloaded from ManualsPrinter com Manuals...

Page 270: ...Scanning Using MF Toolbox Starting from an application You can use ScanGear MF to load the scanned image into Adobe Photoshop Microsoft Office Word or other image processing and word processing applic...

Page 271: ...ou want to scan You can specify up to ten areas Click Scan to scan the areas in the cropping frames as separate images Clear Crop Frame Clears the selected cropping frame Left Rotate Right Rotate Rota...

Page 272: ...t A4 and Print 300dpi for Select Purpose Click to switch between the portrait and landscape orientation This button is not available when Flexible is selected If you select Add Delete you can add new...

Page 273: ...glass and click Preview a preview image is displayed You can specify the area you want to scan and check the effects of image adjustments on the preview image Operating Preview Images Clear Clears th...

Page 274: ...heck the details that are difficult to see with To return the image to its original size click this button again Specifying Settings for Documents and Color Mode Original Input Method Select a setting...

Page 275: ...n and Image Size Output Resolution Select the resolution of the scanned image that suits your intended use If documents are placed in the feeder the maximum resolution is 300 dpi NOTE About the output...

Page 276: ...ith the set Output Resolution and Output Size Adjusting Image Quality Auto Tone Automatically adjusts the color tone of the image Reduce Dust and Scratches Makes dust or scratches on the document less...

Page 277: ...hat the brightness balance of the original image is automatically adjusted with the specified part being the average Likewise you can also adjust the balance with the brightness of the medium tone bei...

Page 278: ...erence between the light and dark parts of the image Invert the Negative Positive Image Inverts the light and dark parts of the image Final Review The results of all adjustments made to the brightness...

Page 279: ...ayed on the preview image Execute Auto Cropping on Previewed Images Auto Crop is performed based on the scanned document Display the Last Frame on Previewed Images Auto Crop is not performed and the m...

Page 280: ...Color Mode Specifying Settings for Documents and Color Mode NOTE If Color Matching is enabled the Fading Correction Adjusting Image Quality setting and the buttons for brightness and color settings A...

Page 281: ...Completed The specified sound file is played when scanning is complete Test Scanner You can check whether the scan function of the machine is working properly When the Scanner Diagnostics screen opens...

Page 282: ...ghtness or color Adjusting Brightness and Color Select settings to register as necessary Select Add Delete in the drop down list The Add Delete Tone Curve Settings or Add Delete Threshold Settings scr...

Page 283: ...LINKS Configuring Scan Settings in Simple Mode Scanning Using MF Toolbox Scanning Using an Application Downloaded from ManualsPrinter com Manuals...

Page 284: ...documents into PDF files and send them directly from the machine as e mail attachments You can work more efficiently because this feature eliminates the need to use your computer to send scanned docum...

Page 285: ...ion cable Do not use USB memory devices with special functions such as built in security functions NOTE The USB memory port of the machine supports USB 2 0 If a folder in a USB memory device has many...

Page 286: ...folder becomes full of 100 files File Name File names from SCAN0000 XXX to SCAN9999 XXX are given to the scanned data files XXX is the extension for the file format such as JPG For the first two nume...

Page 287: ...Downloaded from ManualsPrinter com Manuals...

Page 288: ...d hold to delete all the input characters at once To make it easier to specify destinations by using other methods such as the Address Book see Specifying Destinations E mail Shared Folder MF8580Cdw M...

Page 289: ...ult The body is not set by default Enter it as necessary Without the body text only scanned documents are sent The reply to address is not set by default If you want to display the reply to address di...

Page 290: ...s 1 Select Reply To and press 2 Select Specify from Address Book and press 3 Select a reply to address from the Address Book and press For instructions on how to use the Address Book see Specifying fr...

Page 291: ...ents E mail Shared Folder MF8580Cdw MF8550Cdn MF8540Cdn Only Checking Log for Sent Documents E mail Shared Folder MF8580Cdw MF8550Cdn MF8540Cdn Only When scanning is complete follow the procedures bel...

Page 292: ...tings Specifying Detailed Settings If you select JPEG in File Format only one page can be scanned when the document is placed on the platen glass To scan multiple documents at a time place them in the...

Page 293: ...E mail Shared Folder MF8580Cdw MF8550Cdn MF8540Cdn Only Checking Log for Sent Documents E mail Shared Folder MF8580Cdw MF8550Cdn MF8540Cdn Only When scanning is complete follow the procedures below e...

Page 294: ...l If the screen displays a list of documents when is pressed Documents have been scanned and are waiting to be processed Use to select the document to cancel LINKS Sending Documents as E mails Directl...

Page 295: ...scanned documents as well as the basic settings such as specifying the document orientation or scanning size Specifying a Scanning Size Selecting a File Format Adjusting Density Specifying Orientatio...

Page 296: ...the USB memory device Scan Size Select the document size LINKS Scanning Documents Directly to USB Memory Sending Documents as E mails Directly from the Machine MF8580Cdw MF8550Cdn MF8540Cdn Only Savi...

Page 297: ...e resolutions of each file format see Specifications for Scanning to Shared Folders MF8580Cdw MF8550Cdn MF8540Cdn Only Detailed Settings for PDF Compact Scan Settings Output File Image Settings PDF Co...

Page 298: ...tly to USB Memory Sending Documents as E mails Directly from the Machine MF8580Cdw MF8550Cdn MF8540Cdn Only Saving Documents Directly to a Shared Folder MF8580Cdw MF8550Cdn MF8540Cdn Only Downloaded f...

Page 299: ...ry device Density Adjust the density Apply Decreases the density Increases the density LINKS Scanning Documents Directly to USB Memory Sending Documents as E mails Directly from the Machine MF8580Cdw...

Page 300: ...ent orientation Portrait Select for documents with portrait orientation Landscape Select for documents with landscape orientation LINKS Scanning Documents Directly to USB Memory Sending Documents as E...

Page 301: ...itable when scanning documents that only contain text Text Photo Suitable when scanning documents that contain both text and photos Photo Suitable when scanning documents that contain printed photos s...

Page 302: ...ory device 2 Sided Original Select Book Type or Calendar Type Book Type Select for documents whose images on the front and back sides face the same direction Calendar Type Select for documents whose i...

Page 303: ...Apply Decreases the sharpness resulting in a softer image Example If you want to improve the appearance of magazine photos Increases the image sharpness Example If you want to sharpen text and lines w...

Page 304: ...Size Specify the setting Small Memory Priority The data size is highly compressed and reduced but the image quality becomes low Standard The compression ratio and the image quality are adjusted to an...

Page 305: ...h brightness true to the original documents NOTE For the gamma value of a monitor display see the instruction manual included with the display Scan Settings Output File Image Settings YCbCr TX Gamma V...

Page 306: ...fied using the Address Book or an LDAP server To specify destinations as Cc or Bcc addresses you need to use the Address Book When specifying destinations for shared folders You cannot specify destina...

Page 307: ...ok or an LDAP server To specify destinations as Cc or Bcc addresses you need to use the Address Book Specifying from Address Book Specifying Destinations in an LDAP Server E mail Press Use to select E...

Page 308: ...ared Folder as a Save Location Registering Address Book from Remote UI MF8580Cdw MF8550Cdn MF8540Cdn MF8280Cw Only Press Use to select E Mail or Windows SMB and press If you select Windows SMB proceed...

Page 309: ...ions you can delete destinations as necessary 1 Select Confirm Edit Destination and press 2 Select a destination you want to delete and press 3 Press Clear Dest select Yes and press If you specified d...

Page 310: ...verything is correct select OK and press To specify another destination select Cancel press and enter a three digit number again Displaying Destinations in Address Book If you want to specify multiple...

Page 311: ...lder MF8580Cdw MF8550Cdn MF8540Cdn Only If you want to easily and quickly delete destinations without displaying a list of destinations Before selecting Confirm Edit Destination in step 1 you can pres...

Page 312: ...g OFF the machine or setting Restrict New Destinations to On deletes the past destinations and disables this feature Limiting Available Destinations NOTE When you specify a destination using this feat...

Page 313: ...lect the LDAP server you are using and press Select the search criteria and press Personal names fax numbers e mail addresses organization names and department names are available criteria for searchi...

Page 314: ...red in the LDAP server and press Apply Registering LDAP Servers MF8580Cdw MF8550Cdn MF8540Cdn MF8280Cw Only Select a destination and press Apply Up to 10 destinations can be specified To search for a...

Page 315: ...ct Yes and press NOTE If you want to easily and quickly delete destinations without displaying a list of destinations Before selecting Confirm Edit Destination in step 1 you can press to toggle the de...

Page 316: ...ult Settings Select the setting Change the default value of the selected item Apply Settings Select the item you want to set and change the default value E mail Scan Settings TX Function Settings Chan...

Page 317: ...cuments Directly to USB Memory Sending Documents as E mails Directly from the Machine MF8580Cdw MF8550Cdn MF8540Cdn Only Saving Documents Directly to a Shared Folder MF8580Cdw MF8550Cdn MF8540Cdn Only...

Page 318: ...Display Job Log Press Status Monitor Use to select TX Job and press Select Job Log and press A list of the documents that were sent is displayed Select the document whose detailed information you wan...

Page 319: ...network setup one step at a time Connecting to a Computer Viewing the Machine s Network Settings Connecting to a Network Viewing Network Settings Configuring or Preparing for Print PC Fax Scan Functi...

Page 320: ...is correctly connected to the network For more information see the instruction manuals for the devices you are using or contact the device manufacturers Make sure that the network settings have been c...

Page 321: ...ecessary This step is required when you want to assign a specific IP address to the machine or change the dynamic IP addressing protocol from the default DHCP Setting IP Addresses Downloaded from Manu...

Page 322: ...d to uninstall MF Drivers installed on your computer and then reinstall them MF Driver Installation Guide Press Use to select Network Settings and press If the logon screen appears enter the correct I...

Page 323: ...nect a LAN cable Connect the machine to a router by using a LAN cable Push the connector in until it clicks into place Wait approximately 2 minutes While you wait the IP address is set automatically N...

Page 324: ...low For the wireless security compatibility of your wireless router see the instruction manuals for your networking devices or contact your manufacturer 128 104 64 40 bit WEP WPA PSK TKIP AES CCMP WPA...

Page 325: ...ess Router Select this setup option if you need to manually set up the connection but want to complete the setup as easily as possible Setting Up Connection by Selecting a Wireless Router Manually Ent...

Page 326: ...to enable the wireless LAN message is displayed select Yes and press Read the message that is displayed and press Select WPS Push Button Mode and press Select Yes and press Press and hold the WPS butt...

Page 327: ...Signal strength is measured using RSSI Received Signal Strength Indication NOTE Reducing power consumption You can set the machine to enter Power Save Mode based on signals emitted from the wireless r...

Page 328: ...Settings and press If the logon screen appears enter the correct ID and PIN using the numeric keys and then press Logging on to the Machine Select Wireless LAN Settings and press If the Do you want t...

Page 329: ...n the machine connects to the device with the strongest signal Signal strength is measured using RSSI Received Signal Strength Indication NOTE Reducing power consumption You can set the machine to ent...

Page 330: ...the manual entry method Setting Up Connection by Specifying Detailed Settings Press Use to select Network Settings and press If the logon screen appears enter the correct ID and PIN using the numeric...

Page 331: ...splayed and approximately 2 seconds later the Wi Fi indicator lights up Wait approximately 2 minutes until the IP address settings of the machine are completed IMPORTANT Signal strength When more than...

Page 332: ...LINKS Connecting to a Wireless LAN MF8580Cdw MF8280Cw Only Downloaded from ManualsPrinter com Manuals...

Page 333: ...played select Yes and press Read the message that is displayed and press Select SSID Settings Enter Manually Enter the SSID that you have written down and press Apply Entering Text Specify the securit...

Page 334: ...ct Select WEP Key and press 7 Select the WEP key you have edited and press 1 Select WPA WPA2 PSK and press 2 Select an encryption method and press Auto Sets the machine to automatically select AES CCM...

Page 335: ...h When more than one wireless router is available for connection the machine connects to the device with the strongest signal Signal strength is measured using RSSI Received Signal Strength Indication...

Page 336: ...hentication Encryption When manually setting up a wireless connection by specifying detailed settings you need to specify security settings Check the following information Security types WEP WPA PSK W...

Page 337: ...the information that is displayed NOTE If wireless routers are not found Click Refresh If nothing happens check that the settings are correctly configured on the computer and the wireless router LINKS...

Page 338: ...es a unique network IP address Two versions of IP addresses are available IPv4 and IPv6 Configure these settings depending on the network environment To use IPv6 addresses you need to properly configu...

Page 339: ...lect to automatically assign an IP address via a protocol such as DHCP When Auto Acquire On is displayed automatic addressing is enabled Manually Acquire Select to configure the IP address settings by...

Page 340: ...achine wait for at least 10 seconds and turn it back ON NOTE Checking whether the settings are correct Make sure that the Remote UI screen can be displayed with your computer Starting Remote UI If a c...

Page 341: ...LINKS Setting IPv6 Addresses Viewing Network Settings Configuring WINS Downloaded from ManualsPrinter com Manuals...

Page 342: ...with devices beyond a router A link local address is automatically set when the IPv6 function of the machine is enabled Manual address 1 An address that is entered manually When using this address sp...

Page 343: ...ddress in the corresponding text boxes IP Address Enter an IPv6 address Addresses that start with ff or multicast address cannot be entered Prefix Length Enter a number that indicates how many bits ar...

Page 344: ...creen can be displayed with your computer by using the IPv6 address of the machine Starting Remote UI Using the operation panel IPv6 settings can also be accessed from IPv6 Settings LINKS Setting IPv4...

Page 345: ...before the machine starts communicating Setting a Wait Time for Connecting to a Network You can print a list of the current network settings User Data List System Manager Data List Status Monitor Net...

Page 346: ...SK information 1 Select Security Settings and press 2 View the current security settings and press If the security settings are not configured None is displayed 3 Select the setting to view and press...

Page 347: ...r perform the basic setup procedures including the printer driver installation MF Driver Installation Guide NOTE Printing protocols are rules for delivering document data created on a computer to the...

Page 348: ...ces on Devices NOTE To change protocols port numbers see Changing Port Numbers Start the Remote UI and log on in System Manager Mode Starting Remote UI Click Settings Registration Click Network Settin...

Page 349: ...nning Available for Windows Vista 7 8 WSD scanning enables you to scan documents to a computer without installing the scanner driver Select the check box to scan documents via WSD When not using WSD s...

Page 350: ...g up WSD network devices on Windows Vista 7 8 The WSD printer and scanner can be added from the printer folder Open the printer folder Displaying the Printer Folder click Add a device or Add a printer...

Page 351: ...settings on the computer IMPORTANT To perform the following procedure log on to your computer with an administrator account Open the printer folder Displaying the Printer Folder Right click your print...

Page 352: ...3 Click Auto Detect select the machine when it is detected and click Next NOTE If the machine is not detected Click Refresh If the problem persists click IP address or MAC address enter the IP addres...

Page 353: ...LINKS Setting Up Print Server Downloaded from ManualsPrinter com Manuals...

Page 354: ...system and the bit architecture 32 bit or 64 bit of the print server and client computers When implementing a print server in a domain environment consult your Network Administrator NOTE Using Departm...

Page 355: ...indows Server 2003 under Version Windows Vista 7 8 Server 2008 Server 2012 x64 under Processor NOTE If you do not know whether your Windows Vista 7 8 Server 2008 Server 2012 is a 32 bit or 64 bit oper...

Page 356: ...LINKS Printing from a Computer Double click the shared printer Follow the on screen instructions to install the drivers 2 3 Downloaded from ManualsPrinter com Manuals...

Page 357: ...n that is included with the machine will assist you with the required setup Set the necessary configuration depending on your network environment Scanning to E mail Configuring the Machine for Scannin...

Page 358: ...more information about the e mail server settings contact your Internet service provider or Network Administrator Make sure that the computer meets the following system requirements for the Send Funct...

Page 359: ...art the Send Function Setting Tool Using a Web browser Enter http the IP address of the machine sendsupport_login html in the address field of a Web browser and press the ENTER key Using the User Soft...

Page 360: ...hine and then click OK 6 Confirm the settings and click OK Click Start If the logon screen is displayed enter the appropriate ID and PIN in the corresponding text boxes and then click Logon Click Send...

Page 361: ...unauthorized users the machine supports SMTP authentication SMTP AUTH and POP before SMTP For more information about the required authentication method contact your Internet service provider or Networ...

Page 362: ...yption For more information about the required settings contact your Internet service provider or Network Administrator Start the Remote UI and log on in System Manager Mode Starting Remote UI Click S...

Page 363: ...y be sent to the address specified in E Mail Address Depending on the e mail service you are using these error notifications may eventually fill your mail box in the server to its capacity if you do n...

Page 364: ...e the SMTP or POP3 port setting Changing Port Numbers For more information contact your Internet service provider or Network Administrator LINKS Configuring the Machine for Scanning to E mail Configur...

Page 365: ...e set to the folder the user name and password information is also needed NOTE For instructions on how to create a new shared folder see Send Setting Guide included with the User Software CD ROM Make...

Page 366: ...of the shared folder by registering the folder to the Address Book The Send Function Setting Tool is helpful for users who want to complete the setup easily Start the Send Function Setting Tool Using...

Page 367: ...gain If the problem persists click Search by IP Address enter the IP address of the machine and then click OK 6 Confirm the settings and click OK Click Start If the logon screen is displayed enter the...

Page 368: ...registered Set a name that will be easy for you to find later in the Address Book Store Destination Settings Protocol The protocol that is used for sending scanned documents to a shared folder is disp...

Page 369: ...rd to Access text box Click Next Confirm the settings and click Register Restart the machine Turn OFF the machine wait for at least 10 seconds and turn it back ON LINKS Configuring the Machine for Sca...

Page 370: ...on the purpose of the network The machine has been designed to be compatible with as many network configurations as possible and it is equipped with a variety of technologies Consult your Network Admi...

Page 371: ...automatically or manually Configuring Ethernet settings automatically Select On and press The machine detects and automatically sets the communication mode and the Ethernet type that can be used Conf...

Page 372: ...LINKS Changing the Maximum Transmission Unit Setting a Wait Time for Connecting to a Network Downloaded from ManualsPrinter com Manuals...

Page 373: ...as necessary For more information contact your Network Administrator Press Use to select Network Settings and press If the logon screen appears enter the correct ID and PIN using the numeric keys and...

Page 374: ...y that network devices are connected or if you add a new device If this type of problem occurs set a wait time for connecting to the network Press Use to select Network Settings and press If the logon...

Page 375: ...gs as necessary Note that the procedures for configuring DNS are different for IPv4 and IPv6 Start the Remote UI and log on in System Manager Mode Starting Remote UI Click Settings Registration Click...

Page 376: ...address is changed When specifying the interval between updates enter the time in hours in the DNS Dynamic Update Interval text box mDNS Settings Use mDNS Adopted by Bonjour mDNS multicast DNS is a p...

Page 377: ...namic Update Select the check box to dynamically update the DNS records whenever the machine s IP address is changed To specify the type s of addresses you want to register to the DNS server select th...

Page 378: ...LINKS Setting IPv4 Address Setting IPv6 Addresses Viewing Network Settings Downloaded from ManualsPrinter com Manuals...

Page 379: ...tifying network connected computers as well as for file sharing and other network services Most computers use the computer name as the NetBIOS name Workgroup Name Workgroup name is a name for grouping...

Page 380: ...o 15 alphanumeric characters for the name of the workgroup that the machine belongs to IMPORTANT NetBIOS names or workgroup names that start with an asterisk cannot be registered to a WINS server Rest...

Page 381: ...to specify WINS server settings NetBIOS name and workgroup name are required to be set Configuring SMB The function is not available in an IPv6 network Start the Remote UI and log on in System Manager...

Page 382: ...in the WINS Server Address text box Scope ID If the network is divided into several groups with scope IDs identifiers for groups of devices in the network enter up to 63 alphanumeric characters for t...

Page 383: ...servers via the Remote UI NOTE LDAP servers that are supported by the machine are Windows Server 2003 Server 2008 Server 2012 Active Directory The machine communicates with LDAP servers using LDAPv3 U...

Page 384: ...ard lookup select Do Not Use or Use for Login Information If you select Use Security Authentication make sure that the DNS server supports reverse lookup Position to Start Search Specify the node in t...

Page 385: ...the user name in the form domain name user name example domain1 user1 When Use Security Authentication is selected enter the user name only example user1 Set Change Password To specify or change the p...

Page 386: ...based on Coordinated Universal Time UTC so specify the time zone setting before configuring SNTP Date Time Settings SNTP settings can be specified via the Remote UI NOTE The SNTP of the machine suppor...

Page 387: ...1 to 48 hours Click OK Restart the machine Turn OFF the machine wait for at least 10 seconds and turn it back ON NOTE Testing communication with the NTP SNTP server You can test whether the machine is...

Page 388: ...network will be vulnerable to attacks If you want to ensure network security disable SNMPv1 and use SNMPv3 SNMPv3 With SNMPv3 you can implement network device management that is protected by robust s...

Page 389: ...t the check box to specify a community name If you do not need to specify a community name clear the check box Community Name Enter up to 32 alphanumeric characters for the name of the community MIB A...

Page 390: ...ccess Permission Select Read Write or Read Only for the access privileges to MIB objects Read Write Permits both viewing and changing the values of MIB objects Read Only Permits only viewing the value...

Page 391: ...s been selected for Security Settings Authentication Algorithm Click the MD5 or SHA1 radio button for the algorithm that corresponds to your network environment Encryption Algorithm Click the DES or A...

Page 392: ...rom SNMP Settings Enabling Both SNMPv1 and SNMPv3 If both versions of SNMP are enabled it is recommended that MIB access permission in SNMPv1 be set to Read Only MIB access permission can be set indep...

Page 393: ...such a network imageWARE searches the network for the machine by using protocols such as Service Location Protocol SLP to gather information from the machine including the power status SLP settings ca...

Page 394: ...RE multicast discovery packets and enable monitoring by imageWARE Scope Name To include the machine into a specific scope enter up to 32 characters for the scope name 3 Click OK NOTE To change the por...

Page 395: ...communication during sleep mode and reduce the total power consumption Port Number Change the port number for this function according to the network environment Number of Routers to Traverse Specify...

Page 396: ...n your confidential information is leaked To counter these risks the machine is equipped with a variety of security functions Set the necessary configuration depending on your network environment Esta...

Page 397: ...Access Prevent unauthorized third parties from accessing and using the machine You can implement multiple security measures such as managing user access privileges using firewalls and changing port n...

Page 398: ...ine and enhance security System Manager ID System Manager ID is an account with full access privileges If you specify a System Manager ID you need to log on to the machine using the System Manager ID...

Page 399: ...a number of up to seven digits using the numeric keys and press Apply When PIN Confirm is displayed enter the PIN once again to confirm NOTE You cannot register an ID or PIN that consists only of zero...

Page 400: ...ss Network Settings or System Management Settings when only the System Manager ID is enabled the following logon screen is displayed LINKS Setting Access Privileges Setting the Department ID Managemen...

Page 401: ...Department ID Management for operations from a computer such as printing and PC faxing Registering Editing Department ID and PIN Enabling the Department ID Management Setting the Department ID Managem...

Page 402: ...registered Department ID 1 Click the corresponding text link under Department ID to edit 2 Change the settings as necessary and click OK NOTE Deleting a Department ID Click Delete on the right of the...

Page 403: ...nt Jobs with Unknown IDs Allow Scan Jobs with Unknown IDs Allow Black White Copy Jobs check boxes see Blocking Jobs When Department ID Is Unknown NOTE Using the operation panel If you only want to ena...

Page 404: ...icon and click Printer properties or Properties Click the Device Settings tab and specify the required settings 1 Select the Use Department ID Management check box and click Settings on the right of...

Page 405: ...e machine When you try to print or fax from a computer when Department ID Management is enabled the following pop up screen is displayed unless the Confirm Department ID PIN When Printing Confirm Depa...

Page 406: ...entering an ID and PIN Allow Scan Jobs with Unknown IDs If the check box is selected you can select Computer or Remote Scanner on the main screen and scan documents into a computer anytime using Clea...

Page 407: ...ies can access computers and other communication devices that are connected to a network To prevent this unauthorized access specify the settings for packet filter a feature that restricts communicati...

Page 408: ...IP addresses can be specified for both IPv4 and IPv6 The packet filters described in this section control communications over TCP UDP and ICMP Start the Remote UI and log on in System Manager Mode St...

Page 409: ...es whose IP addresses are entered in Exception Addresses Communications with other devices are prohibited Allow Select to block communication packets when they are sent to or received from devices who...

Page 410: ...ns Select an IP address and click Delete 3 Click OK Restart the machine Turn OFF the machine wait for at least 10 seconds and turn it back ON NOTE You can enable or disable the IP Address Filter setti...

Page 411: ...m Manager Mode Starting Remote UI Click Settings Registration Click Security Settings MAC Address Filter Click Edit for a filter type Outbound Filter Select to restrict sending data from the machine t...

Page 412: ...Exception Addresses Communications with other devices are permitted 2 Specify address exceptions Enter the MAC address in the Address to Register text box and click Add You do not need to delimit the...

Page 413: ...LINKS Specifying IP Addresses for Firewall Rules Downloaded from ManualsPrinter com Manuals...

Page 414: ...AP Servers MF8580Cdw MF8550Cdn MF8540Cdn MF8280Cw Only Press Use to select Network Settings and press If the logon screen appears enter the correct ID and PIN using the numeric keys and then press Log...

Page 415: ...networks but also blocks unauthorized access and consolidates anti virus protection for enhanced security When you use Google Cloud Print to print over the Internet you can enhance security by setting...

Page 416: ...entication To enable authentication by the proxy server select the check box and enter up to 24 alphanumeric characters for the user name in the User Name text box Set Change Password To set or change...

Page 417: ...by partially or completely disabling these functions Restricting Access to Address Book and Sending Functions Restricting Access to Address Book and Sending Functions MF8580Cdw MF8550Cdn MF8540Cdn MF...

Page 418: ...able fax and e mail destinations to those registered in the Address Book or LDAP servers or by setting a PIN for the Address Book so that unauthorized users cannot add or edit Address Book entries You...

Page 419: ...gits using numeric keys and press Apply When PIN Confirm is displayed enter the PIN once again to confirm NOTE You cannot set a PIN that consists only of zeros such as 00 or 0000000 To disable the PIN...

Page 420: ...the logon screen appears enter the correct ID and PIN using the numeric keys and then press Logging on to the Machine Select Restrict TX Function Restrict New Destinations Select On and press Off Can...

Page 421: ...and PIN using the numeric keys and then press Logging on to the Machine Select Restrict TX Function Allow Fax Driver TX Select Off and press Off Disables PC faxing On Enables PC faxing Press LINKS Se...

Page 422: ...orrect ID and PIN using the numeric keys and then press Logging on to the Machine Select Restrict TX Function Restrict Resending from Log Select On and press Off Enables use of previously used destina...

Page 423: ...oes not display the screen for confirming the fax number On Displays the screen for confirming the fax number Press When using coded dial numbers to specify destinations you need to remember whose des...

Page 424: ...ys the details of the entered coded dial number Press LINKS Registering Destinations Specifying from Address Book Fax Specifying from Address Book Registering Address Book from Remote UI MF8580Cdw MF8...

Page 425: ...to the Machine Select Restrict TX Function Restrict Sequential Broadcast Select Confirm Sequential Broadcast or Reject Sequential Broadcast and press Off Enables sequential broadcasting Confirm Seque...

Page 426: ...o select System Management Settings and press If the logon screen appears enter the correct ID and PIN using the numeric keys and then press Logging on to the Machine Select USB Device On Off and pres...

Page 427: ...t Settings and press If the logon screen appears enter the correct ID and PIN using the numeric keys and then press Logging on to the Machine Select Memory Media Print On Off and press Select Off and...

Page 428: ...rinting and printing with Google Cloud Print Press Use to select Network Settings and press If the logon screen appears enter the correct ID and PIN using the numeric keys and then press Logging on to...

Page 429: ...k of having your machine controlled remotely over the network by malicious third parties Press Use to select System Management Settings and press If the logon screen appears enter the correct ID and P...

Page 430: ...r an e mail application IPSec encrypts the whole or payloads of IP packets This enables IPSec to offer a more versatile security system than SSL Configuring IPSec Settings IEEE 802 1X Authentication I...

Page 431: ...IEEE 802 1X authentication TTLS PEAP or SNMPv3 To use SSL for the Remote UI you need to set a key pair and enable the SSL function Generate or install the key pair for SSL before enabling SSL Configur...

Page 432: ...Pairs and Digital Certificates Enable SSL for the Remote UI 1 Click Security Settings Remote UI Settings 2 Click Edit 3 Select the Use SSL check box and click OK Restart the machine Turn OFF the mach...

Page 433: ...MF8550Cdn MF8540Cdn only If the SMTP server and the POP3 server support SSL you can enable SSL for communication with these servers Configuring Advanced E mail Settings For more information about the...

Page 434: ...DHCPv6 at the same time IPSec is unavailable in networks in which NAT or IP masquerade is implemented Using IPSec with IP address filter IP address filter settings are applied before the IPSec policie...

Page 435: ...meric characters can be shared with the other devices Enable SSL for the Remote UI before specifying this authentication method Enabling SSL Encrypted Communication for the Remote UI Digital Signature...

Page 436: ...e steps below clear the Receive Non Policy Packets check box Click Register New Policy Specify the Policy Settings 1 In the Policy Name text box enter up to 24 alphanumeric characters for a name that...

Page 437: ...es of the other devices IPv4 Manual Settings Select to specify a single IPv4 address or a range of IPv4 addresses to apply IPSec Enter the IPv4 address or the range in the Addresses to Set Manually te...

Page 438: ...uthentication Method Select Pre Shared Key Method or Digital Signature Method for the method used when authenticating the machine You need to enable SSL for the Remote UI before selecting Pre Shared K...

Page 439: ...ryption DH Group settings Specify the IPSec Network Settings Use PFS Select the check box to enable Perfect Forward Secrecy PFS for IPSec session keys Enabling PFS enhances the security while increasi...

Page 440: ...ine supports transport mode in which the payloads of IP packets are encrypted Tunnel mode in which whole IP packets headers and payloads are encapsulated is not available Click OK If you need to regis...

Page 441: ...er by mutually verifying their certificates A key pair issued by a certification authority CA is required for the client authentication when authenticating the machine For the server authentication a...

Page 442: ...enable IEEE 802 1X authentication Login Name Enter up to 24 alphanumeric characters for a name EAP identity that is used for identifying the user Setting TLS 1 Select the Use TLS check box and click K...

Page 443: ...TLS PEAP 1 Select the Use TTLS or Use PEAP check box NOTE Internal protocol for TTLS You can select MSCHAPv2 or PAP If you want to use PAP click the PAP radio button 2 Click Change User Name Password...

Page 444: ...acters for the new password both in the Password and Confirm text boxes Click OK Restart the machine Turn OFF the machine wait for at least 10 seconds and turn it back ON NOTE You can enable or disabl...

Page 445: ...ta It is extremely difficult for third parties to abuse digital certificates A digital certificate that contains a public key of a certification authority CA is referred to as a CA certificate CA cert...

Page 446: ...ing Remote UI Click Settings Registration Click Security Settings Key and Certificate Settings Click Generate Key NOTE Deleting a registered key pair Click Delete on the right of the key pair you want...

Page 447: ...han Validity Start Date YYYY MM DD cannot be set Country Region Click the Select Country Region radio button and select the country region from the drop down list You can also click the Enter Internet...

Page 448: ...rting Remote UI Click Settings Registration Click Security Settings Key and Certificate Settings for key pairs or CA Certificate Settings for CA certificates Click Register Key and Certificate or Regi...

Page 449: ...The key pair or CA certificate is installed in the machine Register the key pair or CA certificate Registering a key pair 1 Click Register on the right of the key pair you want to register 2 Enter th...

Page 450: ...ey Pairs Verifying Key Pairs and Digital Certificates Enabling SSL Encrypted Communication for the Remote UI Configuring IPSec Settings Configuring IEEE 802 1X Authentication Downloaded from ManualsPr...

Page 451: ...UI and log on in System Manager Mode Starting Remote UI Click Settings Registration Click Security Settings Key and Certificate Settings for key pairs or CA Certificate Settings for CA certificates C...

Page 452: ...The result from verifying the certificate is displayed as shown below LINKS Generating Key Pairs Using CA issued Key Pairs and Digital Certificates Downloaded from ManualsPrinter com Manuals...

Page 453: ...e Machine Status Setting Up Menu Options from Remote UI Saving Loading Registered Data Registering Address Book from Remote UI MF8580Cdw MF8550Cdn MF8540Cdn MF8280Cw Only Basics of the Remote UI Start...

Page 454: ...Remote UI When the Department ID Management is disabled Select System Manager Mode or End User Mode System Manager Mode You can perform all the Remote UI operations and settings Enter the appropriate...

Page 455: ...Downloaded from ManualsPrinter com Manuals...

Page 456: ...Consumables Information Displays paper information and the remaining amount of toner Support Link Displays the support link specified in Device Information under System Management Status Monitor Canc...

Page 457: ...he page is scrolled down To Portal Returns to Portal Page main page Menu Click an item the content is displayed in the right page Setting Up Menu Options from Remote UI Breadcrumb Trail Indicates the...

Page 458: ...rumb Trail Indicates the series of pages you opened to display the currently displayed page You can check what page is currently displayed List Number Specifies the range of coded dial numbers display...

Page 459: ...job by clicking Cancel NOTE Regardless of the Department ID Management setting all the print documents currently printing and waiting to be printed will be listed If you entered your user name when yo...

Page 460: ...int speed and the Secure Print memory capacity are displayed Log on to the Remote UI Starting Remote UI Status Monitor Cancel Device Features Information about the machine and the system manager is di...

Page 461: ...ation The total number of pages that have been printed by the copy print and fax functions is displayed Log on to the Remote UI Starting Remote UI Status Monitor Cancel Check Counter LINKS Remote UI S...

Page 462: ...Remote UI Starting Remote UI Click Settings Registration Click the menu item you want to set For more information about the settings menu see each item below Menu items Referents Preferences Paper Se...

Page 463: ...gement Settings Department ID Management Setting the Department ID Management Network Settings Network Security Settings Security Communication Management Settings Forwarding Settings System Managemen...

Page 464: ...exported from the machine If using the same model you can import export menu options and other data except the Address Book Saving Loading Address Book MF8580Cdw MF8550Cdn MF8540Cdn MF8280Cw Only Sav...

Page 465: ...chine and vice versa It may not be available depending on the model Saving Address Book Loading Address Book Start the Remote UI and log on in System Manager Mode Starting Remote UI Click Settings Reg...

Page 466: ...s Do not operate the Remote UI until the message The file name download has completed is displayed at the bottom of the screen IMPORTANT The Address Book data currently registered is overwritten when...

Page 467: ...file or enter the path to the file in File Path the file name with the location where the file is saved Click OK The specified Address Book data will be imported into the machine LINKS Remote UI Scre...

Page 468: ...gs Date Time Settings Fax Setup Guide Fax Settings Shortcut Key Settings Scan Settings Cloud Print Settings Settings Registration Network Settings User Settings 1 User Settings 2 User Settings 3 Setti...

Page 469: ...ot operate until the process is complete The screen remains the same during the export process Do not operate the Remote UI until the message The file name download has completed is displayed at the b...

Page 470: ...specify the file to be imported click Browse and select the file or enter the path to the file in File Path the file name with the location where the file is saved Click OK The specified setting data...

Page 471: ...Turn OFF the machine wait for at least 10 seconds and turn it back on LINKS Remote UI Screens Setting Menu List Downloaded from ManualsPrinter com Manuals...

Page 472: ...the enter PIN page is displayed The Address Book is protected by a PIN Enter the PIN and click OK Click Coded Dial You can also register destinations in Favorites In this case click Favorites instead...

Page 473: ...estination Type to Register and click OK Specify required settings and click OK LINKS Remote UI Screens Saving Loading Address Book MF8580Cdw MF8550Cdn MF8540Cdn MF8280Cw Only Address Book List MF8580...

Page 474: ...this machine You can adjust each of the settings in detail Access these settings by pressing TIPS You can print the setting menu in list form to check the current settings User Data List System Manag...

Page 475: ...80Cw Only Wired LAN Wireless LAN Specify settings for connecting the machine to a wireless LAN You can also view the current settings or specify the setting for saving power consumption WPS Push Butto...

Page 476: ...nt wireless LAN settings Viewing Network Settings MAC Address Wireless LAN Status Latest Error Information Channel SSID Settings Security Settings Power Save Mode Specify settings for using the machin...

Page 477: ...using DNS functions without DNS servers Configuring DNS Off On mDNS Name DHCP Option Settings Select whether to acquire the host name and whether to use the dynamic update function via the DHCP option...

Page 478: ...ich provides a NetBIOS name for IP address resolutions in a mixed network environment of NetBIOS and TCP IP Configuring WINS WINS Resolution Off On WINS Server Address 0 0 0 0 Scope ID LPD Print Setti...

Page 479: ...to 65535 HTTP 1 to 80 to 65535 POP3 1 to 110 to 65535 SMTP 1 to 25 to 65535 SNMP 1 to 161 to 65535 WSD Search 1 to 3702 to 65535 Multicast Discovery 1 to 427 to 65535 MTU Size Select the maximum size...

Page 480: ...port is used when printing faxing or scanning uses MF Toolbox and when browsing or specifying the machine settings over the network Off On Network Settings SNMP Settings SNMPv1 Settings Select Off or...

Page 481: ...thernet Settings Off Communication Mode Half Duplex Full Duplex Ethernet Type 10BASE T 100BASE TX On MAC Address Check the MAC address of the machine which is a number unique to each communication dev...

Page 482: ...ation panel or when a paper jam occurs Adjusting the Volume Fax Tone Select whether to make a dial tone while a fax is being sent You can also adjust the volume Off On Three Levels Ring Tone Select wh...

Page 483: ...h as when a user is trying to enter a number unavailable for a setting Off On Restock Supplies Tone Select whether the machine beeps when one of the toner cartridges is almost empty Off On Warning Ton...

Page 484: ...ct On to invert the display colors Select On if the display is hard to view even after the brightness was adjusted in Brightness Off On Millimeter Inch Entry Switch Select the unit of measurement Mill...

Page 485: ...the cursor to the right of the entered character Auto Manual Language Select the display language used for the display reports and lists English French Spanish German Italian Dutch Finnish Portuguese...

Page 486: ...e Remote UI screens English French Spanish German Italian Dutch Finnish Portuguese Norwegian Swedish Danish Czech Hungarian Russian Turkish Polish 2 Preferences Display Settings Remote UI Language Sel...

Page 487: ...fter Auto Reset Auto Sleep Time Auto Offline Time Specify date and time settings including the date format and the 12 or 24 hour clock display setting The date and time that are printed on each fax do...

Page 488: ...set in Current Date Time Settings are also changed accordingly UTC 12 00 to UTC 0 00 to UTC 12 00 NOTE UTC Coordinated Universal Time UTC is the primary time standard by which the world regulates cloc...

Page 489: ...ether to return the display to the default screen after the Auto Reset is performed If Default Function is selected the main screen of the function selected in Default Screen after Startup Restoration...

Page 490: ...ally becomes offline Specify the time period at which the machine becomes offline You can also set the machine to remain online 0 The machine remains online 1 to 5 to 60 min Set a timer to automatical...

Page 491: ...ection feature for the paper sources If automatic drawer selection is set to On when printing documents the machine automatically selects a paper source that is loaded with the appropriate paper size...

Page 492: ...e automatic drawer selection NOTE Select Other for functions such as printing reports and lists and printing images from a USB memory device Paper Sources Select the paper source for which you want to...

Page 493: ...ot need to flip over paper in the paper source whether 1 or 2 sided printing is selected NOTE If Print Side Priority is set for a paper source that is loaded with paper you cannot use for 2 sided prin...

Page 494: ...settings are used as the default settings of the copy function Changing Default Settings Number of Copies 1 to 99 Density Nine Levels Original Type Text Photo Map Speed Text Photo Map Text Photo Map Q...

Page 495: ...Yellow 17 Levels Magenta 17 Levels Cyan 17 Levels Black 17 Levels Downloaded from ManualsPrinter com Manuals...

Page 496: ...int Settings Fax Setup Guide Specify the basic settings for using the machine as a fax device Register Unit Telephone Number Register the fax number for the machine Registering the Fax Number and Unit...

Page 497: ...ecks are performed on both the sending and receiving devices Even when ECM is enabled errors may occur due to telephone line conditions It may take a longer time than usual to process data when ECM is...

Page 498: ...ed information Off On Print Position Inside Image Area Outside Image Area Mark Number as FAX TEL Fax Settings TX Function Settings Set Pause Time Specify the duration of pause Apply 1 Fax Settings TX...

Page 499: ...o process data when ECM is enabled because the error check and corrections are performed while the data is transmitted Incoming Ring Print Position Specifies the position to print the terminal ID info...

Page 500: ...ber by using the telephone This feature can save you the trouble of going all the way to the machine For instructions on how to use Remote Reception see Using a Telephone to Receive Faxes Remote Recep...

Page 501: ...izontal Vertical Only RX Page Footer Select whether to print information including date and time of reception and page numbers on the bottom of received faxes Off On 2 Fax Settings RX Print Settings P...

Page 502: ...use received documents are not stored in memory you need to ask the sender to resend the document Select to display on screen instructions for specifying settings including the fax number and the tele...

Page 503: ...lder You can register the sender name for e mails Change Default Settings Specify settings used for scanning documents to send as e mails or storing scanned documents in a shared folder The selected s...

Page 504: ...E Mail Register the sender name for e mails The registered name is displayed in e mails along with the e mail address If the sender name is not registered only the e mail address is displayed Specify...

Page 505: ...nt you are scanning when converting scanned documents into PDF Compact files Data Size Priority makes the compression ratio higher than normal to create smaller files with lower image quality On the o...

Page 506: ...nection Color Scan B W Scan Custom 1 Custom 2 Scan PC2 Off USB Connection Color Scan B W Scan Custom 1 Custom 2 Network Connection Color Scan B W Scan Custom 1 Custom 2 Confirm Destination Scan PC1 Sc...

Page 507: ...at Specify the USB Print settings The selected settings are used as the default settings of the USB Print function Changing Default USB Print Settings Number of Copies 1 to 99 Paper Multi Purpose Tray...

Page 508: ...e Short File Name Long File Name Memory Media Print Settings Default Display Settings Select Details or Images Details Displays file names and dates in list form Images Displays thumbnails for preview...

Page 509: ...at have similar names numbers such as 1 or 2 are added at the end of the file names Long File Name Displays a file name up to 20 characters NOTE The number of characters described above does not inclu...

Page 510: ...he printer drivers for the machine are not available Availability of settings All the printer settings described in this section except for Paper Size Override Paper Size Override are only available f...

Page 511: ...elect the default setting for the type of the paper to print on Plain 1 60 74 g m Plain 2 70 84 g m Plain 3 75 90 g m Recycled Color Heavy 1 86 119 g m Heavy 2 120 128 g m Heavy 3 129 163 g m Coated 1...

Page 512: ...agenta 17 Levels Cyan 17 Levels Black 17 Levels Toner Density Fine Adjust Adjust the toner density for each toner color You can adjust the density separately for darker areas High medium areas Medium...

Page 513: ...when selecting High 1 High 1 High 2 Special Smoothing Mode Select a smoothing mode to print documents with a smooth finish If you are not satisfied with the printing results of Mode 1 default you can...

Page 514: ...s and graphics smoothly This setting is recommended for most types of printing Mode 2 Prints both edges and interior halftones of graphics smoothly Mode 3 Prints dark colored text and lines on halfton...

Page 515: ...e this setting in combination with the Gutter setting to set the binding margin for the selected binding position Gutter Specify the binding margin to apply to the binding position selected in the Bin...

Page 516: ...he print position by setting the offset value for the long edge on the front side of the paper Increasing the value moves the print position downward Decreasing the value moves the print position upwa...

Page 517: ...be printed Select whether to automatically perform error skip to bypass errors and continue printing when an error occurs with the print data If Off is selected you can perform error skip by using the...

Page 518: ...d the machine automatically switches the color mode printing color pages in color and black and white pages in black and white Auto Color B W Color Black and White Specify this setting to improve the...

Page 519: ...printing including any blank pages that you have inserted in your document select Off Off On Orientation Select Portrait vertical orientation or Landscape horizontal orientation for the page orientat...

Page 520: ...This setting is automatically changed according to the settings specified in Default Paper Size and Orientation 5 to 64 to 128 lines Character Code Select the character code that is most suited for th...

Page 521: ...mension Off On Unit of Measure Select the unit of measurement to use to set a custom paper size Millimeters Inches X dimension Specify the horizontal dimension short edge of the custom paper 77 to 215...

Page 522: ...he next line just under the received LF code Yes No Enlarge A4 Print Width Select whether to expand the width of the printable area of A4 size paper in portrait orientation to that of LTR size Off On...

Page 523: ...he printout becomes darker You can specify the setting separately for text graphics and images Text sRGB Gamma 1 5 Gamma 1 8 Gamma 2 4 Graphics sRGB Gamma 1 5 Gamma 1 8 Gamma 2 4 Image sRGB Gamma 1 5...

Page 524: ...that displayed on the computer display You can specify the setting separately for text graphics and images Text Perceptual Saturation Colorimetric Graphics Perceptual Saturation Colorimetric Image Per...

Page 525: ...olor matching for printing vivid graphics such as illustrations and diagrams Colorimetric Performs color matching to minimize the differences in color between originals such as color samples or logos...

Page 526: ...amma Correction Set the gamma correction value to match the brightness of the printouts to that of the original data If the printout looks darker or brighter than original change the gamma correction...

Page 527: ...can apply the setting separately for text and graphics Advanced Smoothing Off Smooth 1 Smooth 2 Apply to Graphics Off On Apply to Text Off On Printer Settings PCL Gamma Correction Select Text Graphics...

Page 528: ...ent or color shift correction after the machine is turned ON Auto Adjust Image Regularly Select when to make an automatic quick gradation adjustment If On is selected quick adjustment is automatically...

Page 529: ...l Paper Processing When printing on the back side of printed paper rough paper or envelopes the print results may be improved by adjusting the following settings Manual Back Side Settings for 2 Sided...

Page 530: ...If envelope flaps cling to the envelope bodies when printing select On Off On Envelope Switch Adjust this setting if envelope printouts are light or envelopes do not feed smoothly Envelope 1 Envelope...

Page 531: ...n the feeder rollers if documents become dirty after being fed through the feeder Feeder Adjustment Maintenance Special Processing Special Paper Processing Envelope Switch Select Envelope 1 or Envelop...

Page 532: ...ettings Select Country Region Forwarding Settings Store Print When Forwarding Remote UI On Off Restrict TX Function Display Job Log USB Device On Off Store to USB Memory Memory Media Print On Off Prod...

Page 533: ...isable settings for encrypted communication via SSL or IPSec as well as settings for IP address or MAC address packet filtering Use SSL Select whether to use SSL encrypted communication Enabling SSL E...

Page 534: ...for filtering packets sent to or received from devices with specified IPv6 addresses Specifying IP Addresses for Firewall Rules Outbound Filter Off On Inbound Filter Off On On Restart the machine Syst...

Page 535: ...0 bps 7200 bps 4800 bps 2400 bps RX Start Speed Adjust the communication start speed This adjustment should be made when it takes a long time to start receiving a fax due to a poor telephone line conn...

Page 536: ...tting may vary depending on the setting selected at initial power on Turning ON the Power and Configuring Initial Settings Austria AT Belarus BY Belgium BE Czech Republic CZ Denmark DK Egypt EG Finlan...

Page 537: ...occurs Printing Documents to be Forwarded Off On Only When Error Occurs Store Images in Memory Select whether to store fax documents in memory when they are not successfully forwarded You can resend o...

Page 538: ...ers to enter the fax number twice when it is entered by using the numeric keys Displaying the Screen for Confirming the Fax Number MF8580Cdw MF8550Cdn MF8280Cw Only Off On Coded Dial TX Confirmation S...

Page 539: ...ttached to the machine Restricting the USB Print Function Off On Enable or disable the Product Extended Survey Program a program for the machine usage survey Off On Enable or disable Google Cloud Prin...

Page 540: ...uage so that the machine is detected as a printer that is compatible with that language when it is connected to a computer via USB UFRII LT UFRII LT XPS PCL5 PCL6 Secure Print Settings 5 PDL Selection...

Page 541: ...Address Book settings to the factory defaults Initializing Address Book MF8580Cdw MF8550Cdn MF8540Cdn MF8280Cw Only Select to restore the System Management Settings to the factory defaults You can res...

Page 542: ...can restore individual settings separately Initializing Menu NOTE Asterisks Settings marked with an asterisk are only available for the MF8580Cdw MF8550Cdn MF8280Cw Preferences Timer Settings Common...

Page 543: ...Error Code Appears Common Problems If you suspect that the machine is malfunctioning see the following sections before contacting Canon Common Problems Installation Settings Problems Copying Problems...

Page 544: ...r Remove the jammed paper Paper Jams in the Paper Drawer IMPORTANT When removing the jammed paper do not turn OFF the machine Turning OFF the machine deletes the data that is being printed Be especial...

Page 545: ...jammed document from the inner cover inside the feeder 1 Hold the green knob and open the inner cover 2 Gently pull out the document 3 Close the inner cover Return the lever back in place and close th...

Page 546: ...cibly remove jammed paper from the machine If the jammed paper cannot be removed easily proceed to the next step Remove the jammed paper in the tray 1 Gently pull out the paper 2 Close the tray Remove...

Page 547: ...ly pull out the paper IMPORTANT Do not touch the rubber pad Touching it may deteriorate print quality Hold the green knobs and return the part shown in the figure back in place Return the part shown i...

Page 548: ...e paper When the optional paper drawer drawer 2 is attached gently pull out the paper in the same way Set the paper drawer When the screen shown below is displayed use to select Yes and press Open the...

Page 549: ...er Close the rear cover If there are documents placed in the feeder remove them first Then follow the procedure below Open the feeder cover Gently pull out the document Close the feeder cover Document...

Page 550: ...e operation panel Open the rear cover Gently pull out the paper Close the rear cover Pull out the paper drawer Paper Jams in the Front and Back Sides Paper Jams in the Manual Feed Slot MF8280Cw MF8230...

Page 551: ...the green knobs and push down the part shown in the figure Gently pull out the paper Hold the green knobs return the part shown in the figure back in place and close the cover Return the part shown i...

Page 552: ...n could not be edited because it was registered to Group Dial To change the type of destination that is registered to Group Dial first delete the registered destination from Group Dial Next change the...

Page 553: ...ential Broadcast to Off or Confirm Sequential Broadcast For more information contact your Administrator Prohibiting Sequential Broadcasting MF8580Cdw MF8550Cdn MF8280Cw Only Cannot specify a group Gro...

Page 554: ...chine with Google Cloud Print Cleaning failed Paper jammed during cleaning Remove the jammed paper set paper correctly and perform cleaning again Clearing Jams Feeder Fixing Unit The amount of toner r...

Page 555: ...lain or recycled A4 or Letter size paper into the paper drawer Full Adjust Adjust Copy Image An adjustment image that is required for correction is not placed on the platen glass correctly Place the a...

Page 556: ...e it has reached the end of its lifetime or for other reasons Replacement of the toner cartridge is recommended You can continue printing but the print quality may deteriorate How to Replace Toner Car...

Page 557: ...connect again Connecting to a Network Open System authentication failed Check the WEP settings The authentication method of the machine is set to Open System but that of a wireless router is set to S...

Page 558: ...ner cartridge Toner is running low Have a new toner cartridge ready About Replacement Toner Cartridges NOTE When copying or printing you can continue printing If the machine is receiving a fax or auto...

Page 559: ...icted Scanning that is operated by using a computer is disabled in the Department ID Management Log on to the Remote UI in System Manager Mode display the edit screen of the corresponding Department I...

Page 560: ...ew destinations is restricted Only destinations that are registered in the Address Book can be specified to send a fax or e mail To enter a new destination with the operation panel or add or edit it i...

Page 561: ...Received Faxes into Memory Memory Reception If sending a document with many pages divide it into multiple sections If sending a fax reduce the resolution to scan the document Adjusting Resolution If...

Page 562: ...on by Specifying Detailed Settings The USB memory is restricted The function that stores a scanned document to a USB memory device is disabled Set Store to USB Memory to On Restricting the Scan to USB...

Page 563: ...splayed again If the message still appears the toner cartridge may be faulty Contact your local authorized Canon dealer or the Canon help line How to Replace Toner Cartridges Use Remote UI to set the...

Page 564: ...e Feeder MF8280Cw MF8230Cn 003 A fax could not be sent or received due to its large data size When sending a fax Reduce the resolution and scan the document Adjusting Resolution When receiving a fax A...

Page 565: ...again Registering in the Address Book MF8580Cdw MF8550Cdn MF8540Cdn MF8280Cw Only Printing Resending Deleting Documents that Failed to be Forwarded 037 Memory is full If a sending or printing job is...

Page 566: ...that was allocated for images was full when sending an e mail or storing to a shared folder If another sending document is queued wait for a while until it is completed and send again Divide the docu...

Page 567: ...in Setting a Wait Time for Connecting to a Network 801 When communicating with an SMTP server to send an e mail a timeout error occurred from the server Check whether SMTP is running on the network co...

Page 568: ...in If the destination that was registered in the Address Book was used check whether the e mail address is correct Registering in the Address Book MF8580Cdw MF8550Cdn MF8540Cdn MF8280Cw Only 810 When...

Page 569: ...erver If the problem persists clear the Use POP before SMTP check box and set the communication setting to a setting other than POP before SMTP Configuring Advanced E mail Settings When verifying an S...

Page 570: ...ory Send the secured document again and print it within the period Printing via Secure Print Printing using Secure Print was attempted when Secure Print was restricted When Secure Print Settings is se...

Page 571: ...ected correctly Use care not to mistake the phone cord s port for the other cables ports Connecting the Telephone Line Parts and Their Functions Is sleep mode activated If you leave the machine unatte...

Page 572: ...of the set IP address Viewing Network Settings The connection method cannot be switched between a wired LAN and a wireless LAN Did you select a wired LAN or a wireless LAN on the operation panel on t...

Page 573: ...ct to the network Check whether the machine is turned ON If the machine is turned ON turn it OFF and then turn it back ON Check the installation site of the machine and the wireless router Is the mach...

Page 574: ...When only IEEE 802 11n is used for the wireless communication WEP is selected or the WPA WPA2 encryption method is set to TKIP The stealth mode is activated Downloaded from ManualsPrinter com Manuals...

Page 575: ...0ALJ 0CJ Copying Problems See Common Problems also Printing results are not satisfactory Paper creases or curls When You Cannot Print Properly Downloaded from ManualsPrinter com Manuals...

Page 576: ...low Print or delete data in memory Printing Documents in Memory Checking Deleting Documents in Memory Disabling Secure Print is recommended if you are not using it Changing the Valid Time Period for S...

Page 577: ...P phone The results of a sent fax are not satisfactory Clean the platen glass or feeder If cleaning does not improve the results the recipient s fax machine may be a cause Platen Glass Feeder The resu...

Page 578: ...r the Canon help line Smudge Marks Appear on the Bottom Edge of Printouts Streaks Appear on Printouts White Streaks Appear Toner Smudges and Splatters Appear Printouts Are Faded A Portion of the Page...

Page 579: ...f paper or 10 mm or less around the edge of envelopes is not printable with the machine Make sure to have margins around the document to print Finishing tab Advanced Settings Expand Print Region and P...

Page 580: ...er size and type settings properly Paper Loading Paper Specifying Paper Size and Type Are the printouts faded when you print on envelopes Selecting Envelope 2 for Envelope Switch may solve the problem...

Page 581: ...eplace the toner cartridges as necessary Replacing Toner Cartridges Printouts Are Grayish Is toner running low Check how much toner is left and replace the toner cartridges as necessary Replacing Tone...

Page 582: ...ng Paper Are you using appropriate paper Check usable paper and replace with appropriate paper Paper Paper Curls Are you using appropriate paper Check usable paper and replace with appropriate paper A...

Page 583: ...opes If the envelopes are not fed properly even after you have uncurled them selecting Envelope 2 for Envelope Switch may solve the problem Special Processing Paper Is Not Fed Two or More Sheets Are F...

Page 584: ...urself it may not be covered by warranty When Contacting Canon When contacting us have the following information ready Product name MF8580Cdw MF8550Cdn MF8540Cdn MF8280Cw MF8230Cn Dealer where you pur...

Page 585: ...or an office move Relocating the Machine Managing Print Quality Maintaining and Improving Print Quality Shades of colors on printouts are different from originals Correcting the Gradation Adjusting Va...

Page 586: ...ully read the safety instructions before you start cleaning Maintenance and Inspections Where to Clean Exterior of the machine and ventilation slots Exterior Rollers inside the feeder Feeder Internal...

Page 587: ...sing the Memory Reception function faxes that are waiting to be sent and reports that are automatically printed after sending and receiving faxes are not deleted Clean the exterior of the machine and...

Page 588: ...e waiting to be sent and reports that are automatically printed after sending and receiving faxes are not deleted Open the feeder Clean the platen glass and the underside of the feeder Clean the areas...

Page 589: ...you need ten sheets of plain A4 or Letter size paper Set them in the feeder before performing the following procedure Placing Documents Press Use to select Adjustment Maintenance and press Select Cle...

Page 590: ...t the paper in the paper drawer or manual feed slot Loading Paper in the Paper Drawer Loading Paper in the Manual Feed Slot before performing the following procedure NOTE Cleaning requires toner Make...

Page 591: ...procedure Note that you cannot clean the transfer belt when the machine has documents waiting to be printed Press Use to select Adjustment Maintenance and press Select Clean ITB and press Press Clean...

Page 592: ...r printing you can continue printing the document If the Prepare the black toner cartridge message is displayed when the machine is receiving a fax or automatic report output is set received faxes and...

Page 593: ...ow to Replace Toner Cartridges White streaks appear Partially faded Uneven density Toner smudges and splatters appear Blank space of originals becomes grayish in printouts Checking Toner Level You can...

Page 594: ...ner cartridge straight up and out of the machine Remove the replacement toner cartridge from the protective bag Shake the toner cartridge 5 or 6 times as shown below to evenly distribute the toner ins...

Page 595: ...etely removed Remove the drum protective cover Install the toner cartridge Each toner cartridge color has its own slot in the toner cartridge tray and this tray is indicated with a corresponding color...

Page 596: ...MF8540Cdn Canon Genuine Toner Cartridge Average yield of toner cartridge Canon Cartridge 718 Black 3 400 sheets Canon Cartridge 718 Yellow Canon Cartridge 718 Magenta Canon Cartridge 718 Cyan Composit...

Page 597: ...50Cdn MF8540Cdn Power plug Power cord USB cable LAN cable Telephone cable External telephone cable Handset cable MF8280Cw MF8230Cn When transporting the machine across a long distance remove the toner...

Page 598: ...MF8230Cn Carefully place the machine at the new installation site For information about how to install the machine after relocating it see Setting Up the Machine 6 Downloaded from ManualsPrinter com...

Page 599: ...lor reproducibility There are three types of adjustments Full Adjust Quick Adjust and Adjust Copy Image Correcting the Gradation Correct Print Color Mismatch If the colors in printouts become blurry p...

Page 600: ...hen the machine performs full adjustment it obtains information to optimize color reproducibility The machine maintains this information until the next time you perform full adjustment For making full...

Page 601: ...e Gently close the feeder Press Color The adjustment image is scanned and adjustment starts In approximately 1 to 2 minutes the adjustment is finished Press to close the menu screen Open the feeder an...

Page 602: ...ished Press to close the menu screen NOTE You can set the machine to perform this adjustment automatically after the power is turned ON Auto Correction Settings This adjustment improves the result of...

Page 603: ...imately 1 to 2 minutes the adjustment is finished Press to close the menu screen Open the feeder and remove the adjustment image Gently close the feeder NOTE If the Correction failed message is displa...

Page 604: ...er cartridges are replaced When color shifts occur When color shifts do not occur NOTE This adjustment is not available when Only Continue Black White Printing is selected on the screen displaying the...

Page 605: ...ently in the feeder and platen glass NOTE The settings are applied to color copies when Original Type is set to Text Photo Map or Text Selecting Document Type Adjustment Maintenance Black Text Process...

Page 606: ...check the total volume of printouts for each Department ID Department ID Management Report Address Book List You can check the list of destinations registered in the Address Book Address Book List MF...

Page 607: ...en a sending error occurs Example Fax sending Example Scanning to e mail shared folder Result OK indicates that the transmission was completed successfully while NG and three digits an error code indi...

Page 608: ...rt of a fax document on the report When you select On or Only When Error Occurs a part of a fax document can be included in the report Set Report with TX Image to On and press Downloaded from ManualsP...

Page 609: ...print the report automatically Separate TX RX Select On to print sent and received reports separately or Off to print both reports on one sheet Print the Report Manually Report Print List Communicati...

Page 610: ...Report Select the print setting Off Select if you do not want to print RX Result Reports On Select to print an RX Result Report every time you receive a document Only When Error Occurs Select to prin...

Page 611: ...ing a Department ID Management Report By checking the printout totals you can better manage your paper and toner supplies Report Print List Department ID Management Report Check that the size and type...

Page 612: ...nt List Address Book List Select the setting you want to print out Check that the size and type of paper displayed on the screen is loaded in the machine Yes Example Coded Dial Example Favorites Examp...

Page 613: ...List or System Manager Data List Check that the size and type of paper displayed on the screen is loaded in the machine Yes Example NOTE The User Data List does not include the setting lists of Networ...

Page 614: ...settings registered in the machine by printing an IPSec Policy List Report Print List IPSec Policy List Check that the size and type of paper displayed on the screen is loaded in the machine Yes Exam...

Page 615: ...8540Cdn Only You can check the list of available fonts for the machine Report Print List PCL Font List Check that the size and type of paper displayed on the screen is loaded in the machine Yes Exampl...

Page 616: ...pages used for color printouts and black and white printouts These totals include faxes reports and lists in addition to copies and printouts of data from computers Status Monitor Device Status Check...

Page 617: ...n restore the following settings Initializing Menu Initializing Key and Certificate Initializing Address Book MF8580Cdw MF8550Cdn MF8540Cdn MF8280Cw Only Initializing System Management Settings Downlo...

Page 618: ...ettings of Network Settings and System Management Settings see Initializing System Management Settings Initialize Menu Select the item you want to initialize Yes Items for initializing Select the sett...

Page 619: ...eleted after initializing NOTE After initializing functions that require key pairs such as SSL encrypted communication and TLS of the IEEE 802 1X authentication are not available To use these function...

Page 620: ...e information registered in the Address Book will be deleted after initializing System Management Settings Initialize Address Book Yes LINKS Registering in the Address Book MF8580Cdw MF8550Cdn MF8540C...

Page 621: ...ize System Management Settings Select the item that you want to initialize Yes Restart the machine if necessary Items for initializing Select the setting you want to initialize Initialize All Initiali...

Page 622: ...chapter contains technical specifications of this machine instructions on how to use the e Manual disclaimers copyright information and other important information for customers Downloaded from Manua...

Page 623: ...Give the features that are described in this section a try The features are grouped under four headings Going Green and Saving Money Improving Efficiency Going Digital and So Much More Downloaded from...

Page 624: ...Sides To really start saving paper shrink multiple pages onto a single sheet 2 or 4 pages for copies and up to 16 pages for print jobs sent from your computer If you are using a machine capable of 2...

Page 625: ...on see Saving Toner Fax documents directly from your computer Why bother printing and then faxing It just wastes paper and costs you money You can save yourself this trouble and cut costs with paperle...

Page 626: ...elect an Address Book address as an e mail destination Specifying from Address Book To save Address Book addresses on your computer or to export Address Book addresses that are saved on your computer...

Page 627: ...tart Head over to the machine make some PDF files and take the USB stick you stored them on into the conference room For more information about this function see Scanning Documents Directly to USB Mem...

Page 628: ...at everyone needs there s just no other way to go For more information about this function see Saving Documents Directly to a Shared Folder MF8580Cdw MF8550Cdn MF8540Cdn Only What if you re scanning a...

Page 629: ...anned as an image but you can convert it into text that can also be edited Select OCR as the scan type when you scan with MF Toolbox The software that comes with this machine will convert any text in...

Page 630: ...ill be able to print your documents without entering your password on the machine s operation panel Don t let your confidential documents lie exposed on the tray for everyone to see For more informati...

Page 631: ...Faxes Blow up a regular one sheet printout and make an exceptionally large poster A large poster will be printed out on nine sheets Put them together in a 3x3 grid and voila For more information abou...

Page 632: ...MF8540Cdn Only Wireless LAN Specifications MF8580Cdw MF8280Cw Only Document Type Scan Area Paper Copy Specifications Fax Specifications MF8580Cdw MF8550Cdn MF8280Cw Only Scanner Specifications Printer...

Page 633: ...is installed 510 x 484 x 479 mm Environmental Conditions Temperature 10 to 30 C Humidity 20 to 80 RH no condensation Color Compatibility Full Color Gradation 256 gradations Acceptable Documents Suppor...

Page 634: ...emperature 10 to 30 C Humidity 20 to 80 RH no condensation Color Compatibility Full Color Gradation 256 gradations Acceptable Documents Supported Document Types Acceptable Paper Stock Paper Printable...

Page 635: ...8580Cdw MF8550Cdn MF8540Cdn Only Cassette Feeding Unit V1 Paper Capacity 250 sheets 60 to 90 g m Available Paper Paper Power Supply From main unit Dimensions W x L x H 430 x 454 x 102 mm Weight Approx...

Page 636: ...802 11b 1 2 5 5 11 Mbps IEEE 802 11n SGI Invalidated 20 MHz 6 5 13 19 5 26 39 52 58 5 65 Mbps SGI Validated 20 MHz 7 2 14 4 21 7 28 9 43 3 57 8 72 2 Mbps SGI Invalidated 40 MHz 13 5 27 40 5 81 108 121...

Page 637: ...example tracing paper transparencies etc Booklet Up to 20 mm thickness Plain paper one page document Multi page documents of the same size thickness and weight Size W x L Up to 215 9 x 297 mm Maximum...

Page 638: ...lass Platen Glass Feeder Copy NOTE The scan area for copying may differ from the printable area Printable Area NOTE The scan area for copying may differ from the printable area Printable Area Fax Scan...

Page 639: ...utomatic 2 sided printing is available without replacing paper The machine can print received fax documents You can load Envelope Monarch only in the manual feed slot Custom paper size of 100 to 215 9...

Page 640: ...0 g m 250 sheets 50 sheets Heavy paper 86 to 119 g m 200 sheets 30 sheets 120 to 163 g m 150 sheets 20 sheets Recycled paper 60 to 74 g m 250 sheets 50 sheets Color paper 60 to 74 g m 250 sheets 50 sh...

Page 641: ...ransparency 50 sheets 1 sheet Label 50 sheets 1 sheet Index Card 15 sheets 1 sheet Envelope 10 sheets 1 sheet Use laser printer transparencies Paper Type and Setting for the Machine Loading Paper Prin...

Page 642: ...inuous Copying Capacity Maximum 99 copies First Copy Time A4 MF8580Cdw MF8550Cdn MF8540Cdn Platen glass Color 16 2 seconds or less Platen glass B W 15 5 seconds or less Feeder Color 16 7 seconds or le...

Page 643: ...400 x 400 dpi Dialing Favorites 19 destinations Coded dialing 181 destinations Group dialing 199 destinations Address Book dialing Regular dialing with numeric keys Automatic redialing Manual redialin...

Page 644: ...interpolation resolution 9 600 x 9 600 dpi Scan Speed A4 300 x 600 dpi Color 10 sheets minute Black and White 20 sheets minute Host Interface 100BASE TX 10BASE T Hi Speed USB USB IEEE 802 11b g n Inf...

Page 645: ...Cdn 2 sided printing Color up to 10 ppm pages per minute 5 spm sheets per minute B W up to 10 ppm pages per minute 5 spm sheets per minute MF8280Cw MF8230Cn Color 14 ppm B W 14 ppm First Print Time A4...

Page 646: ...sion PDF Compact Text 300 dpi Background 150 dpi System Environment Windows XP Vista 7 8 Server 2003 Server 2008 Server 2012 Solaris Version 2 6 or later with Samba 2 2 or later Mac OS X Red Hat Linux...

Page 647: ...lor JPEG 300 dpi TIFF 300 dpi JPEG Compression PDF 200 dpi JPEG Compression PDF Compact Text 300 dpi Background 150 dpi System Environment Windows XP Vista 7 8 Server 2003 Server 2008 Server 2012 Sola...

Page 648: ...search by entering a keyword such as fax or wireless LAN and the pages containing the keyword are displayed You can find the page you are looking for from those results You can also enter phrases such...

Page 649: ...laying the CD ROM Setup or Select language Screen Select your language and click Install Read the License Agreement and click Yes to agree NOTE The installation begins Click Exit when the following sc...

Page 650: ...k Next NOTE Select USB Connection even if connected using a network Clear all the check boxes except for Manuals and click Install Read the License Agreement and click Yes to agree 3 4 5 Downloaded fr...

Page 651: ...The installation begins Wait a moment This process may take some time Click Exit Click Next Exit 6 7 Downloaded from ManualsPrinter com Manuals...

Page 652: ...g system you are using a security warning message may appear If the message appears allow the content to be displayed in your Web browser Using the Multi lingual User Manual CD 1 Insert the Multi ling...

Page 653: ...elect a language and click OK if you are prompted to do so If the CD ROM Setup screen does not appear remove the CD ROM from the drive and then insert it again or see Displaying the CD ROM Setup or Se...

Page 654: ...lower left corner of the screen and select File Explorer Enter either of the following paths in the address field and press the ENTER key C Documents and Settings the user name My Documents Canon MFP...

Page 655: ...Click Uninstall Uninstall begins Wait a moment This process may take some time Click Exit Click Back Exit 4 5 6 Downloaded from ManualsPrinter com Manuals...

Page 656: ...Downloaded from ManualsPrinter com Manuals...

Page 657: ...ts tab Search tab Click to toggle the display between the table of contents and search Contents The titles of chapters are displayed Place the mouse pointer over one of the titles and topics of the ch...

Page 658: ...g the pointer onto it Feature Highlights Quick Help Click to view how to solve problems or maintain the machine Notice Click to view important information you should know when using the machine Office...

Page 659: ...e subsections of that topic Click to close the expanded topic Print all All pages of the selected chapter are opened in a separate window The chapter can be printed if necessary Navigation See what ch...

Page 660: ...ul when you can predict the general location of the topic that you are looking for Search options selector Select the check box to make your search case sensitive Search with these conditions Click to...

Page 661: ...of the selected chapter Title Topic Displays titles and topics Click a title or topic to jump to the page Click to return to the page top Click to go to the previous or next chapter Downloaded from M...

Page 662: ...nctions or tips for using the machine Keys and buttons used in this manual Keys on the operation panel and buttons on the computer display appear in the following notation Type Example Keys on the ope...

Page 663: ...ing system Windows XP Microsoft Windows Vista operating system Windows Vista Microsoft Windows 7 operating system Windows 7 Microsoft Windows 8 operating system Windows 8 Microsoft Windows Server 2003...

Page 664: ...0ALJ 0HK Others This section describes basic Windows operations and includes disclaimers copyright information and other information Downloaded from ManualsPrinter com Manuals...

Page 665: ...en select Control Panel View devices and printers Displaying Shared Printers in the Print Server Open Windows Explorer Windows XP Vista 7 Server 2003 Server 2008 Start select All Programs or Programs...

Page 666: ...rner of the screen select Run 2 Enter D Minst exe for the User Software CD ROM or D Maninst exe for the Multi lingual User Manual CD and then click OK Printing a Test Page in Windows You can check whe...

Page 667: ...l Display System Windows Vista 7 8 Server 2008 R2 Server 2012 Click System and Maintenance or System and Security System Windows Server 2008 Click System Check the bit architecture For 32 bit versions...

Page 668: ...ista 7 8 Server 2008 R2 Server 2012 Click System and Security or System and Maintenance System Windows Server 2008 Double click System Checking the LPR RAW Printer Port Open the printer folder Display...

Page 669: ...Downloaded from ManualsPrinter com Manuals...

Page 670: ...lded cable is necessary to comply with the technical EMC requirements of EC Directive Laser Safety Information Laser radiation could be hazardous to the human body For this reason laser radiation emit...

Page 671: ...effective usage of natural resources For more information about the recycling of this product please contact your local city office waste authority approved scheme or your household waste disposal ser...

Page 672: ...overeenstemming is met de essenti le eisen en de andere relevante bepalingen van richtlijn 1999 5 EG Malti Maltese Magyar Hungarian Polski Polish stosownymi postanowieniami Dyrektywy 1999 5 EC Portug...

Page 673: ...SI SK Notice for use of this product France This product cannot be used outdoors Espa ol Spanish Este equipo puede ser utilizado en AT BE BG CH CY CZ DE DK EE ES FI FR GB GR HU IE IS IT LI LT LU LV MT...

Page 674: ...CH CY CZ DE DK EE ES FI FR GB GR HU IE IS IT LI va utiliza n exterior Bulgarian slenska Icelandic Vi ger essu t ki m annast AT BE BG CH CY CZ DE DK EE ES FI FR GB GR HU IE IS IT LI LT LU LV MT NL NO...

Page 675: ...Macintosh and OS X are trademarks or registered trademarks of Apple Inc in the U S and or other countries Microsoft Windows Windows Vista Windows Server Internet Explorer Word Excel and Power Point a...

Page 676: ...EUROPA N V Bovenkerkerweg 59 1185 XB Amstelveen The Netherlands CANON CHINA CO LTD 15F Jinbao Building No 89 Jinbao Street Dongcheng District Beijing 100005 PRC CANON SINGAPORE PTE LTD 1 HarbourFront...

Page 677: ...Downloaded from ManualsPrinter com Manuals...

Page 678: ...the Latest Drivers Downloaded from the Canon Homepage 42 Installing the MF Drivers on the WSD Network For Windows 43 Installing the MF Drivers 44 Setting WSD 51 Uninstalling the Software 53 Uninstall...

Page 679: ...ead this chapter before installing the software such as the MF Drivers About the Drivers and Software Supported Operating Systems Selecting the Driver to Be Installed Before Using the Driver Downloade...

Page 680: ...utomatically installed along with the scanner driver MF Toolbox 2 The MF Toolbox provides a group of commands for you to open a scanned image in an application send it as an e mail attachment file sto...

Page 681: ...FRII LT 1 1 1 Printer driver UFRII LT XPS 1 Printer driver PCL5 2 1 1 1 Printer driver PCL6 2 1 1 1 Fax driver 2 1 1 1 Scanner driver Network Scan Utility 1 1 MF Toolbox Presto PageManager 1 Supported...

Page 682: ...or to highlight System Management Settings and then press 3 Press or to highlight PDL Selection Plug and Play and then press 4 Press or to highlight Network or USB and then press 5 Press or to highli...

Page 683: ...XPS PCL5 PCL6 USB UFRII LT UFRII LT XPS PCL5 PCL6 6 Restart the machine It is necessary to restart the machine for the settings to take effect Turn OFF the machine and wait for at least 10 seconds be...

Page 684: ...rk connection When installing downloaded drivers Installing the Latest Drivers Downloaded from the Canon Homepage Presto PageManager is not installed by selecting Easy Installation To install the soft...

Page 685: ...lick OK Windows Vista 7 and Server 2008 1 Enter D MInst exe in Start Search or Search programs and files under the Start menu 2 Press the ENTER key on the keyboard Windows 8 and Server 2012 1 Right cl...

Page 686: ...reen appears select the connection to a computer For USB Connection Select USB Connection and click Next For Network Connection Select Network Connection and click Next NOTE Windows Server 2003 Server...

Page 687: ...5 Read the License Agreement and click Yes 6 Click Next Downloaded from ManualsPrinter com Manuals...

Page 688: ...et Security software has been exited 2 Click Update Device List If any machines are not displayed by performing the above procedure perform the following procedure 1 Click Search by IP Address 2 Enter...

Page 689: ...3 Click OK 8 Installation starts when clicking Starts 9 Click Exit For USB Connection For Network Connection Next installation of MF Toolbox starts In Windows Server 2003 Server 2008 Server 2012 MF To...

Page 690: ...10 Click Start 11 Click Exit 12 When the following screen appears read the displayed information click Accept or Do Not Accept and then click Next Downloaded from ManualsPrinter com Manuals...

Page 691: ...ten years Any other information including your personal information is not sent You can also uninstall the Product Extended Survey Program Uninstalling the Product Extended Survey Program For Windows...

Page 692: ...ntil your computer is restarted USB Cable Connection Only when Connecting with USB In the case of network connection check the installation results Checking the Installation Results For Windows Downlo...

Page 693: ...lick OK Windows Vista 7 and Server 2008 1 Enter D MInst exe in Start Search or Search programs and files under the Start menu 2 Press the ENTER key on the keyboard Windows 8 and Server 2012 1 Right cl...

Page 694: ...hod to a computer For USB Connection Select USB Connection and click Next For Network Connection Select Network Connection and click Next NOTE Windows Server 2003 Server 2008 Server 2012 This screen i...

Page 695: ...The options to be displayed differ depending on your country or region 5 Read the License Agreement and click Yes 6 Click Next Downloaded from ManualsPrinter com Manuals...

Page 696: ...ion Proceed to step 13 For Network Connection Proceed to step 7 7 Select the machine to be installed 1 Select the machine 2 Click Next If no machines are displayed in Device List Perform the following...

Page 697: ...IP address other than link local addresses is set for the computer set an IP address in the same subnet as the computer other than link local addresses also for this machine manually This enables the...

Page 698: ...ded NOTE If you selected the Use as Shared Printer or Use as Shared Fax check box Install the additional driver as follows 1 Click Drivers to Add 2 Select the operating system displayed in Drivers to...

Page 699: ...64 bit operating system cannot be installed Windows XP on which no service pack or SP1 is installed Windows Server 2003 on which no service pack is installed 10 Click Start to start installation 11 S...

Page 700: ...nection For Network Connection Next installation of MF Toolbox starts In any of the following cases MF Toolbox is not installed Proceed to step 17 If you are using Windows Server 2003 Server 2008 Serv...

Page 701: ...respective screens and then click Next Click Start in the displayed screen 15 Click Exit The software for which the check box was selected in step 4 is installed Follow the on screen instructions 16 W...

Page 702: ...luding your personal information is not sent You can also uninstall the Product Extended Survey Program Uninstalling the Product Extended Survey Program For Windows 17 Confirm that the applications ar...

Page 703: ...ntil your computer is restarted USB Cable Connection Only when Connecting with USB In the case of network connection check the installation results Checking the Installation Results For Windows Downlo...

Page 704: ...er and Fax For Macintosh The installation screen varies depending on the version of Mac OS X Be sure to close all applications that are running 1 Insert the User Software CD ROM into the slot on your...

Page 705: ...4 Read the License Agreement and click Continue 5 Click Agree 6 When the following screen appears click Continue Downloaded from ManualsPrinter com Manuals...

Page 706: ...nstall The Change Install Location button may appear but you cannot change the installation location 8 Enter your Name and Password and click OK If you are using Mac OS X 10 7 x or later click Install...

Page 707: ...lick Close In the case of USB connection proceed to USB Cable Connection Only when Connecting with USB In the case of network connection proceed to Registering the Printer and Fax For Macintosh Downlo...

Page 708: ...quare end b to the USB port on the machine If a dialog box is displayed Follow the on screen instructions and complete installation In the case of Windows check the installation results Checking the I...

Page 709: ...layed depending on the operating system Software Location Icon Printer driver Printers and Faxes Printers or Devices and Printers folder Fax driver Printers and Faxes Printers or Devices and Printers...

Page 710: ...o the MF Toolbox For details see the Canon Scanner Driver Guide Connection method Registration method Auto IP Bonjour Bonjour Connection TCP IP connection TCP IP Connection USB connection USB Connecti...

Page 711: ...capable for this machine from the driver list and then click OK If you are using Mac OS X 10 5 x clicking OK is not required 6 Click Add 7 If the following screen appears specify the optional setting...

Page 712: ...ose the dialog box TCP IP Connection Register the printer and fax respectively following the procedure below The fax driver cannot be used in an IPv6 environment 1 Open System Preferences and click Pr...

Page 713: ...lick IP and then select a print protocol from Protocol 4 Enter the IP address of the machine to Address and then select Select Printer Software from Print Using Downloaded from ManualsPrinter com Manu...

Page 714: ...If you are using Mac OS X 10 5 x clicking OK is not required 6 Click Add 7 If the following screen appears specify the optional settings and then click Continue or OK 8 Check that this machine is add...

Page 715: ...og box USB Connection Register the printer and fax respectively following the procedure below 1 Open System Preferences and click Printer Fax or Print Scan 2 Click the icon Downloaded from ManualsPrin...

Page 716: ...er Software from Print Using 5 Select a driver that is capable for this machine from the driver list and then click OK If you are using Mac OS X 10 5 x clicking OK is not required 6 Click Add 7 If the...

Page 717: ...8 Check that this machine is added to the Printer Fax or Print Scan dialog box 9 Close the dialog box Downloaded from ManualsPrinter com Manuals...

Page 718: ...uble click Setup or Setup exe If the User Account Control screen appears click Yes or Continue 3 Follow the on screen instructions After the installation completes perform the following procedure In t...

Page 719: ...D Web Services on Devices protocol To use WSD follow the procedures in both Installing the MF Drivers and Setting WSD IMPORTANT To enable or disable WSD Use the operation panel on the machine e Manual...

Page 720: ...ndows 7 Server 2008 From the Start menu select Devices and Printers For Windows 8 Server 2012 Right click the lower left corner of the screen select Control Panel and then click View devices and print...

Page 721: ...irm that LPT1 Printer Port is displayed for Use an existing port and click Next 5 Click Have Disk 6 Insert the User Software CD ROM into the slot on your computer Downloaded from ManualsPrinter com Ma...

Page 722: ...lay is displayed Click to close the dialog box 7 Click Browse 8 Open the folder where the printer driver files are stored For 32 bit versions Open DRIVERS us_eng 32bit Driver on the CD ROM and click O...

Page 723: ...which operating system that you are using on your computer How to Check the Bit Architecture For Windows 9 Click OK 10 Select the printer driver you are using and then click Next Downloaded from Manua...

Page 724: ...e default printer name When Set as default printer is displayed specify whether to choose the machine as the default printer Windows Vista Server 2008 2 Click Next Installation begins Wait until the f...

Page 725: ...onfigure the related settings after you have performed the procedure provided in Setting WSD 13 Click Finish When Set as the default printer is displayed specify whether to choose the machine as the d...

Page 726: ...The icon is added to the printer folder Downloaded from ManualsPrinter com Manuals...

Page 727: ...from the Start menu and click Network For Windows 8 Server 2012 Right click the lower left corner of the screen select File Explore and then click Network 2 Right click the machine icon and select In...

Page 728: ...re below to delete the icon added in step 13 of Installing the MF Drivers if you do not need it 1 Right click the icon and select Remove device or Delete from the pop up menu 2 Click Yes 3 When User A...

Page 729: ...he WSD Device For Windows Uninstalling the Product Extended Survey Program For Windows Uninstalling the Software For Macintosh IMPORTANT Confirm the following before uninstalling the software You must...

Page 730: ...lick Uninstall a Program or double click Programs and Features For Windows 8 Server 1012 Right click the lower left corner of the screen and select Programs and Features 2 Select Canon MF8500C Series...

Page 731: ...Downloaded from ManualsPrinter com Manuals...

Page 732: ...1 From the Start menu select Control Panel 2 Click Uninstall a Program or double click Programs and Features For Windows 8 Server 1012 Right click the lower left corner of the screen and select Progr...

Page 733: ...Downloaded from ManualsPrinter com Manuals...

Page 734: ...your country or region If AutoPlay is displayed click to close the dialog box 2 Open the folder that contains the uninstaller on the CD ROM For 32 bit DRIVERS us_eng 32bit misc For 64 bit DRIVERS us_e...

Page 735: ...When User Account Control appears Click Yes or Continue 4 Click Delete 5 Click Yes 6 Click Exit Downloaded from ManualsPrinter com Manuals...

Page 736: ...t click the machine icon and select Uninstall from the pop up menu When User Account Control appears Click Yes or Continue The machine icon is deleted from the printer folder and uninstall is complete...

Page 737: ...Panel 2 Click Uninstall a program or double click Programs and Features For Windows 8 Right click the lower left corner of the screen and select Programs and Features 2 Select Canon Laser Printer Scan...

Page 738: ...Delete the files or folders below that correspond to the driver you want to uninstall Drag files or folders to Trash icon on the Dock to delete If Authenticate dialog box appears enter the administrat...

Page 739: ...non ScanGear MF Library Application Support Canon WMCLibrary framework Library Application Support Canon WMCReb plist Library Image Capture Devices Canon MFScannerxxx app xxx may differ depending on t...

Page 740: ...the Machine Are Not Properly Registered in the MF Toolbox Applications are automatically registered to the MF Toolbox once they have been installed They are not however if installed while the MF Toolb...

Page 741: ...operating system on your computer Once the upgrade has been complete reinstall the software Uninstalling the Software Installing the MF Drivers and MF Toolbox Installing the MF Drivers on the WSD Net...

Page 742: ...u bar in the application 2 Select the printer in Select Printer or Name in the Print dialog box 3 Click Preferences or Properties 4 Click Help Searching from Contents Click Contents in the Help screen...

Page 743: ...How to display the Help screen Special Features etc 4 Click Searching contents You can search a content by entering a keyword Downloaded from ManualsPrinter com Manuals...

Page 744: ...hing hub The machine may not be able to connect to a network even if your network settings are appropriate In this case the startup time of the machine needs to be set to a waiting state e Manual Sett...

Page 745: ...tus Monitor to close the screen Confirming IPv6 address settings 1 Press or Status Monitor 2 Press or to highlight Network Information and then press 3 Press or to highlight IPv6 and then press Downlo...

Page 746: ...4 Press or to highlight the option you want to confirm and then press 5 View the information 6 Press or Status Monitor to close the screen Downloaded from ManualsPrinter com Manuals...

Page 747: ...play System Windows Vista 7 8 Server 2008 R2 Server 2012 Click System and Maintenance or System and Security and then click System Windows Server 2008 Click System 3 Check the bit architecture For 32...

Page 748: ...PT AS PROVIDED HEREIN INCLUDING WITHOUT LIMITATION THEREOF WARRANTIES AS TO MARKETABILITY MERCHANTABILITY FITNESS FOR A PARTICULAR PURPOSE OF USE OR NON INFRINGEMENT CANON INC SHALL NOT BE LIABLE FOR...

Page 749: ...ansmitted transcribed stored in a retrieval system or translated into any language or computer language in any form or by any means electronic mechanical magnetic optical chemical manual or otherwise...

Page 750: ...registered trademarks of Apple Inc in the U S and or other countries This product contains the Universal Font Scaling Technology or UFST under license from Monotype Imaging Inc UFST is a trademark of...

Reviews: