


Chapter 13
13-4
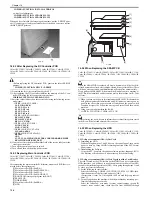
4) Check the waste toner collection case.
If the case is half full or more, empty it in an appropriate bag for collection. Or, replace the waste toner collection case.
- When disposing of the waste toner, be sure to follow all applicable regulations of the local government.
- Do not dispose of waste toner in fire. (Doing so can cause an explosion.)
5) Clean the copyboard glass and the reading glass.
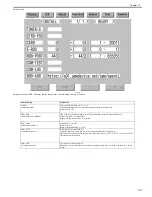
6) Make test copies.
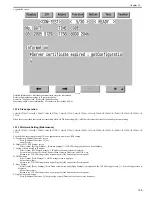
7) Make sample copies.
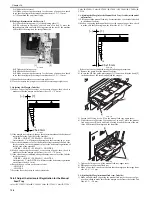
8) Check the operation of the leakage breaker.
While the machine is supplied with power (power switch ON), press the test switch of the leakage breaker to see if the breaker operates normally (i.e., the lever will
shift to OFF to cut off the power).
If the leakage breaker fails to operate normally, replace the breaker, and make a check once again.
<Resetting>
When you have checked the operation of the leakage breaker, turn off the power switch, shift the lever to ON, and turn on the power switch.
9) Put the sample copies in order, and clean up the area around the machine.
10) Record the latest counter readings. At this time, be sure to also record the settings of the following: 'FX-UP-RL' and 'DV-UNIT-K'.
11) Fill out the form in the Service Book, and report to the person in charge. be sure also to indicate the check on the leakage breaker in the history of checks.
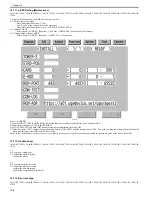
13.3.2 Items of Work for Scheduled Servicing (reader unit)
0014-5601
Color iR C3380G / Color iR C2880G / Color iR C3380i / Color iR C3380 / Color iR C2880i / Color iR C2880 / iR C3480 / iR C3480i / iR C3080i / iR C2550
The machine's reader unit does not have items that must be serviced on a scheduled basis.
Be sure to clean the copyboard glass and the ADF reading glass during each visit you make for scheduled servicing.
13.3.3 Items of Work for Scheduled Servicing (printer unit)
0014-5603
Color iR C3380G / Color iR C2880G / Color iR C3380i / Color iR C3380 / Color iR C2880i / Color iR C2880 / iR C3480 / iR C3480i / iR C3080i / iR C2550
Do not use solvents or oils other than those indicated.
T-13-3
margin (single-sided)
leading edge:2.5±1.5mm
left:2.5±1.5mm
margin (double-sided)
leading edge:2.5±2.0mm
left edge:2.5±2.0mm
Laser exposure system
dust-blocking glass (cleaning)
Feeding system
toner/feed guide
fixing inlet guide
Developing system
developing butting spacer
Unit
Location
Item
of
work
Inter-
vals
Remarks
Transfer
assembly
Transfer/feed guide
clean
55,000
images
[1]Feed guide
[2]Secondary transfer
iner delivery roller guide
Item
Summary of Contents for CiRC2550
Page 2: ......
Page 27: ...Chapter 1 Introduction ...
Page 28: ......
Page 47: ...Chapter 1 1 18 F 1 14 ON OFF ON OFF ...
Page 70: ...Chapter 1 1 41 5 Turn on the main power switch ...
Page 79: ...Chapter 2 Installation ...
Page 80: ......
Page 85: ...Chapter 2 2 3 Not available in some regions ...
Page 134: ...Chapter 3 Basic Operation ...
Page 135: ......
Page 137: ......
Page 143: ...Chapter 4 Main Controller ...
Page 144: ......
Page 152: ...Chapter 4 4 6 F 4 6 CPU HDD ROM access to the program at time of execution ...
Page 171: ...Chapter 5 Original Exposure System ...
Page 172: ......
Page 203: ...Chapter 6 Laser Exposure ...
Page 204: ......
Page 206: ......
Page 220: ...Chapter 7 Image Formation ...
Page 221: ......
Page 277: ...Chapter 8 Pickup Feeding System ...
Page 278: ......
Page 282: ......
Page 336: ...Chapter 9 Fixing System ...
Page 337: ......
Page 339: ......
Page 357: ...Chapter 10 Externals and Controls ...
Page 358: ......
Page 362: ......
Page 366: ...Chapter 10 10 4 F 10 2 F 10 3 FM1 FM2 FM5 FM8 FM11 FM4 FM3 FM6 FM7 FM9 FM10 ...
Page 375: ...Chapter 10 10 13 F 10 10 2 Remove the check mark from SNMP Status Enabled ...
Page 376: ...Chapter 10 10 14 F 10 11 ...
Page 402: ...Chapter 11 MEAP ...
Page 403: ......
Page 405: ......
Page 452: ...Chapter 12 RDS ...
Page 453: ......
Page 455: ......
Page 464: ...Chapter 13 Maintenance and Inspection ...
Page 465: ......
Page 467: ......
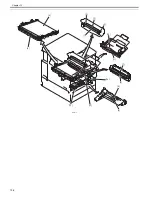
Page 469: ...Chapter 13 13 2 F 13 1 8 9 1 2 3 3 5 6 7 10 11 12 13 14 4 ...
Page 474: ...Chapter 14 Standards and Adjustments ...
Page 475: ......
Page 477: ......
Page 485: ......
Page 486: ...Chapter 15 Correcting Faulty Images ...
Page 487: ......
Page 495: ...Chapter 15 15 4 F 15 2 COLOR M 1 COLOR Y C K 0 ...
Page 569: ...Chapter 15 15 78 F 15 82 J102 J107 J103 J108 J101 J109 J106 J112 J115 J113 J114 J104 J105 ...
Page 570: ...Chapter 16 Self Diagnosis ...
Page 571: ......
Page 573: ......
Page 600: ...Chapter 17 Service Mode ...
Page 601: ......
Page 603: ......
Page 712: ...Chapter 18 Upgrading ...
Page 713: ......
Page 715: ......
Page 746: ...Chapter 19 Service Tools ...
Page 747: ......
Page 749: ......
Page 752: ...APPENDIX ...
Page 774: ......


