


Plates
44
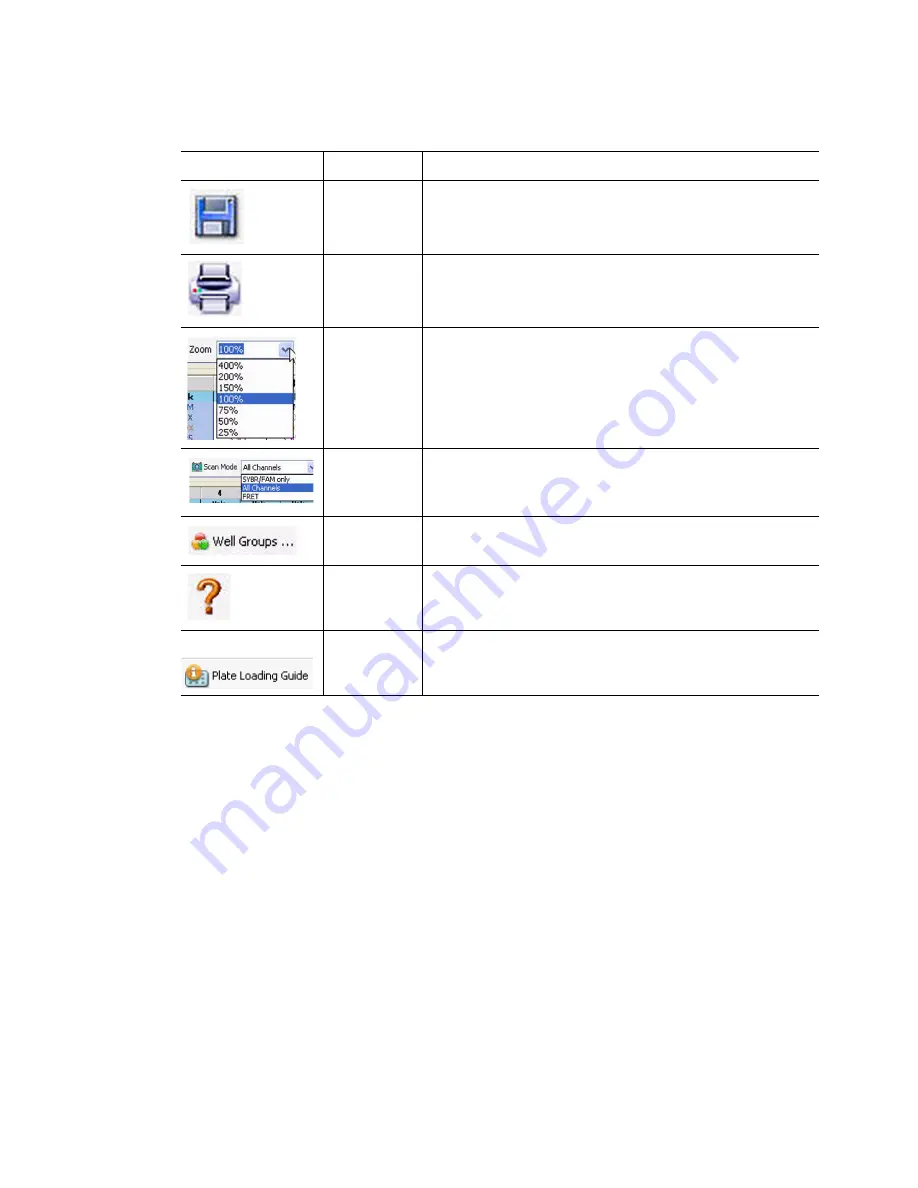
Table 16 lists the functions available in the Plate Editor toolbar.
Plate Size and Type
The software applies these plate settings to all the wells during the experiment:
•
Plate Size.
Select a plate size that represents the size of the reaction module block of
your instrument. Choosing the instrument type, CFX96 or CFX384, from the pull down
menu option on the Startup Wizard will change the default plate size loaded in the Plate
tab of the Experiment Settings window. In the Plate Editor, select the plate size from the
Settings menu (see Table 15). Plate size can not be changed during or after the
experiment
•
Plate Type.
Select clear or white wells from the Settings menu. Make sure the
fluorophore being used in the experiment is calibrated for the selected plate type
NOTE: CFX96 and CFX384 instruments are factory calibrated for many fluorescent
dye and plate combinations. Calibration is specific to the instrument, dye, and
plate type. To calibrate a new combination of dye and plate type on an instrument,
select
Tools > Calibration Wizard
(see “Calibration Wizard” on page 131)
Table 16. Toolbar items in the Plate Editor
Toolbar Item
Name
Function
Save
Save the current plate file
Print the selected window
Zoom
Increase or decrease magnification in plate view
Scan Mode
Select a scan mode to instruct the instrument what
channels to collect fluorescence data from during a run.
Select
All Channels
(default),
SYBR/FAM only
, or
FRET
Well Groups
Open the Well Groups Manager window and set up well
groups for the current plate
Help
Open the software Help for information about plates
Plate Loading
Guide
Show a quick guide about how to set up a plate and load
the wells
Summary of Contents for CFX384
Page 9: ...Table of Contents viii ...
Page 49: ...Protocols 40 ...
Page 89: ...Data Analysis Overview 80 ...
Page 149: ...Resources 140 ...
Page 157: ...Index 148 ...


