Removal and Replacement
6-53
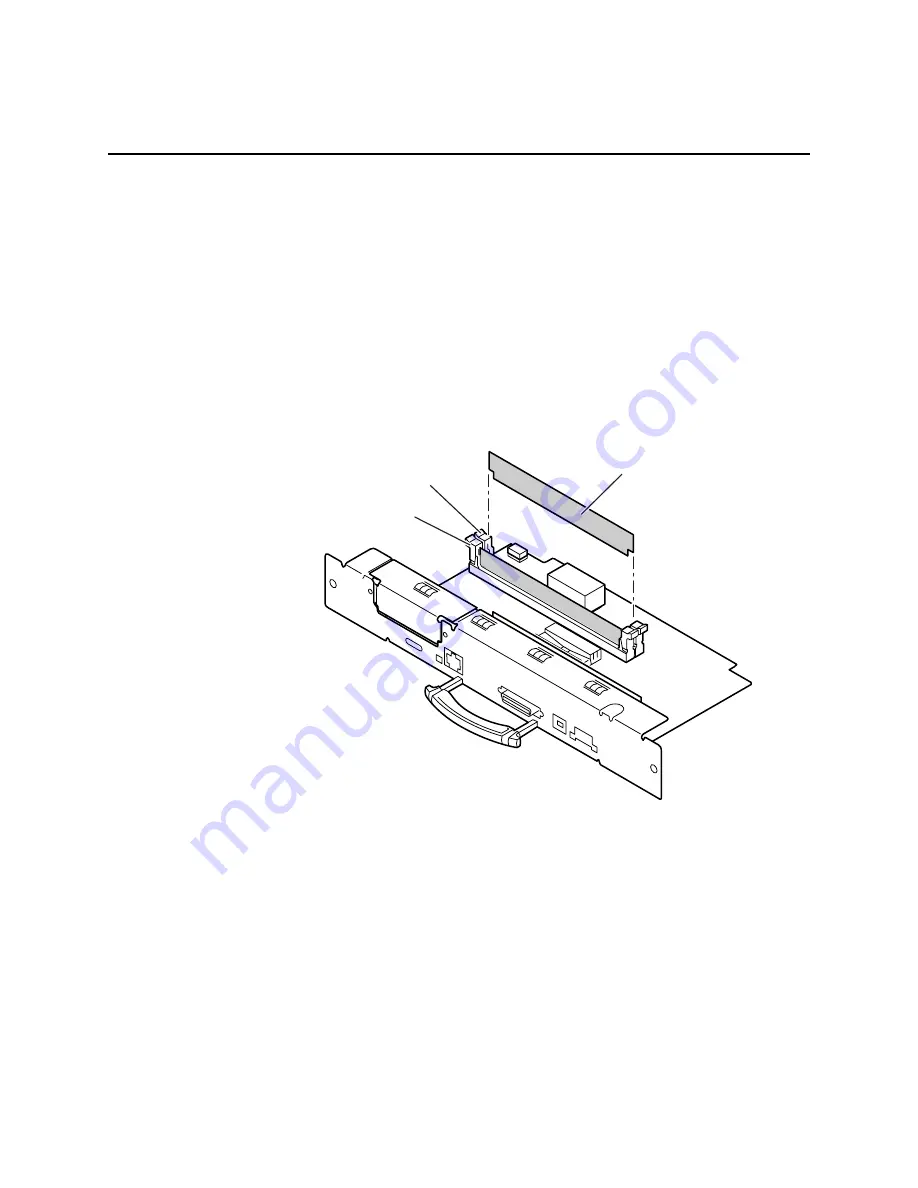
Installing RAM DIMMs
The printer accepts two SDRAM DIMMs which are 64 Mbyte in size.
The printer recognizes any acceptable size SDRAM DIMM in any
RAM DIMM slot. Use the following steps to installing new RAM
DIMMs.
1. Power down the printer. Leave the power cord plugged in to
provide a ground path for static discharges.
2. Loosen the two rear panel screws securing the main board.
Slide out the main board.
3. To release an installed RAM DIMM, spread the latches
securing each end of the DIMM in the connector.
840-4-37s
SDRAM DIMM
DIMM 1
DIMM 2
Figure 6-34. Locating RAM DIMMs
4. To install a RAM DIMM in the keyed DIMM connector, insert
the DIMM until it locks in place. When properly inserted, a tab
on each end of the connector slips into a notch on each end of
the RAM DIMM.
5. Reinstall the main board into the printer.
6. Reconnect the host interface cables. Turn on the printer and
print the start page to verify the memory installation.
Содержание Nuvera 100
Страница 1: ...General Information 1 1 Chapter...
Страница 24: ...1 24 ii LINX Solid Inkjet 100 Service Manual 1239 35b Figure 1 13 Repacking the Printer...
Страница 27: ...General Information 1 27...
Страница 28: ...1 28 ii LINX Solid Inkjet 100 Service Manual...
Страница 79: ...Error Codes and Messages 2 1 Chapter...
Страница 101: ...Troubleshooting 3 1 Chapter...
Страница 145: ...Adjustments 4 1 Chapter...
Страница 180: ...4 36 ii LINX Solid Inkjet 100 Service Manual...
Страница 181: ...Cleaning and Maintenance 5 1 Chapter...
Страница 190: ...5 10 iiLINX Solid Inkjet 100 Service Manual...
Страница 191: ...Removal and Replacement 6 1 Chapter...
Страница 207: ...Removal and Replacement 6 17 840 4 32 Power supply Wiring harnesses Figure 6 11 Removing the Power Supply...
Страница 231: ...Removal and Replacement 6 41 Paper path motor Remove three screws 840 4 28 Figure 6 26 Removing the Paper Path Motor...
Страница 249: ...Printer Networking 7 1 Chapter 7...
Страница 277: ...Printer Networking 7 29 10 Click Finish The Printer should now be installed You can print a test page for verification...
Страница 280: ...7 32 ii LINX Solid Inkjet 100 Printer Service Manual...
Страница 281: ...Material Number Listings A 1 Appendix...
Страница 285: ...Material Number Listings A 5 7 5 6 8 1 2 4 0388 21 3 Figure A 1 Cabinet parts...
Страница 287: ...Material Number Listings A 7 4 2 3 6 5 7 8 11 9 13 15 17 16 12 14 1 2 0388 18 18 10 19 Figure A 2 Imaging Parts...
Страница 289: ...Material Number Listings A 9 0388 16 2 1 5 11 10 9 12 6 4 3 7 13 8 Figure A 3 Paper Path Parts...
Страница 291: ...Material Number Listings A 11 0388 14 7 4 3 5 6 2 1 Figure A 4 Motor and Fan Parts...
Страница 293: ...Material Number Listings A 13 4 3 5 2 1 9 7 6 8 10 11 13 0388 13 12 Figure A 5 Circuit Board Parts...
Страница 295: ...Material Number Listings A 15 4 5 3 2 1 0388 23 Figure A 6 Solenoid and Clutch Parts...
Страница 297: ...Material Number Listings A 17 0388 22a 9 7 3 4 2 13 15 11 5 10 6 14 12 16 17 18 19 1 8 20 Figure A 7 Gear and Belt Parts...
Страница 299: ...Material Number Listings A 19 0388 15 7 3 2 1 4 5 9 8 10 16 12 17 14 18 19 6 11 13 15 Figure A 8 Sensor and Flag Parts...
Страница 304: ...A 24 ii LINX Solid Inkjet 100 Service Manual...


