4-16
ii LINX™ Solid Inkjet 100 Service Manual
19.
Terminate the PC-based diagnostics and disconnect the laptop.
20.
Reinstall the top cover.
21.
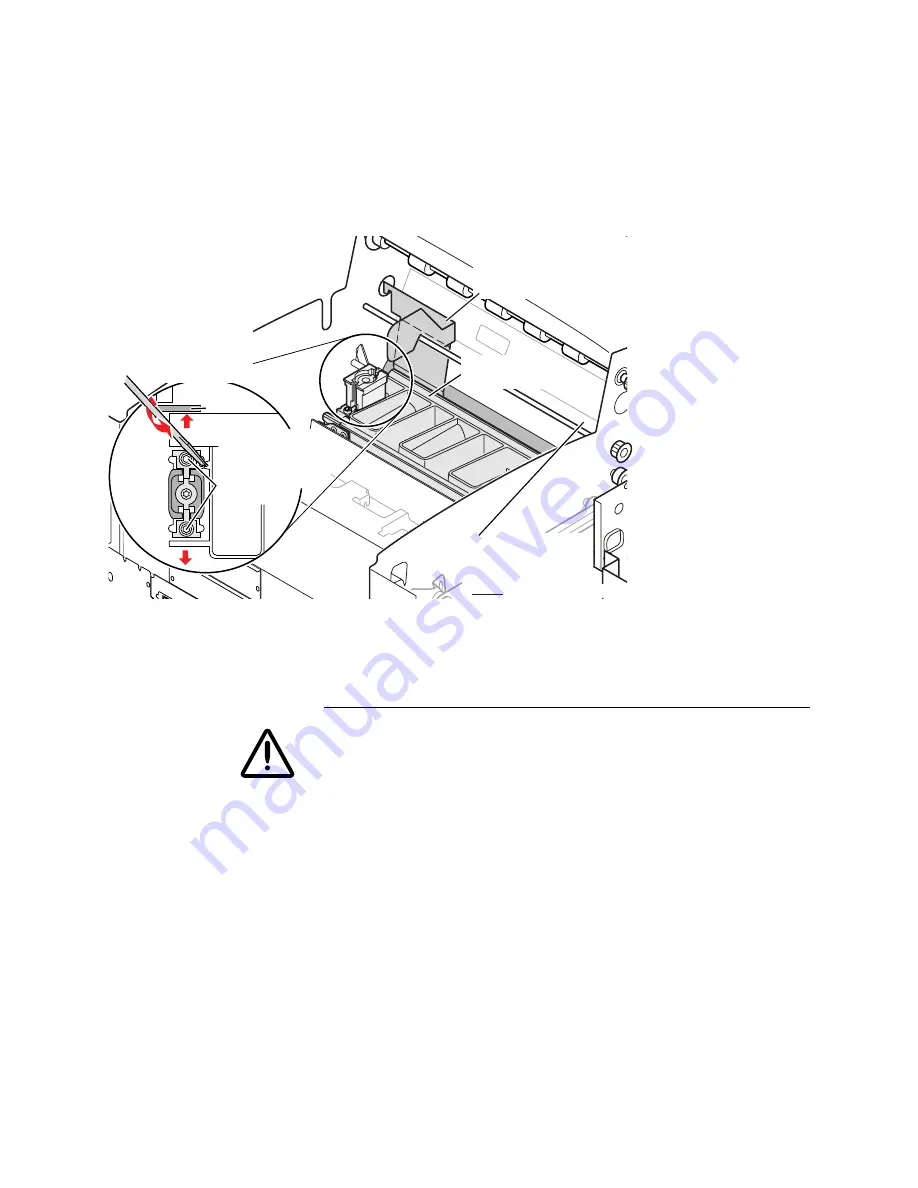
Print Service Test Print 12: Comb Pattern to check alignment.
RIGHT
Tighten locking
screws when
both left and right
adjustments are
complete
Gap tool
Insert flatblade
screwdriver in
adjusting slot.
Use a twisting
motion to move
the printhead.
Position gap tool
between the printhead
and drum, hook in side
frame and over shaft
0388-31
Repeat adjustment
at this end of
printhead with
LEFT gap tool
Printhead in
print position
Figure 4-5. Setting the Head to Drum Gap Adjustment
CAUTION
When powering up after installing a new printhead, reset the “Head
Adjust in the hidden Service menu to “128”. If this step is
forgotten, the jets may eject too much ink on the page, causing one
or more of the following:
• shifting or displacement of ink during transfix
• wrinkling
• jet “drop out”causing random weak vertical streaks in
solid fills. It may take multiple solid fills for this effect to
Содержание Nuvera 100
Страница 1: ...General Information 1 1 Chapter...
Страница 24: ...1 24 ii LINX Solid Inkjet 100 Service Manual 1239 35b Figure 1 13 Repacking the Printer...
Страница 27: ...General Information 1 27...
Страница 28: ...1 28 ii LINX Solid Inkjet 100 Service Manual...
Страница 79: ...Error Codes and Messages 2 1 Chapter...
Страница 101: ...Troubleshooting 3 1 Chapter...
Страница 145: ...Adjustments 4 1 Chapter...
Страница 180: ...4 36 ii LINX Solid Inkjet 100 Service Manual...
Страница 181: ...Cleaning and Maintenance 5 1 Chapter...
Страница 190: ...5 10 iiLINX Solid Inkjet 100 Service Manual...
Страница 191: ...Removal and Replacement 6 1 Chapter...
Страница 207: ...Removal and Replacement 6 17 840 4 32 Power supply Wiring harnesses Figure 6 11 Removing the Power Supply...
Страница 231: ...Removal and Replacement 6 41 Paper path motor Remove three screws 840 4 28 Figure 6 26 Removing the Paper Path Motor...
Страница 249: ...Printer Networking 7 1 Chapter 7...
Страница 277: ...Printer Networking 7 29 10 Click Finish The Printer should now be installed You can print a test page for verification...
Страница 280: ...7 32 ii LINX Solid Inkjet 100 Printer Service Manual...
Страница 281: ...Material Number Listings A 1 Appendix...
Страница 285: ...Material Number Listings A 5 7 5 6 8 1 2 4 0388 21 3 Figure A 1 Cabinet parts...
Страница 287: ...Material Number Listings A 7 4 2 3 6 5 7 8 11 9 13 15 17 16 12 14 1 2 0388 18 18 10 19 Figure A 2 Imaging Parts...
Страница 289: ...Material Number Listings A 9 0388 16 2 1 5 11 10 9 12 6 4 3 7 13 8 Figure A 3 Paper Path Parts...
Страница 291: ...Material Number Listings A 11 0388 14 7 4 3 5 6 2 1 Figure A 4 Motor and Fan Parts...
Страница 293: ...Material Number Listings A 13 4 3 5 2 1 9 7 6 8 10 11 13 0388 13 12 Figure A 5 Circuit Board Parts...
Страница 295: ...Material Number Listings A 15 4 5 3 2 1 0388 23 Figure A 6 Solenoid and Clutch Parts...
Страница 297: ...Material Number Listings A 17 0388 22a 9 7 3 4 2 13 15 11 5 10 6 14 12 16 17 18 19 1 8 20 Figure A 7 Gear and Belt Parts...
Страница 299: ...Material Number Listings A 19 0388 15 7 3 2 1 4 5 9 8 10 16 12 17 14 18 19 6 11 13 15 Figure A 8 Sensor and Flag Parts...
Страница 304: ...A 24 ii LINX Solid Inkjet 100 Service Manual...


