


Removal and Replacement
6-7
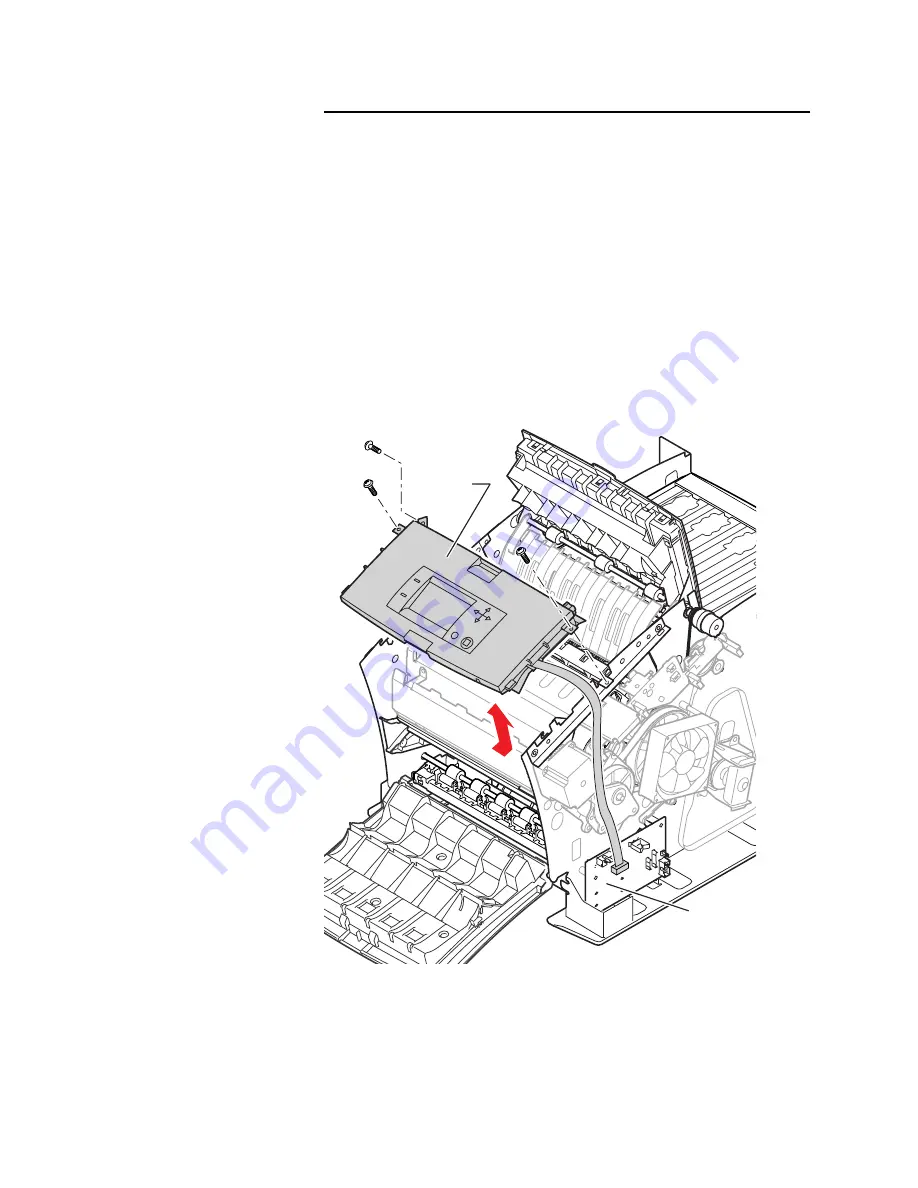
Removing the Front Panel
1. Open the exit door.
2. Remove the right and left covers.
3. Remove the three screws securing the front panel. One of the
screws is located inside the exit door area.
4. Disconnect the front panel display wiring harness from the
right I/O board. Slide the front panel rearward slightly, lift and
remove the front panel.
Reverse these steps to install the front panel.
Figure 6-4. Removing Front Panel
840-4-06
Front
panel
Right I/O
board
Содержание Nuvera 100
Страница 1: ...General Information 1 1 Chapter...
Страница 24: ...1 24 ii LINX Solid Inkjet 100 Service Manual 1239 35b Figure 1 13 Repacking the Printer...
Страница 27: ...General Information 1 27...
Страница 28: ...1 28 ii LINX Solid Inkjet 100 Service Manual...
Страница 79: ...Error Codes and Messages 2 1 Chapter...
Страница 101: ...Troubleshooting 3 1 Chapter...
Страница 145: ...Adjustments 4 1 Chapter...
Страница 180: ...4 36 ii LINX Solid Inkjet 100 Service Manual...
Страница 181: ...Cleaning and Maintenance 5 1 Chapter...
Страница 190: ...5 10 iiLINX Solid Inkjet 100 Service Manual...
Страница 191: ...Removal and Replacement 6 1 Chapter...
Страница 207: ...Removal and Replacement 6 17 840 4 32 Power supply Wiring harnesses Figure 6 11 Removing the Power Supply...
Страница 231: ...Removal and Replacement 6 41 Paper path motor Remove three screws 840 4 28 Figure 6 26 Removing the Paper Path Motor...
Страница 249: ...Printer Networking 7 1 Chapter 7...
Страница 277: ...Printer Networking 7 29 10 Click Finish The Printer should now be installed You can print a test page for verification...
Страница 280: ...7 32 ii LINX Solid Inkjet 100 Printer Service Manual...
Страница 281: ...Material Number Listings A 1 Appendix...
Страница 285: ...Material Number Listings A 5 7 5 6 8 1 2 4 0388 21 3 Figure A 1 Cabinet parts...
Страница 287: ...Material Number Listings A 7 4 2 3 6 5 7 8 11 9 13 15 17 16 12 14 1 2 0388 18 18 10 19 Figure A 2 Imaging Parts...
Страница 289: ...Material Number Listings A 9 0388 16 2 1 5 11 10 9 12 6 4 3 7 13 8 Figure A 3 Paper Path Parts...
Страница 291: ...Material Number Listings A 11 0388 14 7 4 3 5 6 2 1 Figure A 4 Motor and Fan Parts...
Страница 293: ...Material Number Listings A 13 4 3 5 2 1 9 7 6 8 10 11 13 0388 13 12 Figure A 5 Circuit Board Parts...
Страница 295: ...Material Number Listings A 15 4 5 3 2 1 0388 23 Figure A 6 Solenoid and Clutch Parts...
Страница 297: ...Material Number Listings A 17 0388 22a 9 7 3 4 2 13 15 11 5 10 6 14 12 16 17 18 19 1 8 20 Figure A 7 Gear and Belt Parts...
Страница 299: ...Material Number Listings A 19 0388 15 7 3 2 1 4 5 9 8 10 16 12 17 14 18 19 6 11 13 15 Figure A 8 Sensor and Flag Parts...
Страница 304: ...A 24 ii LINX Solid Inkjet 100 Service Manual...


