Section 5 OTHER CONVENIENT FUNCTIONS
5-7
4
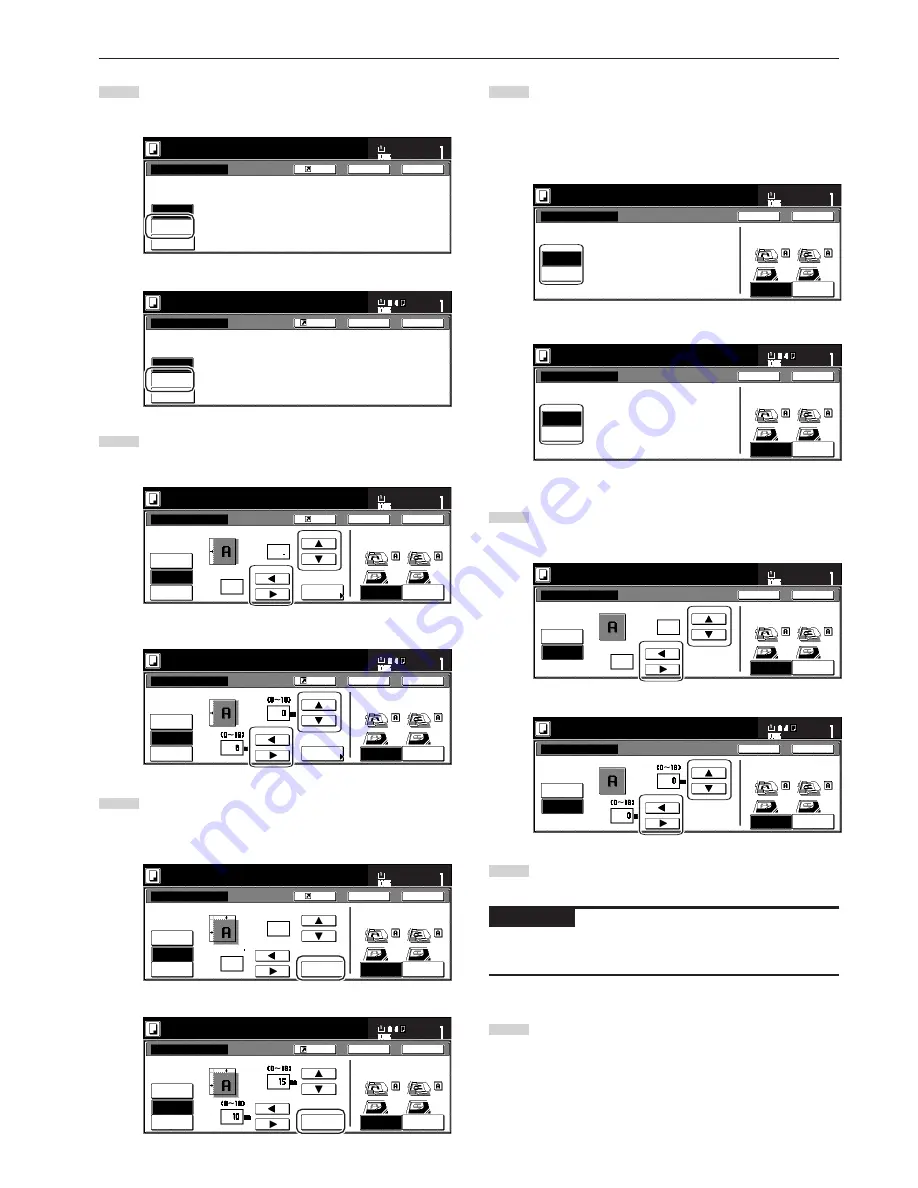
Touch the “Margin” key. The screen to set the front side
margin will be displayed.
Inch specifications
Margin/Centering
Reposition image to left/right or
top/bottom, and also center image
on paper.
None
Margin
Centering
Ready to copy.
Register
Back
Close
11x8
1
/
2
"
Set
Paper size
Metric specifications
None
Back
Close
Ready to copy.
Register
Set
Paper size
Margin/Image shift
R e p o s i t i o n i m a g e t o l e f t / r i g h t o r
t o p / b o t t o m a n d c e n t e r i m a g e o n p a p e r.
Margin
Image
shift
5
Use the up/down and left/right cursor keys to select the
desired location and width of each margin.
Inch specifications
Centering
Front page
Back page
margin
Au t o
None
Margin
Margin/Centering
Ready to copy.
Register
Back
Close
11x8
1
/
2
"
Set
Paper size
Rear
Check direction
Left top
corner
Check direction of
original top side.
Left
1
/
4 "
0
"
(0~
3
/
4
)
(0~
3
/
4
)
Metric specifications
Back
Close
Ready to copy.
Register
Set
Paper size
Back Edge
Left top
corner
None
Margin
Image
shift
Margin/Image shift
C h e ck d i r e c t i o n
C h e ck d i r e c t i o n o f
o r i g i n a l .
Fr o n t p a g e
Left
Back page
margin
Au t o
6
If you are making 2-sided copies, touch the “Back page
margin” key. The “Back page margin” screen will be
displayed.
Inch specifications
Top
Centering
Front page
Back page
margin
Au t o
None
Margin
Margin/Centering
Ready to copy.
Register
Back
Close
11x8
1
/
2
"
Set
Paper size
Rear
Check direction
Left top
corner
Check direction of
original top side.
Left
1
/
2 "
1
/
4 "
(0~
3
/
4
)
(0~
3
/
4
)
Metric specifications
Back
Close
Ready to copy.
Register
Set
Paper size
Back Edge
Left top
corner
Margin/Image shift
None
Margin
Image
shift
Fr o n t p a g e
Left
Top
Back page
margin
C h e ck d i r e c t i o n
C h e ck d i r e c t i o n o f
o r i g i n a l .
Au t o
7
If you want to create a margin on the back side of the copies
that lines up with that on the front side, touch the “Auto” key.
If you want to set the margins for the front and back sides
separately, touch the “Front/Back margin” key. The screen to
set the back side margin will be displayed.
Inch specifications
Back page margin
Auto
Front/Back
margin
If "AUTO" is selected for duplex
copying, rear will have same margin
setting as that for the front page.
Ready to copy.
Back
Close
11x8
1
/
2
"
Set
Paper size
Rear
Check direction
Left top
corner
Check direction of
original top side.
Metric specifications
Back page margin
Auto
Front/Back
margin
I f " AU TO " i s s e l e c t e d a t t h e d u p l ex
c o py i n g , b a ck s i d e w i l l h ave s a m e m a r g i n
s e t t i n g a s t h a t fo r t h e f r o n t p a g e.
Back
Close
Ready to copy.
Set
Paper size
Back Edge
Left top
corner
C h e ck d i r e c t i o n
C h e ck d i r e c t i o n o f
o r i g i n a l .
8
Use the up/down and left/right cursor keys to select the
desired location and width of each margin.
Inch specifications
Back page margin
Auto
Front/Back
margin
Back page
Ready to copy.
Back
Close
11x8
1
/
2
"
Set
Paper size
Rear
Check direction
Left top
corner
Check direction of
original top side.
(0~
3
/
4
)
"
"
(0~
3
/
4
)
0
0
Metric specifications
Back page margin
Auto
Front/Back
margin
B a ck p a g e
Back
Close
Ready to copy.
Set
Paper size
Back Edge
Left top
corner
C h e ck d i r e c t i o n
C h e ck d i r e c t i o n o f
o r i g i n a l .
9
Follow the instructions on the right side of the touch panel
and verify the direction in which the originals were set.
IMPORTANT!
If the designation for the direction that the originals are set is not
correct, copying may be accomplished incorrectly.
10
Press the [Start] key.
Copying will start.
Содержание DC 2075
Страница 1: ...INSTRUCTION HANDBOOK DC 2075...
Страница 44: ...Section 4 BASIC OPERATION 4 12...
Страница 230: ...Section 8 OPTIONAL EQUIPMENT 8 10...
Страница 261: ......
Страница 263: ...NOTE Deck unit connector output is non ClassII Finisher connector output is non ClassII...


