Section 7 COPIER MANAGEMENT FUNCTIONS
7-24
●
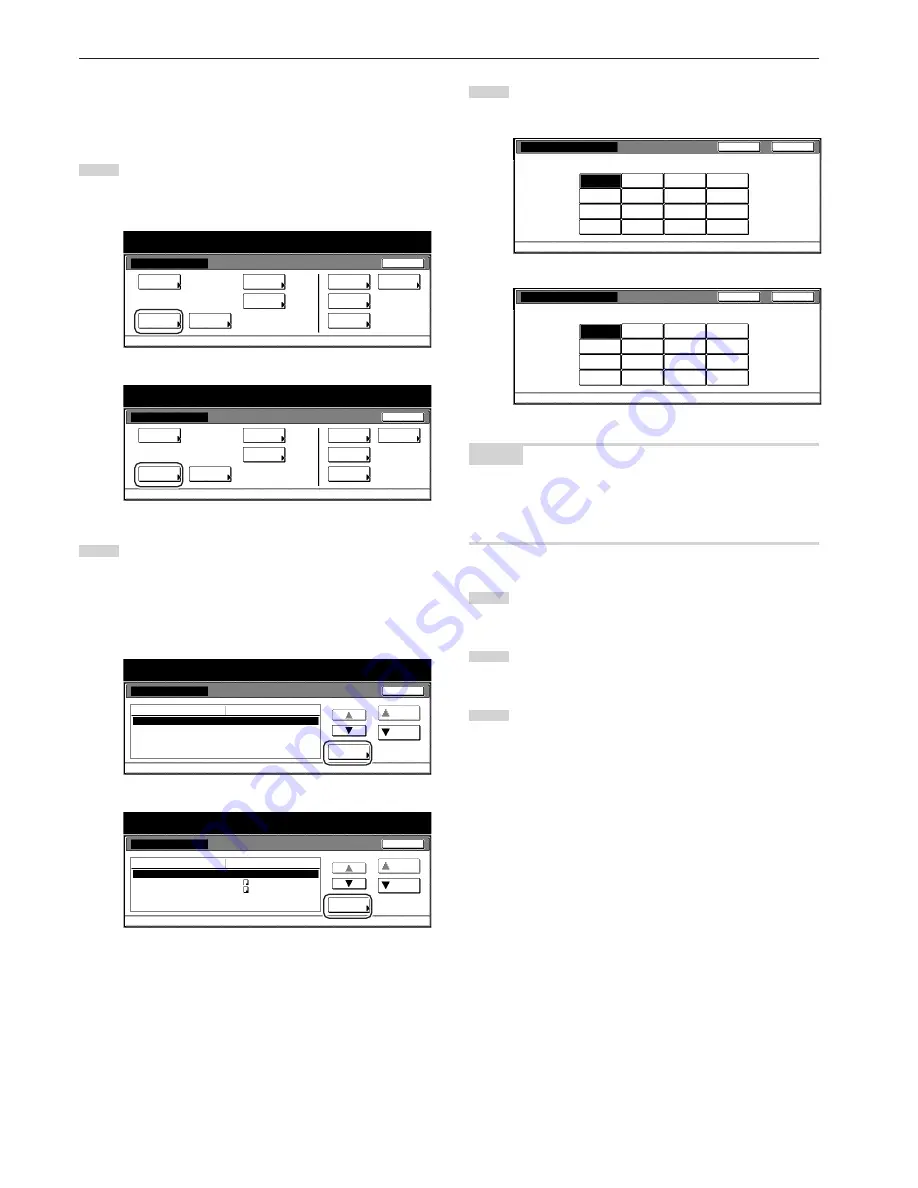
Paper type (drawer[cassette] No.1 - No. 4)
Perform the following procedure to set the type of paper that is loaded
in drawers[cassettes] No.1 through No.4.
1
Display the “Machine default” screen.
(See “(2) Accessing the machine default settings” on
page 7-21.)
Inch specifications
Default setting
Default setting
Copy
default
Weekly
timer
Machine
default
Language
Management
End
BOX
Management
Bypass
setting
Document
Management
Print
report
Metric specifications
Default setting
Default setting
Copy
default
Machine
default
Language
Bypass
setting
Management
Week
timer
End
Hard Disk
Management
Document
Management
Print
report
2
Select one of the “Paper type” settings
(“1st drawer[cassette]” through “4th drawer[cassette]”) in the
settings list on the left side of the touch panel and then touch
the “Change #” key.
The screen to set the paper type for that drawer[cassette] will
be displayed.
Inch specifications
Default setting
Machine default
Auto drawer switching
Paper size(2nd drawer)
Paper size(3rd drawer)
Paper type(1st drawer)
Paper type(2nd drawer)
On / All types of paper
Auto / Inch
Auto / Inch
Plain
Plain
Default menu
Down
Change #
Close
Setting mode
Up
Default setting
Metric specifications
Default setting
Machine default
Auto cassette switching
Paper size (2nd cassette)
Paper size (3rd cassette)
Paper type (1st cassette)
Paper type (2nd cassette)
On / All types of paper
A4
A4
Plain
Plain
Up
Down
Change #
Close
Default setting
Default menu
Setting mode
3
Touch the key that corresponds to the type of paper that is
loaded in that drawer[cassette].
Inch specifications
Select and display paper type.
Preprinted
Plain
Recycled
Letterhead
Prepunched
Color
Rough
Bond
Custom 2
Custom 1
Custom 3
Custom 4
Custom 6
Custom 5
Custom 7
Custom 8
Paper type(1st drawer)
Default setting - Machine default
Back
Close
Metric specifications
Paper type (1st cassette)
Select and display paper type.
Default setting - Machine default
Back
Close
Preprinted
Plain
Recycled
Letterhead
Prepunched
Colour
Rough
Bond
Custom 2
Custom 1
Custom 3
Custom 4
Custom 6
Custom 5
Custom 7
Custom 8
NOTES
• If you want to quit the displayed setting without changing it, touch
the “Back” key. The touch panel will return to the screen in step 2.
• The drawer[cassette] No.4 setting will only be displayed when the
optional Side Feeder is installed on your copier.
4
Touch the “Close” key. The touch panel will return to the
screen in step 2.
5
Touch the “Close” key once again. The touch panel will return
to the “Default setting” screen.
6
Touch the “End” key. The touch panel will return to the
contents of the “Basic” tab.
Содержание DC 2075
Страница 1: ...INSTRUCTION HANDBOOK DC 2075...
Страница 44: ...Section 4 BASIC OPERATION 4 12...
Страница 230: ...Section 8 OPTIONAL EQUIPMENT 8 10...
Страница 261: ......
Страница 263: ...NOTE Deck unit connector output is non ClassII Finisher connector output is non ClassII...


