


Operating Instructions
12-83
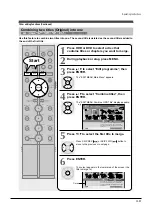
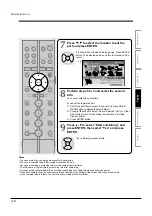
Creating a DVD-Video using DVD-R/RW
Content stored on the HDD of the recorder can be edited and copied to a DVD-R, a popular media for
distribution, and played on a compatible DVD video player. Rewriteable DVD-RW are also available.
Caution
•
Beforehand confirm the content in the disc.
If you use a DVD-R, prepare a new one. This DVD-Video creation procedure is possible only once per disc on
this recorder. Once you have copied to a DVD-R, you cannot redo it, add, delete, or correct the copied contents
in the disc. If you start copying then cancel the job, you cannot re-use the DVD-R.
If you use a DVD-RW, be sure to confirm contents in it. This procedure overwrites a whole disc, and all contents
in a DVD-RW will be lost. If you want to add contents to a DVD-RW, do not use this procedure. Record directly or
make a dubbing to the DVD-RW, then execute the finalization (
page 92). This procedure includes the
finalizing process, and you will not be able to add, delete, or correct contents to a DVD-RW later, as it will have
been finalized. If a finalized DVD-RW has remaining space, you can add contents there if you cancel the
finalizing process of the DVD-RW (
page 93).
•
Do not start copying to a DVD-R/RW when a programmed recording is scheduled to begin shortly.
Copying entirely to a DVD-R/RW will take 1 hour and a half (variable depending on the contents). (This does not
include time for “Writing Test”. This option requires more time. Actual time for “Writing Test” depends on the
contents to test, and may be longer than the playing time of the contents if the disc contains too little contents or
too many quality and picture settings, etc.)
If a start time of a programmed recording comes during this procedure, the recording is made onto the HDD.
However, while making a menu theme, the recording is not executed. Also, programmed recordings to DVD
media with “Off” setting of “Relief recording” (
page 123) are not executed.
If a programmed recording starts during this procedure, you cannot continue to make one more discs after
completion of the first disc.
•
Ensure the compatibility of a disc.
Refer to the
page 6.
A finalized DVD-RW (Video mode) can be used, but will be initialized.
*
Discs made by this procedure will comply with the DVD-Video standard. However, it is not guaranteed to play
properly on all DVD video players (including TOSHIBA products).
Depending on the disc, there may be a difference of data capacity between DVD-R and DVD-RW. It may be
possible that contents you have just recorded onto a DVD-R cannot be recorded onto a DVD-RW. (DVD-RW
capacity may be smaller.)
•
Follow the instructions on handling of the disc.
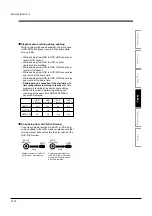
Preparation
• Record contents which you want to copy to DVD-R/RW to make DVD-Video, to the HDD with the following settings:
- “DVD compatible mode” (
page 28): “On (Mode
I
)” or “On (Mode
II
)”.
• Load a new DVD-R or a DVD-RW. (Follow the instructions on handling of the disc.)
• Press the HDD button to select the HDD mode.
Notes
• If you recorded a title while setting “DVD compatible mode” (
page 28) to “Off” or you used another recorder to record a
title in a DVD-RAM disc, and you want to copy such a title to a DVD-R/RW to create a DVD-Video, first set “DVD compatible
mode” to “On (Mode
I
)” or “On (Mode
II
)” then execute the procedure of dubbing (
page 87).
• Depending on the disc, DVD-R 4X speed compatibility may be disabled.
HDD
DVD-RAM
DVD-RW
(VR)
DVD-RW
(Video)
DVD-R
(VR)
DVD-VIDEO
VCD
CD
DVD-R
(Video)
Содержание RD-XS24SB
Страница 10: ...Product Specification 2 4 MEMO ...
Страница 12: ...3 2 Software Update MEMO ...
Страница 19: ...Disassembly and Reaasembly 4 7 4 2 PCB Location Fig 4 7 PCB Location S M P S PCB JACK PCB MAIN PCB ...
Страница 20: ...4 8 Disassembly and Reaasembly MEMO ...
Страница 34: ...Troubleshooting 5 14 MEMO ...
Страница 35: ...6 1 6 Exploded View and Parts List 6 1 Cabinet Assembly Page 6 2 ...
Страница 38: ...Exploded Views and Parts List 6 4 MEMO ...
Страница 50: ...Electrical Parts List 7 12 MEMO ...
Страница 160: ...Operating Instructions 12 110 MEMO ...
Страница 173: ...1 1 SHIBAURA 1 CHOME MINATO KU TOKYO 105 8001 JAPAN ...
Страница 177: ...Block Diagrams 8 3 8 2 Digital Block Diagram ...
Страница 180: ...Block Diagrams 8 6 8 5 AIC01 MSP3417 Block Diagram ...
Страница 181: ...Block Diagrams 8 7 8 6 AIC02 AIC07 MC14052 Block Diagram ...
Страница 182: ...Block Diagrams 8 8 8 7 AIC03 AK5357 Block Diagram ...
Страница 183: ...Block Diagrams 8 9 8 8 AIC04 PCM1753 Block Diagram ...
Страница 184: ...Block Diagrams 8 10 8 9 KIC01 PT6961 Block Diagram ...
Страница 185: ...Block Diagrams 8 11 8 10 MIC01 78F4225 Block Diagram ...
Страница 187: ...Block Diagrams 8 13 8 12 SIC01 MM1647 Block Diagram ...
Страница 188: ...Block Diagrams 8 14 8 13 VIC01 74HC4051 Block Diagram ...
Страница 189: ...Block Diagrams 8 15 8 14 VIC05 MM1568 Block Diagram ...
Страница 190: ...Block Diagrams 8 16 MEMO ...
Страница 191: ...9 Wiring Diagram 9 1 ...
Страница 192: ...Wiring Diagram 9 2 MEMO ...
Страница 193: ...10 1 10 PCB Diagrams 10 1 S M P S PCB 10 2 Main PCB 10 3 Jack PCB 10 4 Key PCB 10 2 10 4 10 6 10 8 ...
Страница 194: ...PCB Diagrams 10 2 10 1 S M P S PCB COMPONENT SIDE ...
Страница 195: ...PCB Diagrams 10 3 CONDUCTOR SIDE ...
Страница 196: ...PCB Diagrams 10 4 10 2 Main PCB COMPONENT SIDE ...
Страница 198: ...PCB Diagrams 10 6 10 3 Jack PCB COMPONENT SIDE ...
Страница 199: ...PCB Diagrams 10 7 CONDUCTOR SIDE ...
Страница 200: ...PCB Diagrams 10 8 10 4 Key PCB COMPONENT SIDE CONDUCTOR SIDE ...
Страница 202: ...Schematic Diagrams 11 2 11 1 S M P S SMPS PCB ...
Страница 203: ...Schematic Diagrams 11 3 11 2 Main Main PCB ...
Страница 204: ...Schematic Diagrams 11 4 11 3 Audio Jack PCB ...
Страница 205: ...Schematic Diagrams 11 5 11 4 Video Jack PCB ...
Страница 206: ...Schematic Diagrams 11 6 11 5 AV switch Scart Jack PCB ...
Страница 207: ...Schematic Diagrams 11 7 11 6 Tuner Front in Connection Jack PCB ...
Страница 208: ...Schematic Diagrams 11 8 11 7 Micom Jack PCB ...
Страница 209: ...Schematic Diagrams 11 9 11 8 Key Key PCB ...
Страница 210: ...Schematic Diagrams 11 10 MEMO ...


