Operating Instructions
12-77
Enabling a DVD-R/RW (Video mode) to which
you dubbed contents to be played on other
DVD players
It is necessary to finish writing data of the disc
(finalizing). Perform the following procedure to finalize
the disc.
Important
• You cannot rewrite data onto a disc after you execute the
DVD-Video finalizing process. However, the disabled
rewritability of a DVD-RW disc can be restored by
cancelling the process of the disc (
page 93). On DVD-
R discs, cancelling of the DVD-Video finalizing process is
not available.
• Cancelling of the DVD-Video finalizing process is available
only on DVD-RW recorded or copied contents on this
recorder.
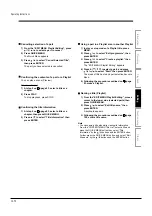
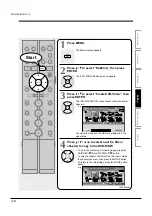
1) During playback or stop, press MENU.
The Menu display appears.
2) Press / to select “Edit programme”, then
press ENTER.
The “EDIT MENU Main Menu” appears.
3) Press DVD, then load a DVD-R/RW disc which
you want to finalize.
4) Press / to select “Finalize/cancel DVD”.
5) Press ENTER.
A display of option settings appears.
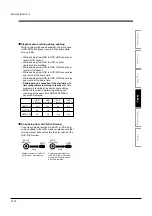
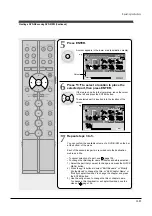
6) Press / / / to select.
As you select each item, its function is explained.
When “Menu Create” is set to “None”:
“Start play” and “After play one title” are
automatically omitted.
E D I T
MENU
A
A
A
B
B
DVD-Video Finalize(Option Settings)
e.g.
Next
Return
Menu Create
Title+Chapter
Title
Chapter
None
Writing Test
None
Parts Test
All Test
Set aspect ratio
Original
4:3 fixed
16:9 fixed
Start Play
Menu
Title 1
After play one title
After play final title
Menu
Next Title
Menu
Title 1
Stop
e.g.
DO NOT
MR. SATO, PLEASE JOIN US TO CREATE MANUALS
LEAVE HERE
DO NOT
LEAVE HERE
DO NOT
LEAVE HERE
DO NOT
LEAVE HERE
DO NOT
LEAVE HERE
DO NOT
LEAVE HERE
DO NOT
LEAVE HERE
DO NOT
LEAVE HERE
DO NOT
LEAVE HERE
DO NOT
LEAVE HERE
DO NOT
LEAVE HERE
DO NOT
LEAVE HERE
DO NOT
LEAVE HERE
DO NOT
LEAVE HERE
DO NOT
LEAVE HERE
DO NOT
LEAVE HERE
DO NOT
LEAVE HERE
DO NOT
LEAVE HERE
DO NOT
LEAVE HERE
DO NOT
LEAVE HERE
DO NOT
LEAVE HERE
DO NOT
LEAVE HERE
DO NOT
LEAVE HERE
DO NOT
LEAVE HERE
Deep Blue
Olive
Sepia
Light Blue
DO NOT
DO NOT
DO NOT
DO NOT
DO NOT
DO NOT
DO NOT
DO NOT
MR. SATO, PLEASE JOIN US TO CREATE MANUALS
MR. SATO, PLEASE JOIN US TO CREATE MANUALS
MR. SATO, PLEASE JOIN US TO CREATE MANUALS
MR. SATO, PLEASE JOIN US TO CREATE MANUALS
MR. SATO, PLEASE JOIN US TO CREATE MANUALS
MR. SATO, PLEASE JOIN US TO CREATE MANUALS
MR. SATO, PLEASE JOIN US TO CREATE MANUALS
E D I T
MENU
DVD-Video Finalize (Title Menu Select)
1 / 2
E D I T
MENU
A
A
A
B
DVD-Video Finalize(Disc Information)
e.g.
Next
Return
Disc Name
11
1 hour 24 min.
Edit Name
Total title number
Total time
Creating your own title — 4: Dubbing to save (Continued)
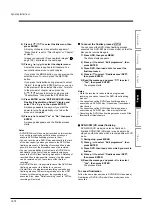
7) Press / to select “Next”, then press ENTER.
Information on data to be processed appears.
If you press the button to select “Edit Name” then
press the ENTER button, a keyboard appears so
that you can enter a title name.
When “Menu Create” is set to “None”:
Select “Writing” at the right bottom by the
/ / / buttons and press the ENTER button.
Skip to step 12).
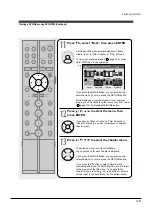
8) Press to select “Next”, then press ENTER.
When “Menu Create” is set to “Title+Chapter” or
“Title”, a display of title menu selection appears.
To view your captured images (
page 104), go to
the next page.
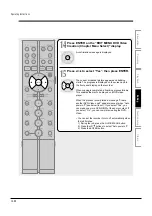
If you press the MODE button, you can preview the
selected menu. To return, press the RETURN
button.
While displaying a preview screen of your captured
image, you can access the other menu to correct
colour (
page 105) by pressing the MODE
button.
Содержание RD-XS24SB
Страница 10: ...Product Specification 2 4 MEMO ...
Страница 12: ...3 2 Software Update MEMO ...
Страница 19: ...Disassembly and Reaasembly 4 7 4 2 PCB Location Fig 4 7 PCB Location S M P S PCB JACK PCB MAIN PCB ...
Страница 20: ...4 8 Disassembly and Reaasembly MEMO ...
Страница 34: ...Troubleshooting 5 14 MEMO ...
Страница 35: ...6 1 6 Exploded View and Parts List 6 1 Cabinet Assembly Page 6 2 ...
Страница 38: ...Exploded Views and Parts List 6 4 MEMO ...
Страница 50: ...Electrical Parts List 7 12 MEMO ...
Страница 160: ...Operating Instructions 12 110 MEMO ...
Страница 173: ...1 1 SHIBAURA 1 CHOME MINATO KU TOKYO 105 8001 JAPAN ...
Страница 177: ...Block Diagrams 8 3 8 2 Digital Block Diagram ...
Страница 180: ...Block Diagrams 8 6 8 5 AIC01 MSP3417 Block Diagram ...
Страница 181: ...Block Diagrams 8 7 8 6 AIC02 AIC07 MC14052 Block Diagram ...
Страница 182: ...Block Diagrams 8 8 8 7 AIC03 AK5357 Block Diagram ...
Страница 183: ...Block Diagrams 8 9 8 8 AIC04 PCM1753 Block Diagram ...
Страница 184: ...Block Diagrams 8 10 8 9 KIC01 PT6961 Block Diagram ...
Страница 185: ...Block Diagrams 8 11 8 10 MIC01 78F4225 Block Diagram ...
Страница 187: ...Block Diagrams 8 13 8 12 SIC01 MM1647 Block Diagram ...
Страница 188: ...Block Diagrams 8 14 8 13 VIC01 74HC4051 Block Diagram ...
Страница 189: ...Block Diagrams 8 15 8 14 VIC05 MM1568 Block Diagram ...
Страница 190: ...Block Diagrams 8 16 MEMO ...
Страница 191: ...9 Wiring Diagram 9 1 ...
Страница 192: ...Wiring Diagram 9 2 MEMO ...
Страница 193: ...10 1 10 PCB Diagrams 10 1 S M P S PCB 10 2 Main PCB 10 3 Jack PCB 10 4 Key PCB 10 2 10 4 10 6 10 8 ...
Страница 194: ...PCB Diagrams 10 2 10 1 S M P S PCB COMPONENT SIDE ...
Страница 195: ...PCB Diagrams 10 3 CONDUCTOR SIDE ...
Страница 196: ...PCB Diagrams 10 4 10 2 Main PCB COMPONENT SIDE ...
Страница 198: ...PCB Diagrams 10 6 10 3 Jack PCB COMPONENT SIDE ...
Страница 199: ...PCB Diagrams 10 7 CONDUCTOR SIDE ...
Страница 200: ...PCB Diagrams 10 8 10 4 Key PCB COMPONENT SIDE CONDUCTOR SIDE ...
Страница 202: ...Schematic Diagrams 11 2 11 1 S M P S SMPS PCB ...
Страница 203: ...Schematic Diagrams 11 3 11 2 Main Main PCB ...
Страница 204: ...Schematic Diagrams 11 4 11 3 Audio Jack PCB ...
Страница 205: ...Schematic Diagrams 11 5 11 4 Video Jack PCB ...
Страница 206: ...Schematic Diagrams 11 6 11 5 AV switch Scart Jack PCB ...
Страница 207: ...Schematic Diagrams 11 7 11 6 Tuner Front in Connection Jack PCB ...
Страница 208: ...Schematic Diagrams 11 8 11 7 Micom Jack PCB ...
Страница 209: ...Schematic Diagrams 11 9 11 8 Key Key PCB ...
Страница 210: ...Schematic Diagrams 11 10 MEMO ...


