background image

FILE NO. 810-200581

SERVICE MANUAL

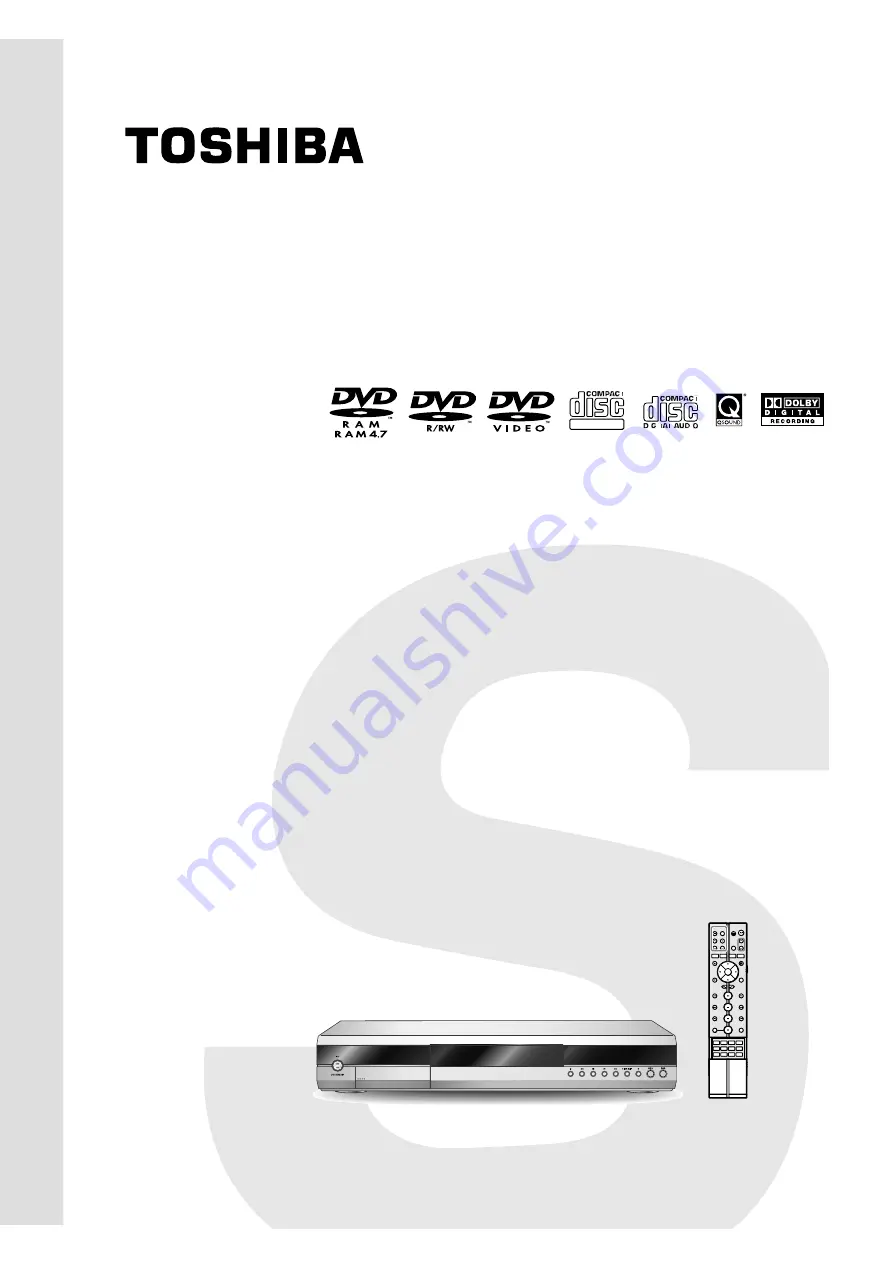
HDD/DVD VIDEO RECORDER

RD-XS24SB
RD-XS24SF
RD-XS24SG

DIGITAL VIDE O

1

2

3

4

5

6

7

8

9

+10

0

TV

DVD

INPUT SELECT

CHANNEL

MODE

RETURN

W

O

L

S

/

D

W

F

V

E

R

/

W

O

L

S

PLAY

STOP

PAUSE

REC

D

W

F


P

I

K

S

V

E

R


P

I

K

S

T

S

U

J

D

A

T

S

U

J

D

A

+

E

T

E

L

E

D

R

V

D

/

V

T

CLEAR

EXIT

ENTER

QUICK MENU

OPERATION

INSTANT

SKIP

INSTANT

REPLAY

NUMBER

HDD

DVD

TOP MENU

MENU

MENU

TIMESLIP

CHANNEL

VOLUME

INPUT SELECT

OPEN/CLOSE

CHP DIVIDE ANGLE

SUBTITLE

AUDIO

REC MODE ZOOM

SEARCH DISPLAY

PROGRESSIVE EXTEND

SETUP

REMAIN

NOV. 2005  (SA)

Содержание RD-XS24SB

Страница 1: ...L S D W F V E R W O L S PLAY STOP PAUSE REC D W F P I K S V E R P I K S T S U J D A T S U J D A E T E L E D R V D V T CLEAR EXIT ENTER QUICK MENU OPERATION INSTANT SKIP INSTANT REPLAY NUMBER HDD DVD TOP MENU MENU MENU TIMESLIP CHANNEL VOLUME INPUT SELECT OPEN CLOSE CHP DIVIDE ANGLE SUBTITLE AUDIO REC MODE ZOOM SEARCH DISPLAY PROGRESSIVE EXTEND SETUP REMAIN NOV 2005 SA ...

Страница 2: ...ate 4 Disassembly and Reassembly 5 Troubleshooting 6 Exploded View and Parts List 7 Electrical Parts List 8 Block Diagrams 9 Wiring Diagram 10 PCB Diagrams 11 Schematic Diagrams 12 Operating Instructions 13 Circuit Operating Descriptions 14 Reference Information ...

Страница 3: ...ters Laboratories UL 1270 40 7 With the instrument s AC switch first in the ON position and then in the OFF position mea sure from a known earth ground metal water pipe conduit etc to all exposed metal parts of the instrument antennas handle brackets metal cabi nets screwheads metallic overlays control shafts etc especially any exposed metal parts that offer an electrical return path to the chassi...

Страница 4: ...of place or frayed wiring Do not change spacing between a component and the printed circuit board Check the AC power cord for damage 5 Components parts and or wiring that appear to have overheated or that are otherwise damaged should be replaced with components parts and or wiring that meet original specifications Additionally determine the cause of overheating and or damage and if necessary take ...

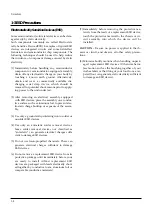
Страница 5: ...s are indicated or printed on the cabinet chassis or components When servic ing follow the printed or indicated service precau tions and service materials 3 The components used in the unit have a specified flame resistance and dielectric strength When replacing components use components which have the same ratings Components identi fied by shading by or by in the circuit dia gram are important for...

Страница 6: ...only a grounded tip soldering iron to solder or unsolder ESD devices 4 Use only an anti static solder removal devices Some solder removal devices not classified as anti static can generate electrical charges suffi cient to damage ESD devices 5 Do not use freon propelled chemicals These can generate electrical charges sufficient to damage ESD devices 6 Do not remove a replacement ESD device from it...

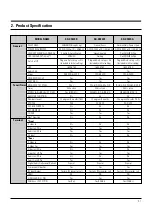
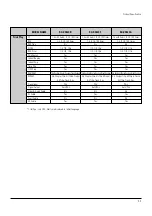
Страница 7: ...BILINGUAL SYSTEM Yes NICAM I NICAM L B G IGR B G NICAM IGR B G D K GEMSTAR FUNCTION No No No Number of event 32 program 2 months TBD 32 program 2 months 32 program 2months TBD VPS PDC PDC PDC VPS PDC VPS SAT BOX CONTROL No No No SAT MONITOR No No No TV DVR Yes Yes Yes NexT ViewLink No No No Front S video In No No No Video In US Pin Yes Yes Yes Audio In US Pin Yes Yes Yes DV Input No No No Rear S V...

Страница 8: ...192kbps 2ch DD2 384kbps 2ch LPCM 48kHz 16bit 2ch LPCM 48kHz 16bit 2ch LPCM 48kHz 16bit 2ch 3D DNR Yes Yes Yes 3D Y C Yes Yes Yes DVD RAM 4 7GB 9 4Gb VR format VR format VR format DVD RW 4 7GB DVD VIDEO VR format DVD VIDEO VR format DVD VIDEO VR format DVD R 4 7GB DVD Video VR format DVD Video VR format DVD Video VR format DVD R 3 9GB No No No DVD R 8cm No No No DVD ROM Yes Yes Yes HDD Yes Yes Yes ...

Страница 9: ...itle Randum Chater Randum Track Randum Title Randum Chater Randum Track Randum Title Randum Chater Randum Track Randum REPEAT A B Chapter Title All Title Playlist A B Chapter Title All Title Playlist A B Chapter Title All Title Playlist All Title Track Disc All Title Track Disc All Title Track Disc Signal Input PAL PAL PAL Signal Output Auto PAL Auto PAL Auto PAL Video Audio Cable No No No RF Cabl...

Страница 10: ...Product Specification 2 4 MEMO ...

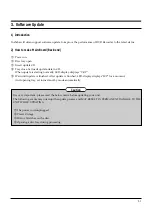
Страница 11: ...rmally LED display displays V UP Wait until update is finished After update is finished LED display displays MP for a moment And opening tray set turns stand by mode automatically It is very important please read the below notice before updating your unit The following events may interrupt the update process and MAY RESULT IN PERMANENT DAMAGE TO THE UNIT WHILE UPDATING The power cord unplugged Pow...

Страница 12: ...3 2 Software Update MEMO ...

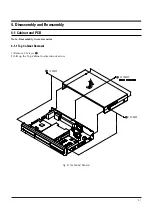
Страница 13: ...ly and Reassembly 4 1 Cabinet and PCB 4 1 1 Top Cabinet Removal 1 Remove 5 Screws Œ 2 Lift up the Top Cabinet in direction of arrow Fig 4 1 Top Cabinet Removal Note Reassembly in reverse order 3 SCREWS 1 SCREW 1 SCREW ...

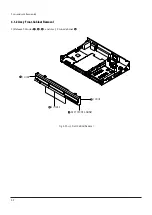
Страница 14: ...4 2 Disassembly and Reaasembly 1 HOOK 3 HOOKS 1 HOOK ASS Y FRONT CABINET Fig 4 2 Ass y Front Cabinet Removal 4 1 2 Ass y Front Cabinet Removal 1 Release 5 Hooks Œ ˇ and Ass y Front Cabinet ...

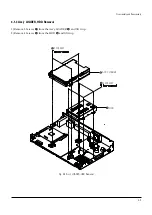
Страница 15: ...Reaasembly 4 3 4 SCREWS 3 SCREWS ASS Y LOADER HDD 4 1 3 Ass y LOADER HDD Removal 1 Remove 3 Screws Œ from the Ass y LOADER and lift it up 2 Remove 4 Screws ˇ from the HDD and lift it up Fig 4 3 Ass y LOADER HDD Removal ...

Страница 16: ...bly 4 SCREWS MAIN PCB 4 SCREWS SMPS PCB Fig 4 4 Main PCB and S M P S PCB Removal 4 1 4 Main PCB and S M P S PCB Removal 1 Remove 4 Screws Œ from the Main PCB and lift it up 2 Remove 4 Screws ˇ from the S M P S PCB and lift it up ...

Страница 17: ...Disassembly and Reaasembly 4 5 4 1 5 Jack PCB Removal 1 Remove 6 Screws Œ ˇ from the Jack PCB ˆ and lift it up 2 SCREWS JACK PCB 1 SCREW 2 SCREWS 1 SCREW Fig 4 5 Jack PCB Removal ...

Страница 18: ...4 6 Disassembly and Reaasembly 4 1 6 DC FAN Removal 1 Remove 2 Screws Œ from the DC Fan and lift it up DC FAN 2 SCREWS Fig 4 6 DC FAN Removal ...

Страница 19: ...Disassembly and Reaasembly 4 7 4 2 PCB Location Fig 4 7 PCB Location S M P S PCB JACK PCB MAIN PCB ...

Страница 20: ...4 8 Disassembly and Reaasembly MEMO ...

Страница 21: ...03 peripheral componenents No Check regulator ICs and if IC is dead change IC Yes Yes Yes NO Power Detected Stand by LED OFF The connection between Jack and key PCB is correct Check connection between Jack and Key PCB Yes No Soldering condition of MIC01 MIC03 is OK cold soldering or short Regulator ICs in SMPS are OK Output voltage ...

Страница 22: ...ormal 5V at VIC05 pin1 34 Pin 3 in VIC05 is in high state Check the connection between VIC05 pin1 34 and power line PD102 PL102 Check the connection between VIC05 pin3 and VR156 Yes Yes Yes Yes No Video signal of About P P 2V appears at Output jack without Connection to TV Check the connection between VIC05 and output jack Yes CVBS Video output error IF Recorder is under PSO progressive scan outpu...

Страница 23: ...ween VIC05 and MIC01 56 pin Check the connection between VIC05 and output jack Yes Yes Yes Yes Yes Component Y Cb Cr output error 2 6 10 Pin in C0N3 of Jack PCB has normal level Video signal of About P P 2V appears at Output Jack without connection to TV Replace the Main B D Check the connection between 2 6 10 pin in C0N3 of JACK PCB and VIC05 IF Recorder is under PSO progressive scan output MODE ...

Страница 24: ...CB and VIC05 Power is normal 5V at VIC05 pin 1 34 No No Check the connection between VIC05 pin 1 34 and power line 7 8 pin of CON03 Video signals of about P P 2V appears at output jack without connection to TV Check the connection between VIC05 and output jack Yes Yes Yes Yes S Video output error Yes No Pin 3 in VIC05 is In high state Check the connection between VIC05 pin 3 and VR156 Check VIC1 p...

Страница 25: ...o Power is normal at VIC05 1 34 RGB control signal level is 4V at 16 pin of SCART 1 AV1JACK RGB Video signal appears at 7 11 15 pin of AV1 output jack Check the connection between 1 34 of VIC05 and power Check the connection between VIC05 and output jack Check the connection between 13pin of SIC01 and AV1 jack Yes Yes Yes Yes Yes AV1 RGB Output Error IF Recorder is under Component mode in OSD setu...

Страница 26: ... connection between SIC01 and SCART Jack AV1 30 pin of SIC02 and 19 pin of AV1 AV2 29 pin of SIC02 and 40 pin of AV2 Check Main PCB No No Check the connection between 1 pin and 5 pin of CON03 in Jack PCB and SIC01 No Check the I2C lin2 between SIC01 32 33 and MIC01 Pin 16 18 Check the SMPS AL5 8V Yes Yes Yes Check the power supply to 2 4 6pin of SIC01 No Yes AV1 AV2 CVBS output error ...

Страница 27: ...1 and LINE pin jack Check the connection between VIC01 9 10 11 and MIC01 pin 29 30 32 Control signal of pic9 10 11 in IC201 is as below LINE Input L H L AV2 Input H H H AV1 Input L H H PROG Input L L L No No No CON02 5 of jack PCB has normal level Check the connection between CON02 5 of jack PCB and pin 3 in VIC01 Yes Yes Yes LINE CVBS Video Input Error ...

Страница 28: ...in16 33V Refer to LINE Video line error Tuner line connect TV directly No No Check SMPS AL5 8V and 33V No Video output signal of Tuner is OK jack PCB Replace TM tuner block Yes Yes Yes I2C signal pin 7 8 of tuner is OK No Check between pin 7 8 of tuner and MIC01 Yes Tuner Video Out Abnormal Tuner Video ...

Страница 29: ... no Digital Audio Out Check Current Digital Audio Setting is PCM Check Digital Audio data at CON03 pin 6 Check 5V at AIC08 pin 14 No Check the AIC08 peripheral circuits Replace MAIN PCB Set the Bitstream Check the A V Receiver can Decode Current Bit Steam No Yes ...

Страница 30: ...block diagram check whether there is no soldering problem each IC surrounding parts in block If there is no soldering problem check each IC s waveform and change the IC that have problem or check the peripheral circuits Check the power of Audio block Yes Yes No Audio input output error ...

Страница 31: ...1pin of TIC1 is normal check audio line out blocks Tuner line connect TV directly No No Check its power line or around elements The signal from 11 pin of tuner is OK No No Check the SIF signal of tuner Does AY101 make 18 432 Mhz signal Jack PCB Check AY101 or around elements Yes Yes Yes Yes Tuner Audio Out Abnormal ...

Страница 32: ...V Is the 40 pin FFC cable betweenmain deck inserted correctly Check the power in SMPS No No Reinsert FFC cable correctly Is communication between Main board and Loader normal No Yes Yes Yes Disc Ioading error Change the Main board Change the loader ...

Страница 33: ...ng 5 13 KIC03 pin1 signal is OK MIC01 61 pin signal is OK Jack PCB Change KIC03 Check the power pin2 line of KIC03 is 5V No No Check peripheral components between MIC01 pin 61 and KIC03 pin 1 Yes Yes Remocon no work ...

Страница 34: ...Troubleshooting 5 14 MEMO ...

Страница 35: ...6 1 6 Exploded View and Parts List 6 1 Cabinet Assembly Page 6 2 ...

Страница 36: ... 9 10 0 TV DVD INPUT SELECT CHANNEL MODE RETURN W O L S D W F V E R W O L S PLAY STOP PAUSE REC D W F P I K S V E R P I K S T S U J D A T S U J D A E T E L E D R V D V T CLEAR EXIT ENTER QUICK MENU OPERATION INSTANT SKIP INSTANT REPLAY NUMBER HDD DVD TOP MENU MENU MENU TIMESLIP CHANNEL VOLUME INPUT SELECT OPEN CLOSE CHP DIVIDE ANGLE SUBTITLE AUDIO REC MODE ZOOM SEARCH DISPLAY PROGRESSIVE EXTEND SE...

Страница 37: ...BH B M3 L10 ZPC YEL SWC W268 6003 000254 BY734068 SCREW TAPTITE BH S M3 L6 ZPC WHT SM20 W270 6001 000742 BY734219 SCREW MACHINE PH UNC6 32 L4 2 ZPC WHT W271 6009 001411 BY731644 SCREW SPECIAL TH M5 L14 NI PLT SWRCH W272 6003 001464 BY731645 SCREW TAPTITE BH B M3 L10 ZPC WHT W275 6003 001561 BY731750 SCREW TAPTITE BH B M3 L6 ZPC YEL SW I B AK68 00894A BY635039 MANUAL USERS RD XS24SB TSB ENG Operati...

Страница 38: ...Exploded Views and Parts List 6 4 MEMO ...

Страница 39: ...C CER CHIP 0 047NF 5 50V C0G TP 1608 AC125 2203 005065 BY130479 C CER CHIP 1000nF 80 20 10V Y5V 1608 AC126 2203 000140 BY130459 C CER CHIP 1 5nF 10 50V X7R 1608 AC127 2203 005148 BY130480 C CER CHIP 100nF 10 16V X7R TP 1608 AC128 2203 005148 BY130480 C CER CHIP 100nF 10 16V X7R TP 1608 AC129 2203 001607 BY130451 C CER CHIP 0 22nF 5 50V NP0 1608 AC130 2203 000125 BY130520 C CER CHIP 1 2nF 10 50V X7...

Страница 40: ...29 2401 000426 BY130103 C AL 10uF 20 16V GP TP 3 5x5 5 AE130 2401 000426 BY130103 C AL 10uF 20 16V GP TP 3 5x5 5 AE131 2401 002095 BY130048 C AL 47uF 20 25V GP TP 6 3x5 5 AE132 2401 000249 BY130560 C AL 100uF 20 10V GP TP 6 3x5 5 AE133 2401 000249 BY130560 C AL 100uF 20 10V GP TP 6 3x5 5 AE134 2401 000426 BY130103 C AL 10uF 20 16V GP TP 3 5x5 5 AE135 2401 000426 BY130103 C AL 10uF 20 16V GP TP 3 5...

Страница 41: ...TP 1608 AR136 2007 001010 BY230360 R CHIP 51Kohm 5 1 10W TP 1608 AR137 2001 000429 70795005 R CARBON 1KOHM 5 1 8W AA TP 1 8X3 2MM AR138 2007 000078 BY230279 R CHIP 1Kohm 5 1 10W TP 1608 AR139 2001 000429 70795005 R CARBON 1KOHM 5 1 8W AA TP 1 8X3 2MM AR140 2007 000078 BY230279 R CHIP 1Kohm 5 1 10W TP 1608 AR141 2007 000102 BY230292 R CHIP 100Kohm 5 1 10W TP 1608 AR142 2007 000077 BY230278 R CHIP 4...

Страница 42: ...1KOHM 5 1 8W AA TP 1 8X3 2MM AR213 2001 000429 70795005 R CARBON 1KOHM 5 1 8W AA TP 1 8X3 2MM AR214 2007 000070 BY230274 R CHIP 0ohm 5 1 10W TP 1608 AR215 2007 000070 BY230274 R CHIP 0ohm 5 1 10W TP 1608 AR220 2001 000273 70795007 R CARBON 100KOHM 5 1 8W AA TP 1 8X3 2M AR221 2007 000102 BY230292 R CHIP 100Kohm 5 1 10W TP 1608 AR222 2007 001010 BY230360 R CHIP 51Kohm 5 1 10W TP 1608 AR223 2007 0010...

Страница 43: ...0W TP 1608 MR113 2007 000074 BY230276 R CHIP 100ohm 5 1 10W TP 1608 MR114 2007 000090 BY230285 R CHIP 10Kohm 5 1 10W TP 1608 MR115 2007 000077 BY230278 R CHIP 470ohm 5 1 10W TP 1608 MR116 2007 000109 BY130423 R CHIP 1Mohm 5 1 10W TP 1608 MR117 2007 001196 BY230309 R CHIP 820Kohm 5 1 10W TP 1608 MR118 2007 000090 BY230285 R CHIP 10Kohm 5 1 10W TP 1608 MR119 2007 000078 BY230279 R CHIP 1Kohm 5 1 10W...

Страница 44: ...I PL101 3811 000389 70693052 WIRE NO SHEATH CU SPCW 300V 52 4mm 1 0 5 PL102 3811 000389 70693052 WIRE NO SHEATH CU SPCW 300V 52 4mm 1 0 5 PL103 2701 000002 BY330009 INDUCTOR AXIAL 100UH 10 4298 PL104 2701 000002 BY330009 INDUCTOR AXIAL 100UH 10 4298 PL105 2701 000002 BY330009 INDUCTOR AXIAL 100UH 10 4298 PR101 2007 000450 BY230299 R CHIP 180ohm 5 1 10W TP 1608 PR102 2007 000090 BY230285 R CHIP 10K...

Страница 45: ...81 BY330053 INDUCTOR AXIAL 33uH 5 2434 SL107 2701 000181 BY330053 INDUCTOR AXIAL 33uH 5 2434 SL108 2701 000181 BY330053 INDUCTOR AXIAL 33uH 5 2434 SL109 2703 001973 BY330093 INDUCTOR SMD 2 7uH 10 1608 SL110 2703 001973 BY330093 INDUCTOR SMD 2 7uH 10 1608 SL111 2703 001973 BY330093 INDUCTOR SMD 2 7uH 10 1608 SL112 2703 001973 BY330093 INDUCTOR SMD 2 7uH 10 1608 SQ101 0504 000152 BY530078 TR DIGITAL...

Страница 46: ...mA TP 133ohm 70 VB102 3301 001419 BY330073 BEAD SMD 220ohm 1608 500mA TP 133ohm 70 VB103 3301 001419 BY330073 BEAD SMD 220ohm 1608 500mA TP 133ohm 70 VC101 2203 005148 BY130480 C CER CHIP 100nF 10 16V X7R TP 1608 VC102 2203 005065 BY130479 C CER CHIP 1000nF 80 20 10V Y5V 1608 VC103 2203 005148 BY130480 C CER CHIP 100nF 10 16V X7R TP 1608 VC104 2203 005148 BY130480 C CER CHIP 100nF 10 16V X7R TP 16...

Страница 47: ...70 BY230274 R CHIP 0ohm 5 1 10W TP 1608 VR117 2007 000070 BY230274 R CHIP 0ohm 5 1 10W TP 1608 VR118 2007 000100 70795719 R CHIP 68Kohm 5 1 10W TP 1608 VR119 2007 000102 BY230292 R CHIP 100Kohm 5 1 10W TP 1608 VR120 2007 000078 BY230279 R CHIP 1Kohm 5 1 10W TP 1608 VR127 2007 000084 BY230282 R CHIP 4 7Kohm 5 1 10W TP 1608 VR128 2007 000119 BY230332 R CHIP 560ohm 5 1 10W TP 1608 VR129 2007 001167 B...

Страница 48: ...220F 4P 10 1 IC1S01 1203 002805 BY631237 IC PWM CONTROLLER ICE2BS01 PDIP 8P 9 52X IC1S02 0604 001028 BY530004 PHOTO COUPLER TR 50 600 250mW DIP 4 ST IC1S03 AC14 12006D 70795271 IC KA431Z TO 92 TAPING L1S01 AC29 00002A BY634272 FILTER LINE NOISE 30mH BLF 2116 L1S02 AC29 00002A BY634272 FILTER LINE NOISE 30mH BLF 2116 PCON01 3710 002036 BY634997 SOCKET BOARD TO BOARD 12P 1R 2 5mm STRAI PCON02 3710 0...

Страница 49: ...05 2202 000797 70795075 C CERAMIC MLC AXIAL 10NF 30 16V Y5S TP KCON01 3708 001803 BY635009 CONNECTOR FPC FFC PIC 10P 1 25MM ANGLE T KD101 0402 000127 70796385 DIODE RECTIFIER 1N4002 100V 1A DO 41 TP KD102 0401 000101 70795150 DIODE SWITCHING 1N4148 75V 150mA DO 35 T KD103 0401 000101 70795150 DIODE SWITCHING 1N4148 75V 150mA DO 35 T KD104 0401 000101 70795150 DIODE SWITCHING 1N4148 75V 150mA DO 35...

Страница 50: ...Electrical Parts List 7 12 MEMO ...

Страница 51: ...s page 39 Use this when recording from other input source such as a VTR or a camcorder 3 Disc tray page 20 Loads a disc into the disc drive 4 Remote sensor page 12 in INSTALLATION GUIDE 5 Front panel display page 15 6 DVD button page 37 46 56 Press this to operate a disc inside the disc tray 7 HDD button page 37 46 Press this to operate the HDD 8 REC button page 37 40 Starts recording 9 TIME SLIP ...

Страница 52: ...t keeps illuminating when executing a timer recording 5 PSO Progressive indicator Illuminates when video signals are output in the progressive format 6 Multi display Displays the current channel elapsed time remaining time input selection picture quality mode or some operational status such as playing etc When the power is turned off it displays the current time 7 DVD RAM indicator Illuminates whe...

Страница 53: ... terminal in this shape 7 VHF UHF RF IN FROM ANT input socket page 14 in INSTALLATION GUIDE Connects to an aerial or satellite signal 1 Power cord page 15 in INSTALLATION GUIDE Connects to a wall outlet 2 Ventilation fan 3 DIGITAL AUDIO OUT COAXIAL jack page 20 in INSTALLATION GUIDE Use this to connect the recorder to an audio receiver equipped with a coaxial digital audio input jack 4 AV OUT 1 AV...

Страница 54: ...t page 14 in INSTALLATION GUIDE Connects the supplied coaxial cable to a TV 9 AV1 TV socket page 39 Use this socket when connecting the TV that has the terminal in this shape Use this socket when connecting the video or other equipment that has the terminal in this shape Operating Instructions 12 4 ...

Страница 55: ... TV DVR DELETE CLEAR EXIT ENTER QUICK MENU OPERATION INSTANT SKIP INSTANT REPLAY NUMBER HDD DVD TOP MENU MENU MENU TIMESLIP CHANNEL VOLUME INPUT SELECT OPEN CLOSE CHP DIVIDE ANGLE SUBTITLE AUDIO REC MODE ZOOM SEARCH DISPLAY PROGRESSIVE EXTEND SETUP REMAIN 1 2 3 4 5 6 7 8 9 10 11 12 13 14 15 16 17 18 19 20 21 22 23 24 25 26 27 28 29 30 31 32 33 34 35 36 37 38 39 40 41 42 Operating Instructions 12 5...

Страница 56: ...PAUSE button page 38 47 TV DVR button page 38 REC button page 37 CHP DIVIDE button page 77 ANGLE button page 57 REC MODE button page 29 ZOOM button page 60 PROGRESSIVE button page 17 in INSTALLATION GUIDE EXTEND button page 36 DVD ON STANDBY button page 20 21 OPEN CLOSE button page 20 21 CHANNEL buttons page 20 37 INPUT SELECT button page 40 TIMESLIP button page 58 59 MENU button 1 QUICK MENU butt...

Страница 57: ...order will output TV channel signals to the connected TV also in the stop mode You can select a desired channel by pressing the CHANNEL or the number buttons Loading a disc Check disc compatibility beforehand page 6 and use a proper playable disc Caution Keep your fingers well clear of the disc tray Neglecting this may cause serious personal injury Keep a close watch on children Do not use a crack...

Страница 58: ...ing the formatting function of the recorder may refresh it However all contents stored on the disc will be completely erased by this initialization process This recorder may indicate alert messages with some DVD RAM discs right after insertion If such a disc is used for playback or recording on other equipment all data in the disc may be damaged and the disc will not be played By executing an init...

Страница 59: ...e status of the recorder e g Main on screen displays Depending on the disc some of these may not appear Playback Pause Stop Fast forward Fast reverse Forward skip Reverse skip Forward slow motion Reverse slow motion Forward frame by frame playback Reverse frame by frame playback Recording Recording pause When title playback is completed Instant skip Instant replay Chapter division Forward skip by ...

Страница 60: ...u To select the drive to operate The recorded contents are displayed To return to the current TV channel press the same button again This menu appears also when the recorder is turned on If you want to disable this feature change the setting page 120 To display Quick Menu a list of functions which are available in the current mode See pages 24 70 Press to select an item then press ENTER Timer reco...

Страница 61: ...1 Press QUICK MENU The following menu Quick Menu appears Actual selections vary depending on operational status 2 Press to select an item then press ENTER To exit the Quick Menu Press QUICK MENU again Alternatively Select Exit with then press ENTER Main function buttons continued e g Quick Menu Restart title Title information Bit rate Special playback mode Exit Operating Instructions 12 11 ...

Страница 62: ...e control operation unless otherwise noted You can use the buttons on the remote control and those on the main unit as well when they have the same function If copy protection signal is detected during recording on this recorder the recording automatically pauses and a message appears In this case the PAUSE button cannot release the recording It is possible to end the recording by pressing the STO...

Страница 63: ...gits and designate sides A and B on a double sided disc 1 Press the buttons to select Edit of Disc Number then press the ENTER button 2 Press the buttons to enter digits 3 Press the ENTER button DVD format 0 0 1 Disc Number Disc Name Start Cancel Edit Edit DVD mode Unformat Edit VR mode DVD format Disc Number Disc Name Start Cancel Edit Edit DVD mode Unformat Video mode DVD format 0 0 1 Disc Numbe...

Страница 64: ...ress RETURN then to select Management settings and press ENTER 4 Press to select DVD RAM physical format then press ENTER 5 Read the message and press to select Yes then press ENTER 6 Ask the question on shutting down using then press ENTER Notes The physical format process may fail if executed to a dirty DVD RAM Also the disc may be difficult to record even it is finished Before executing DVD RAM...

Страница 65: ... In multichannel broadcasting only the right channel sound is recorded Aspect ratio Video mode 4 3 and 16 9 cannot be mixed in one title Therefore set the aspect ratio before recording 4 3 Set the aspect ratio to 4 3 16 9 Set the aspect ratio to 16 9 DVD Video CHP create This is the setting to divide a title into some chapters It is convenient to skip scenes Off Chapter dividing is not available 5...

Страница 66: ... 1 Select the drive by pressing HDD or DVD CONTENT MENU appears Pressing the same button turns it off 2 Press REC MODE repeatedly to select the recording mode Each time you press the button the recording mode display on the front panel changes e g When a 4 7GB single sided DVD RAM is used Note You cannot change the recording mode while recording Recording time Picture quality XP About 1 hour Super...

Страница 67: ...Rec time h m HDD remaining excluding above 51h 24m Start End Media Pict Audio 1 SP 4 6 D M1 HDD e g 10 23 Su 17 50 Basic REC MENU Ch Date Rec folder Rec time h m HDD remaining excluding above 51h 24m Genre Start End Media Pict Audio 1 SP 4 6 D M1 10 30 Su 7 00 HDD DVD mode Edit title name Advanced Cancel Set timer ROOT No genre On l e g ENTER ENTER 1 2 3 4 5 6 7 8 9 10 0 TV DVD INPUT SELECT CHANNE...

Страница 68: ...ailable DVD RAM R RW disc beforehand Correcting a timer program 1 Press MENU 2 Press to select Timer recording then press ENTER 3 Press to select a timer program you want to change then press ENTER 4 Follow steps 4 to 6 to change the settings 5 Press EXIT to exit Important You cannot correct a timer program within 5 minutes before the recording start time You can only delete the timer program 10 2...

Страница 69: ...ck mark will occupy on the disc Pressing the ADJUST button can display or remove the check mark 4 Correct the parameters of the timer program if necessary Skip to step 6 if you do not need this Select an item you want to modify and press the ENTER button The item will be ready to be altered When High rate save is set to On Pict cannot be changed Press the ADJUST button to modify When complete pres...

Страница 70: ... to a recording for 2 5 hours or longer Not applicable when XP SP LP or AT is selected You can set a rate from 1 0 1 4 and at intervals of 0 2Mbps from 2 0 to 9 2 The upper limit of the value depends on the Audio setting Standard setting Superior to D M1 Recommended for recording music programmes Uncompressed original digital audio Equal quality to audio CD but recordable time will be shorter Exec...

Страница 71: ...lder To select a folder into which the programme is saved Available folders appear Select one from them For the folder function see page 50 2Genre To select a genre of the programme Available genres appear Select one from them For genres see page 124 3DVD mode Make this setting when this timer programme is or will be onto DVD R RW Video mode Off On l On ll See page 28 4Edit title name To enter a n...

Страница 72: ... Video mode set DVD Video chp div 8Chapter division when DVD Video Make this setting when this timer programme is or will be onto DVD R RW Video mode This feature creates chapters automatically while recording Chapters enables skipping play of the recorded disc Off This feature is disabled 5 min 10 min 15 min 20 min Select the interval of chapters Notes If a number of chapters reaches the maximum ...

Страница 73: ...r the recording 4 Press ENTER Notes The recording end time cannot be changed in the following cases within 1 minute before the recording end time advancing the recording end time during recording in AT mode Even if you extend the recording end time the recording will stop when the HDD is filled up Also at 8 hours from the start time the recording will stop Relief recording If you set a timer progr...

Страница 74: ...le to record the programme Make sure the loaded disc is not write protected If you record on a DVD R or a DVD RW disc set DVD compatible mode page 28 to On Mode I or On Mode II In DVD R RW recording Off setting is regarded as On Mode I If you record on a DVD R or DVD RW disc set Aspect ratio video mode page 28 according to recording sources HDD DVD RAM DVD RW VR DVD RW Video DVD R VR DVD VIDEO VCD...

Страница 75: ...recorder holds a timer program of recording The programmed end time must be set for 5 minutes later than the current time Recording a TV programme Continued Notes The number of titles cannot exceed 99 for a DVD RAM RW R disc or 396 for the HDD One continuous recording cannot exceed in any case 8 hours Recording automatically stops at 8 hours You cannot start recording immediately before a programm...

Страница 76: ...ord if selectable such as multiplex broadcasting as the recorder records sounds of external source in stereo onto a DVD R RW disc ignoring the setting of DVD compatible mode page 28 DVD R RW discs Video mode cannot record contents with copy restriction signal embedded copy protected or copy once contents the HDD DVD RAM disc CPRM compatible DVD R RW VR mode can record copy once contents Some satel...

Страница 77: ...To record on the HDD DVD To record on a DVD RAM R RW disc 3 Press REC of this recorder to start recording 4 Start playback of the source content on the connected equipment 5 When recording is completed press STOP Recording an external source Continued 1 2 3 4 5 6 7 8 9 10 0 TV DVD INPUT SELECT CHANNEL MODE RETURN SLOW REV FWD SLOW PLAY STOP PAUSE REC SKIP REV SKIP FWD ADJUST ADJUST TV DVR DELETE C...

Страница 78: ...uring recording on this recorder Operations such as pausing resuming fast forwarding CUE and fast reversing REVIEW etc may produce noises which may be detected as copy protection signals Therefore first start playback on the source equipment to confirm that the desired source can be played properly and then start recording on this recorder Do not operate the source equipment during recording After...

Страница 79: ...ing play or stop press MENU 2 Press to select Edit programme then press ENTER 3 Press HDD or DVD to select a disc that contains titles or chapters you want to delete 4 Press to select Del rec programme then press ENTER EDIT MENU Del Selected items appears 5 Select a part a title or chapter to delete To select a part see page 83 84 Select a title to delete pressing 6 Press repeatedly to select Star...

Страница 80: ...ing similar bit rates the difference may be insignificant Generally when you set the bit rate low for longer recording time the data volume shortage will result in a lack of detail information As a result the picture quality is decreased more noticeable with dynamically moving images For example square noises block noise may occur in a scene with fast action or a scene with light and shadows such ...

Страница 81: ...Playback Play your favorite contents Playing recorded contents CONTENT MENU Folder function Playing a DVD video disc Other playback functions Operating Instructions 12 31 ...

Страница 82: ...ton The Chapter List appears By pressing the MODE button again you can return to the Title List 3 Press ENTER Playback starts from a selected title chapter Notes In a CONTENT MENU titles Original precede titles Playlist in order from the oldest one respectively To turn off the CONTENT MENU press the EXIT button Absence of operations for longer than about 15 minutes also turns off the CONTENT MENU ...

Страница 83: ...an go back by the specified time to resume playback You can select the interval per press of the button See Instant replay interval page 121 Notes This operation may not work for some discs Depending on the structure of a disc some operations may be limited Depending on playback conditions some operations may not work Erasing content 1 At step 2 on page 46 select an unnecessary title chapter 2 Pre...

Страница 84: ... frame by frame playback is not available 8 PAUSE Skipping to the next previous chapter or track Press SKIP REV or SKIP FWD repeatedly until the chapter or track number you want appears Playback starts from the selected chapter or track Playback starts from the beginning of the next chapter or track Playback starts from the beginning of the current chapter or track When you press twice playback st...

Страница 85: ...ction is not available on DVD R RW discs The resuming function will not work if the write protect tab is set to PROTECT page 7 To play a recorded title while recording another on the same disc Recorded Title Play During recording you can play a title recorded on the same disc 1 While recording press HDD or DVD 2 Press to select a desired title then press the ENTER Playback of the selected title st...

Страница 86: ...rds Cruise Cat show Cat show Fishing lesson Country life LOCK Natures Natures 1 25 30 0 00 00 HDD 01 001 03 02 001 002 003 03 004 005 006 ENTER Title List on which GARBAGE is placed is called ROOT To open the folder press to select the folder then press ENTER 1 1 2 3 4 5 2 3 4 5 To go back to the ROOT press to select this icon then press ENTER Folder number Folders are displayed in order from the ...

Страница 87: ...me name in the HDD then execute copying the copied contents will be put in the folder of the same name When copying from DVD RAM or DVD R RW VR mode to the HDD the folder of the same name is created automatically A DVD RAM or DVD R RW VR mode which contains folders created on this recorder may lose the folder assortment or the titles may move onto the ROOT if it is used on other players including ...

Страница 88: ... bin then press ENTER 5 Press to select Yes then press ENTER To cancel select No then press ENTER The lid of GARBAGE opens when a title is put in Emptying GARBAGE Titles in GARBAGE can be deleted collectively Once you execute the deleting process it cannot be cancelled You cannot execute in the following situations While preparing for a timer recording While recording a programme 1 Press HDD 2 Pre...

Страница 89: ...r 1 While displaying a Title List press QUICK MENU 2 Press to select Folder function then press ENTER 3 Press to select Move multiple to folder then press ENTER 4 Press to select a title you want to move then press ENTER 5 Press to select a folder in which you want to move the title then press ENTER An icon with the folder number appears e g When set to be moved to folder 03 To cancel the title pr...

Страница 90: ...ar and all the titles in it will move onto the ROOT You cannot remove the following folders LOCK GARBAGE Folders which contain a protected title Cancel the protection 1 Press HDD or DVD to select the drive HDD Contents in the HDD DVD Contents in a loaded disc 2 Press to select a folder you want to remove then press QUICK MENU 3 Press to select Folder function then press ENTER 4 Press to select Rem...

Страница 91: ...t again before pressing the ENTER button If you forget the security code or you want to cancel it press the STOP button 4 times then press the ENTER button Notes It you change the setting from On show or On hide to Off all the titles which are in LOCK will move onto the ROOT Even though parts of a Playlist are in LOCK the Playlist can be played Operating LOCK LOCK changes its status as follows Loc...

Страница 92: ...ated number with the number buttons 3 Press ENTER Notes The instructions above describe basic procedures which may vary depending on the contents of the DVD video disc If different instructions appear on the TV screen follow those instructions If you display the top menu during playback and press the DVD button again without selecting any title the recorder may resume playback from the point where...

Страница 93: ...creen Press the ANGLE button while the angle icon is displayed e g 2 Press ANGLE while the angle number is displayed on the TV screen You can also select the camera angle by pressing the ANGLE button several times The angle icon disappears after about 3 seconds if no further selections are made Notes You can also change the camera angle during still playback The camera angle changes to the new set...

Страница 94: ... recording playback stops when the disc is filled up You can play up to a location where the recorder stopped the recording The time slip recording playback cannot begin if the disc is full The playback picture may appear after a delay of several seconds The playback location will never be identical to the record location in the programme It will always trail the record location by a few seconds W...

Страница 95: ...tton You can play in fast forward to within 10 seconds prior to the current broadcast 3 Press TIMESLIP to exit this mode The recorder stops storing the broadcast on the HDD A message appears and asks you whether you will save the stored data or erase it Press the buttons to select then press the ENTER button Notes This function is not available during recording Pause TV recording stops when the HD...

Страница 96: ...d magnification level MODE Raises the magnification level RETURN Lowers the magnification level Moves the zoom point only after the image has been magnified CLEAR Set OPERATION NUMBER switch to NUMBER Returns the zoom point to the center of the picture Notes Some discs may not respond to zoom feature During some scenes the buttons may not work as described The zoom feature is canceled when the dis...

Страница 97: ...on a disc Press the button until the following display appears e g 2 Press the number buttons and to enter the desired time location on the disc When entering numbers set OPERATION NUMBER switch to NUMBER e g To enter 1 hour 25 minutes and 30 seconds 0 1 2 5 3 0 hour minute second 3 Press ENTER Notes Some discs may not respond to this process Some scenes may not be accessed precisely as you specif...

Страница 98: ...reo R right channel Back to Stereo Dual Mono sound NICAM Dual L Dual R Dual LR Back to Dual L The following discs can be switched by pressing the AUDIO button in the lid DVD RW Video DVD VIDEO DVD R Video Language name sound recording system No of channels e g VCD Stereo Stereo L Stereo R Back to Stereo The display turns off if you do not operate for more than 3 seconds If you press the buttons to...

Страница 99: ...o Mono Mono Mono Stereo Notes Some discs allow you to change audio selections only via the disc menu If this is the case press the MENU button and choose the appropriate language from the selections on the disc menu When you turn on the recorder or replace a disc the recorder returns to the initial default setting page 115 Depending on the disc the sound that is specified the disc is played back I...

Страница 100: ...depending on the size JPEG picture playback is not available during recording on the HDD Operation to JPEG file will be disabled at about 5 minutes before a programmed recording starts To stop playback slide show Press STOP If you press the PLAY button after pressing the STOP button playback will start from the photo you stopped To pause playback slide show Press PAUSE To resume press the PAUSE bu...

Страница 101: ...ess ENTER If you select a folder at step 2 repeat steps 2 and 3 until your favorite file appears The selected photo appears in full screen Notes The CONTENT MENU Picture List cannot show all the files in a disc but only ones regarded as objects of regular play of the disc The larger the file size is the longer the thumbnail takes time to appear Letters of a file folder name overflowing the given s...

Страница 102: ...o 1 Press DVD 2 Load a CD that contains MP3 files Playback starts from the first track of a current folder If playback does not start press the PLAY button To stop playback Press STOP If you press the PLAY button after pressing the STOP button playback will start from the beginning of the track To pause playback Press PAUSE To resume press the PAUSE button again or press the PLAY button To skip tr...

Страница 103: ...able disc formats including CD R containing MP3 files Given the fact that technology in this area is still maturing Toshiba cannot guarantee that all genre of recordable discs will produce optimal playback quality The technical criteria set out in this owner s manual are meant as a guide only Customers should also note that permission is required in order to download MP3 files and music from the i...

Страница 104: ...yback mode Operating disc Receiving channel e g DISPLAY 002 3 00 10 29 00 05 15 0005 Stereo Title repeat DVD RAM Title Chapter Virtual surround Picture Quality Audio Quality Audio Audio Output Subtitle Off SP 1 Stereo R Original Bitstream Off 002 3 00 22 01 00 00 07 0005 Stereo Title repeat DVD RAM Title Chapter D M1 Remaining time HDD DVD RAM DVD RW VR DVD RW Video DVD R VR DVD VIDEO VCD CD DVD R...

Страница 105: ... recording time per 30 minutes Recording end time if it comes within 30 minutes Elapsed time QUICK MENU Changing the location of the time bar While the time bar is displayed press The time bar shifts up and down Turning off the time bar Press QUICK MENU and select TimeBar again then press ENTER Note Time display is an approximation 01 30 00 00 00 00 00 30 00 00 00 00 00 55 00 00F Location 00 18 00...

Страница 106: ...button the following display appears Perform steps 1 and 2 below e g To cancel the procedure press the RETURN button 1 Press ENTER at the beginning of the segment point A you want to repeat The location of point A is memorized The display changes to Set B repeat Set A B A 2 Press ENTER at the end of the segment point B The location of point B is memorized and repeat playback begins between point A...

Страница 107: ...VD RW VR DVD RW Video DVD R VR DVD VIDEO VCD CD DVD R Video 1 During playback or stop press QUICK MENU 2 Press to select Title information then press ENTER Title information To exit the Quick Menu HDD DVD RAM DVD RW VR DVD RW Video DVD R VR DVD VIDEO VCD CD DVD R Video Press QUICK MENU again or Press to select Exit then press ENTER Exit ...

Страница 108: ...ng Instructions 12 58 Editing You can create your own movie from your assembled scenes Save your favorite videos in DVD discs Creating your own title Creating a DVD Video using DVD R RW Other editing functions ...

Страница 109: ... to make a playlist Then copy the playlist and delete the original title or the playlist For example make a playlist and copy it to a DVD RAM Then delete original titles on the HDD It can save time and effort and retain continuity in the HDD space However when moving a copy once program from the HDD to a DVD RAM disc delete unnecessary chapters from original titles For details page 88 Running All ...

Страница 110: ...ylist and it becomes an original title Playlist editing Collect your favorite chapters to make them as one title Playlist If an original title is deleted a playlist will be also deleted because playlists are fictitious titles e g Making a playlist by collecting scenes of cats from title 1 The world of cats and dogs Title 1 Title 2 Title 3 Title 4 Title 5 Title 6 Playlist Editing A fictitious playl...

Страница 111: ...ter entry screen appears To change a title name or chapter name see the steps on page 128 2 06 32 0 04 15 3 10 31 Mo 2005 Media Documentary general Mode Rate Audio HDD 10 00 22 00 CH 006 Title Chapter 0001 LP 2 2 D M1 Off Off Title Information DVD Mode Saving CONTENT MENU 2005 10 31 Ch 3 e g ENTER HDD DVD RAM DVD RW VR DVD RW Video DVD R VR DVD VIDEO VCD CD DVD R Video HDD DVD TOP MENU QUICK MENU ...

Страница 112: ...DE button during recording at the desired points By selecting an option that inserts chapter marks automatically during recording at regular intervals page 28 Recording a programme onto the HDD to make chapter divisions on it then dubbing the title to a DVD R RW Video mode Precise method If you want to modify the chapter division or want to place a chapter mark more precisely monitoring the frame ...

Страница 113: ...pect Ratio Location To create new chapter select desired start point via remote To set press enter Divide Title 004 Chapter 0001 E D I T MENU Chapter Editing HDD VR Fishing Guide e g etc HDD VR Title List Page CONTENT MENU 1 5 0 53 45 0 29 50 Play List 0 54 30 0 51 28 0 52 40 0 30 08 Summer day Singing birds Cruise Cat show Fishing lesson Country life Natures 001 002 003 03 004 005 006 e g Quick M...

Страница 114: ...time bar When complete the CONTENT MENU returns ENTER 00 54 30 00 00 21 24F 00 00 00 4 3 Original Aspect Ratio Location To create new chapter select desired start point via remote To set press enter Divide Title 004 Chapter 0001 E D I T MENU Chapter Editing HDD VR Fishing Guide e g E D I T MENU 00 54 30 00 00 21 24F 00 00 00 4 3 Chapter Editing Original Aspect Ratio Location To create new chapter ...

Страница 115: ...rams such as live sports games 1 Perform steps 1 to 4 on pages 77 to 78 2 Press to select Auto Chapter Create then press ENTER 3 Press to select a chapter division interval then press ENTER Chapter divisions are automatically marked at the selected intervals Notes on contents with 4 3 and 16 9 sizes mixed which will be copied to DVD R RW Video mode Some content from external sources may contain 4 ...

Страница 116: ...ENT MENU Chapter List Naming a chapter 1 From the EDIT MENU Chapter Editing select a chapter which you want to name 2 Press QUICK MENU 3 Press to select Edit Chapter Name then press ENTER A keyboard appears Enter a name following the on screen icon guides Notes You can enter up to 64 characters There is a limit to the number of chapters which can be named If exceeded a message appears You can also...

Страница 117: ...ating your own title 3 Collecting necessary scenes Continued HDD DVD RAM DVD RW VR DVD RW Video DVD R VR DVD VIDEO VCD CD DVD R Video MENU MENU ENTER HDD DVD TOP MENU 1 2 3 4 5 6 7 8 9 10 0 TV DVD INPUT SELECT CHANNEL MODE RETURN SLOW REV FWD SLOW PLAY STOP PAUSE REC SKIP REV SKIP FWD ADJUST ADJUST TV DVR DELETE CLEAR EXIT QUICK MENU OPERATION INSTANT SKIP INSTANT REPLAY NUMBER HDD DVD TOP MENU ME...

Страница 118: ...ETURN SLOW REV FWD SLOW PLAY STOP PAUSE REC SKIP REV SKIP FWD ADJUST ADJUST TV DVR DELETE CLEAR EXIT QUICK MENU OPERATION INSTANT SKIP INSTANT REPLAY NUMBER HDD DVD TOP MENU MENU MENU TIMESLIP CHANNEL VOLUME INPUT SELECT OPEN CLOSE CHP DIVIDE ANGLE SUBTITLE AUDIO REC MODE ZOOM SEARCH DISPLAY PROGRESSIVE EXTEND SETUP REMAIN ENTER HDD VR HDD Playlist Editing Original Play List Source VR Title Object...

Страница 119: ...ot add a title of still pictures or a title or a chapter which contains both still and moving pictures to a playlist By copying dubbing a Playlist a title Original of the same contents is created You cannot program a Playlist of contents recorded on a DVD R RW disc Video mode To make a Playlist using contents of DVD RW discs Video mode copy them to the HDD beforehand Down arrow on the thumbnails m...

Страница 120: ... stop mode of a Playlist title press MENU 2 Press to select Edit programme then press ENTER 3 Press to select Create a playlist then press ENTER The EDIT MENU Playlist Editing appears 4 Press to select a part and press to select Start then press ENTER The areas of title name and part selection become blank 5 Following the procedures outlined on page 83 make a Playlist Naming a title Playlist 1 Fro...

Страница 121: ...necessary parts at once if they are alternating with unnecessary ones 1 On EDIT MENU Playlist Editing press MODE to display chapters 2 Press QUICK MENU 3 Press to select Odd number chapers or Even number chapters 4 Press ENTER Creating your own title 3 Collecting necessary scenes Continued ...

Страница 122: ...o the HDD page 94 Record to HDD You can record copy free contents in a disc to the HDD while playing Use this method in the following cases To copy contents of a finalized DVD R RW to the HDD To copy contents of a DVD R RW which was recorded on other devices therefore cannot display CONTENT MENU on this recorder to the HDD page 95 Copy HDD You can copy recorded contents in the HDD to make another ...

Страница 123: ...its a single copy only The title Playlist contains a portion that prohibits copying Edit the title from the Original and create a new Playlist Notes If either the HDD or DVD RAM is not in optimum physical condition an error may occur when you execute Move and some titles or chapters may be lost If you want to Move non copy protected titles and chapters it is recommended for safety that you first C...

Страница 124: ...the same time Dubbing may be cancelled if the start time of a timer programme recording is reached as time programme recording has priority over dubbing While the recorder is performing dubbing and recording at the same time CONTENT MENU cannot be displayed On dubbing from a DVD R VR mode Copy free contents recorded in a DVD R VR mode can be dubbed to the HDD However please note that moving conten...

Страница 125: ...s this mode to To fit To fit Move to fit To fit Main To fit sub If the disc space is not sufficient for recording of the contents you selected the recorder automatically lowers the picture and sound quality so that the contents fit in the disc space The minimum rate of this mode is 2 0 Change quality Change quality moving Change quality main Change quality sub Picture and sound quality of your usu...

Страница 126: ...ossible but only moving is available If you want to copy titles or chapters do not select titles or chapters of copy once content Adding titles or chapters of copy once content is not accepted If you dubbed onto a DVD R RW and you want to play it also on other DVD device the disc needs to be finalized writing completion process on this recorder Proceed to the next page to finalize the DVD R RW Can...

Страница 127: ... LEAVE HERE DO NOT LEAVE HERE DO NOT LEAVE HERE DO NOT LEAVE HERE DO NOT LEAVE HERE DO NOT LEAVE HERE DO NOT LEAVE HERE DO NOT LEAVE HERE DO NOT LEAVE HERE DO NOT LEAVE HERE DO NOT LEAVE HERE DO NOT LEAVE HERE DO NOT LEAVE HERE DO NOT LEAVE HERE DO NOT LEAVE HERE DO NOT LEAVE HERE DO NOT LEAVE HERE DO NOT LEAVE HERE DO NOT LEAVE HERE DO NOT LEAVE HERE Deep Blue Olive Sepia Light Blue DO NOT DO NOT...

Страница 128: ... also possible however the disc space can be restored only by the volume of the title last recorded On DVD RW discs it is possible to cancel the DVD Video finalizing process or to initialize for a new use If a start time of a programmed recording comes during finalizing process the recording is made onto the HDD However while making a menu the recording is not executed Also when Relief recording i...

Страница 129: ...g DVD HDD page 87 1 Perform steps 1 to 2 on page 90 to select a part 2 Press to select Start then press ENTER Read the message and press to select Yes then press ENTER Dubbing starts Note For options such as dubbing mode selection see page 90 HDD VR HDD Dub Original Source will be Title Source VR Title Dub To Start Capacity High speed dubbing E D I T MENU Dub 11 DVD RAM VR 2 1 ...

Страница 130: ...e beginning and the end of the title Therefore thumbnails in the CONTENT MENU may be black To change the thumbnail see page 106 Record to HDD is not available on copy prohibited DVD video discs and audio CD Record to HDD is not available on copy once content While performing this recording LineU appears on the TV screen and L U on the front panel display Line U is given to names of title created b...

Страница 131: ...a part 2 Press to select Start then press ENTER Read the message and press to select Yes then press ENTER Dubbing starts Note For options such as dubbing mode selection see page 90 Use this method also when you create a new title Original from a title Playlist HDD VR HDD VR HDD Dub Original Source will be Title Source VR Title Dub To Start Capacity High speed dubbing E D I T MENU Dub 11 2 1 ...

Страница 132: ... R RW Unfinalized HDD HDD To From Yes Yes Yes Yes Yes Yes Yes Yes Yes Yes Feature for dubbing of contents in folders It is not possible to designate a receiving folder when dubbing contents in a folder However if you beforehand make a folder of the same name on the receiving disc the contents will be dubbed to the folder For details see Creating folders page 51 When a receiving disc is the HDD and...

Страница 133: ...o little contents or too many quality and picture settings etc If a start time of a programmed recording comes during this procedure the recording is made onto the HDD However while making a menu theme the recording is not executed Also programmed recordings to DVD media with Off setting of Relief recording page 123 are not executed If a programmed recording starts during this procedure you cannot...

Страница 134: ...hat contains the chapter you want then press the MODE button To return to the title display press the MODE button again Continued MENU MENU ENTER ENTER 1 2 3 4 5 6 7 8 9 10 0 TV DVD INPUT SELECT CHANNEL MODE RETURN SLOW REV FWD SLOW PLAY STOP PAUSE REC SKIP REV SKIP FWD ADJUST ADJUST TV DVR DELETE CLEAR EXIT QUICK MENU OPERATION INSTANT SKIP INSTANT REPLAY NUMBER HDD DVD TOP MENU MENU MENU TIMESLI...

Страница 135: ...uttons to select Edit title name or Modify title thumbnail to change the title or Edit Chapter Name or Modify chapter thumbnail to change the chapter and press the ENTER button 3 Use the entry screen to change the title or chapter name To change a title thumbnail or a chapter thumbnail see the steps on page 106 ENTER 1 2 3 4 5 6 7 8 9 10 0 TV DVD INPUT SELECT CHANNEL MODE RETURN SLOW REV FWD SLOW ...

Страница 136: ...f characters is limited for the disc name you can enter If you selected None for Menu Create at step 9 select Writing on the bottom right corner and press the ENTER button Skip to step 15 Continued 1 2 3 4 5 6 7 8 9 10 0 TV DVD INPUT SELECT CHANNEL MODE RETURN SLOW REV FWD SLOW PLAY STOP PAUSE REC SKIP REV SKIP FWD ADJUST ADJUST TV DVR DELETE CLEAR EXIT QUICK MENU OPERATION INSTANT SKIP INSTANT RE...

Страница 137: ...EAVE HERE DO NOT LEAVE HERE DO NOT LEAVE HERE DO NOT LEAVE HERE DO NOT LEAVE HERE DO NOT LEAVE HERE DO NOT LEAVE HERE DO NOT LEAVE HERE DO NOT LEAVE HERE DO NOT LEAVE HERE DO NOT LEAVE HERE DO NOT LEAVE HERE DO NOT LEAVE HERE DO NOT LEAVE HERE DO NOT LEAVE HERE DO NOT LEAVE HERE DO NOT LEAVE HERE DO NOT LEAVE HERE DO NOT LEAVE HERE DO NOT LEAVE HERE Deep Blue Olive Sepia Light Blue DO NOT LEAVE HE...

Страница 138: ...ow appears except when Auto power off see below is set If you select Yes you can make one more DVD R RW of the same content If you select No you can complete creating the DVD Video You can set the recorder to turn off automatically when the job finishes 1 During the job press the QUICK MENU button 2 Press the buttons to select Auto power off 3 Press the ENTER button ENTER ENTER 1 2 3 4 5 6 7 8 9 1...

Страница 139: ... Option Settings Even if the title is recorded with DVD compatible mode set to On Mode I or On Mode II using a recorder other than this may cause failure when recording to a DVD R RW If the DVD R creating fails to be completed most of the discs cannot be used again If an error occurs while a DVD Video is created the error code ERR indicates the error code is shown in the front panel display of the...

Страница 140: ... page numer on upper side of the screen OR the letter color of the title name the chapter name and the time beside the thumbnail 3 Set each item by referring to the guidance on the right half of the display finally press RETURN to exit The preview screen returns If a message appears while selecting a part You may receive a message such as Selection of Writing Test in the next option setting is rec...

Страница 141: ... can register your favorite scene as a thumbnail displayed on the CONTENT MENU On a finalized DVD R RW disc this feature is not available 1 Press HDD or DVD then press to select a title 2 Press QUICK MENU The Quick Menu appears 3 Press to select Create thumbnail or Create CHP thumbnail if selected a chapter at step 1 then press ENTER The CONTENT MENU Create thumbnail display appears HDD DVD RAM DV...

Страница 142: ...s PAUSE 6 Press ENTER The CONTENT MENU returns The selected scene is displayed as a thumbnail Notes There may be a small difference between a thumbnail made on the Create thumbnail display and that displayed in the CONTENT MENU Operation with the SLOW REV or FWD SLOW buttons may extend the difference You cannot create thumbnails of chapters in a title that contains a still picture If you create a ...

Страница 143: ...or stop press MENU 3 Press to select Edit programme then press ENTER The EDIT MENU Main Menu appears 4 Press to select Combine titles then press ENTER The EDIT MENU Combine ORG Title display appears 5 Press to select the first title to merge Press SKIP REV or SKIP FWD button to move to the previous or next page 6 Press ENTER The cursor appears in the lower area of the screen the title to merge to ...

Страница 144: ...the Quick Menu 2 Press buttons to select Cancel Selected Title or Clear All Selected Items for cancelling the selection of multiple items at a time 3 Press ENTER button 9 Press to select Start combining and press ENTER then select Yes and press ENTER The combining process starts Notes You cannot stop the combining process after it has started You cannot combine titles if their length will exceed 8...

Страница 145: ...t in the number of times it can be edited depending on the remaining disc space or the number of times of loading Additionally DVD R VR mode cannot restore the disc space even after recorded content is deleted Area for recorded titles Area where editing information dividing chapter making Playlist deleting etc are saved Each time it is edited the recorder writes over the old one to save Area for r...

Страница 146: ...ot be copied again The only option left is moving from the HDD to a DVD RAM or DVD R RW Moving from a DVD disc to the HDD is not permitted Copy once content recorded on a DVD disc cannot be played on a PC Once recorded copy once content cannot be copied again DVD standard saves the data by the copy protection system called CPRM A PC is required to be equipped with CPRM compatible playback software...

Страница 147: ...Operating Instructions 12 97 Function Setup You can change the default settings to customize performance to your preference Customizing the function settings ...

Страница 148: ... from 115 to change the selection by or other buttons then press ENTER To select another item in the same group repeat steps 3 to 4 To shift to another group press the RETURN button then repeat steps 2 to 4 5 Press SETUP The setup display disappears and the setting is completed 1 2 3 4 5 6 7 8 9 10 0 CHANNEL MODE RETURN SLOW REV FWD SLOW PLAY STOP PAUSE REC SKIP REV SKIP FWD ADJUST ADJUST TV DVR D...

Страница 149: ... in English e g DVD subtitle language DVD dynamic range control DVD audio language DVD player settings DVD disc menu language English English No subtitle On Code E N French To play sound tracks recorded in French German To play sound tracks recorded in German Spanish To play sound tracks recorded in Spanish Others To make further choices After pressing the ENTER button follow steps 1 4 below 1 Obt...

Страница 150: ...the vocal output during DVD KARAOKE disc playback Off The main vocal sound is not output On The main vocal sound is output Notes This function is available only for a DVD KARAOKE disc recorded in Dolby Digital Multi Channel format If you want to enjoy the KARAOKE function connect an amplifier or other such device to this recorder DVD parental lock HDD DVD RAM DVD RW VR DVD RW Video DVD R VR DVD VI...

Страница 151: ...t has a higher limitation level than your selected limitation level cannot be played back For example if you select level 7 discs exceeding level 8 are locked and cannot be played back When US is selected its limitation level corresponds to the following settings Level 7 NC 17 Level 3 PG Level 6 R Level 1 G Level 4 PG13 To change the limitation level of the Parental Lock function Follow step 1 3 a...

Страница 152: ...elect Off Virtual surround On NICAM PAL PAL Auto Normal Picture Audio settings Play DNR Auto Progressive conversion Bitstream Audio out select Setting 1 Setting 2 Setting 3 Custom picture setting Contrast 7 Lower Higher 7 Color 7 Duller Brighter 7 Edge enhance Soft ON Off normal Sharp ON Gamma Level off 1 2 To adjust Gamma Level when the picture is too dark to view 3 After adjusting the items pres...

Страница 153: ...ereo amplifier is connected to this recorder When you play back a disc recorded in Dolby Digital MPEG1 or MPEG2 format the sound is converted to the PCM 2ch format and output Virtual surround HDD DVD RAM DVD RW VR DVD RW Video DVD R VR DVD VIDEO VCD CD DVD R Video This lets you play discs with acoustic effects having greater depth and presence even when using only two speakers Off Virtual surround...

Страница 154: ...up screen is not displayed On Animation The startup screen appears automatically when turning on the power On menu The Menu screen appears automatically when turning on the power Screen protector HDD DVD RAM DVD RW VR DVD RW Video DVD R VR DVD VIDEO VCD CD DVD R Video Turns the screen saver on or off To reduce TV screen damage image burn this function disengages the pause mode of a playback image ...

Страница 155: ...humbnail 0 sec 3 sec 10 sec 35 sec 1 min 5 min Note Thumbnails can also be changed to other scenes See page 106 HDD RAM title play HDD DVD RAM DVD RW VR DVD RW Video DVD R VR DVD VIDEO VCD CD DVD R Video Activates resume play per title or continuous play Title resume Remembers the point where you stop playback Allows you to resume the playback from that point Serial playback You can play back titl...

Страница 156: ...pper limit for the picture quality setting differs Picture record mode HDD DVD RAM DVD RW VR DVD RW Video DVD R VR DVD VIDEO VCD CD DVD R Video Adjusts problems with the brightness of video signals of TV broadcasts or other external input Press the buttons to select the source and the buttons to select the mode Only use this setting when you cannot adjust the brightness satisfactorily with the Cus...

Страница 157: ...D RW Video DVD R VR DVD VIDEO VCD CD DVD R Video See page 28 Relief recording HDD DVD RAM DVD RW VR DVD RW Video DVD R VR DVD VIDEO VCD CD DVD R Video If you set a timer programme to a loaded DVD disc but the disc does not have remaining space to record the programme the recorder records the whole programme to the HDD instead of the loaded disc Off Deactivates this function On Activates this funct...

Страница 158: ...uto stop mode Eco mode Sets the front panel display to turn on off in the standby mode Off Sets the front panel display to turn on in the standby mode On Sets the front panel display to turn off in the standby mode Yes No All titles are about to be deleted in spite of title protected Proceed HDD auto stop HDD DVD RAM DVD RW VR DVD RW Video DVD R VR DVD VIDEO VCD CD DVD R Video Turns on or off a po...

Страница 159: ...tles stored in the HDD are permanently deleted 1 Press the buttons to select Start then press the ENTER button 2 Confirm the message press the buttons to select Start and then press the ENTER button Initialization of the HDD starts If you want to cancel the initializing select Cancel DVD RAM physical format HDD DVD RAM DVD RW VR DVD RW Video DVD R VR DVD VIDEO VCD CD DVD R Video Performs physical ...

Страница 160: ...Operating Instructions 12 110 MEMO ...

Страница 161: ...DEO SIGNALS HDD Fig 13 1 Video signals C Y CY Cb Cr output to video amp MM1568 is 9dB video amplifier This IC amplifies signals which received from main board and outputs CVBS S VIDEO Component signals This IC has 4 inputs and 2 ouputs for video and has audio and video swicher with I2 C bus for two SCARTS AV1 AV2 Each inputs and out puts channels are the same as this block diagram 74HC4051 is anal...

Страница 162: ...ta by audio AD onverter AIC03 The signal passed AD con verter transmit to main board which have Dolby Digital encoder decoder MC14051 is analog Mux for swiching audio inputs Swiching logic controls are performed by front micom MIC01 Swiched one input output to main board RD XS24 has two stereo outputs and one digital output coaxial Decoded signal by AV decorder in main board is inputted to audio D...

Страница 163: ...ection that results in a better band characteristic 5 Mixer IC Mixer OSC PLL It consists a VHF and UHF OSC and Mixer circuit We applied mixer to make better characteristic of rejection it shows especially various beat characteristic 6 PLL IC The PLL IC plays a role selection of Tuner channel It was built in three wire PLL IC charge pump and band driver The minimum of step frequency is 31 25KH z Fr...

Страница 164: ... detection type The carrier which is detected from video det is directly input to AFT The 90 degree delayed phase signal is input at the same time to AFT and the results come out 5 IF AMP IF signal which is selected in Saw filter is amplified in IF amp frequency enough to be detected The IF amp has parallel inputs outputs structure FM Det AFT Lim Amp 1 2 4 5 6 10 11 12 24 21 19 14 15 16 17 Video A...

Страница 165: ...m Lens NA 0 45 0 45 0 5 0 6 0 6 0 6 Laser wavelenght 780um 780um 650um 650um 650um Track pitch 1 6pm 1 6pm 0 74pm 0 74pm 0 615pm Capacity 0 65GB 0 65GB 4 7GB 4 7GB 4 7GB Track structure Pit train Groove Pit train Groove Land Groove 2 Disc Formats DVD consists of two 0 6mm discs attached together enabling access to the upper and lower side of the disk and 4 sides could be used at maximum Single Lay...

Страница 166: ...arge storage capacity DVD Audio Playback Only High quality sound that exceeds the CD multi channel Audio DVD R 1 Time Recording As with CD R write only once DVD RAM Rewritable This can be virtually used as hard disk with a random more than 100 000times read write access Rewritable Similar to DVD RAM except than its technology features DVD RW About 1000times a separated read write access more like ...

Страница 167: ...es the user to select the scenario 7 Multi Angle Able to view the camera angle you selected among the scenes recorded with multiple camera angles Note The above media features must have the DVD Title that contains the appropriate contents to function properly 14 2 2 Audio Video Specifications Classification DVD Video Video CD LD Compression MPEG 2 MPEG 1 Analog Pixel 720 x 480 352 x 240 VIDEO Hori...

Страница 168: ... When Developing the DVD Software various addition and modification is possible DVD Video uses the variable compresion technology the MPEG 2 to compress the moving image optimally mini mizing the Data loss to Provide a clear natural screen while increasing the storage time DVD Video Feature 2 Application of the MPEG 2 compression technology MPEG 2 Variable compression Max 1 40 Field unit compressi...

Страница 169: ...add on components from leading consumer audio vendors Dolby Digital AC 3 Unlike the traditional Dolby pro Logic method the Dolby Digital method separates all 5 main channels Front L R Center Surround Rear L R and the Sub woofer to provide live surround audio Using the Down Mix method the conventional Dolby Pro Logic and Stereo are all compatible Each separated channels are played back at CD qualit...

Страница 170: ... viewer selection capabilities 16 9 TV Wide Mode 16 9 Wide Full Screen 4 3 TV Letter Box Mode Pan Scan Mode DVD Video Feature 5 Multi Aspect 4 3 Pan Scan 16 9 Wide 4 3 Letter Box Up to 9 angles of view may be stored enabling the viewer to select a specific viewpoint at a given time Especially for the Music Video and Sports Title this provides a more lively image of the scene DVD Video Feature 6 Mu...

Страница 171: ...the world into 6 regions and if the DVD Title and the Player s Reginal Code do not agree playback is prohibited Regionnal Coding is optional for the Soft developers Region 0 All Code but the Hardware developers must adopt the appropriate regionnal code for sale Region 1 The United States and its territories Canada Region 2 Europe Japan Greenland Egypt South Africa the Middle East Region 3 Taiwan H...

Страница 172: ...nventional LD VCD or Original Film Different Authoring Process are used accoring to the Software developers and this may affect the DVD image quality Authoring Process Remark DVD Video Authoring Process Video Audio Master Surround Audio Master Subtitle Master MPEG 2 Encoding AC 3 MPEG Audio Encoding Cutting Master Disc Production Subtitle Encoding Authoring Process Video Audio Subtitle Multiplexin...

Страница 173: ...1 1 SHIBAURA 1 CHOME MINATO KU TOKYO 105 8001 JAPAN ...

Страница 174: ...L S D W F V E R W O L S PLAY STOP PAUSE REC D W F P I K S V E R P I K S T S U J D A T S U J D A E T E L E D R V D V T CLEAR EXIT ENTER QUICK MENU OPERATION INSTANT SKIP INSTANT REPLAY NUMBER HDD DVD TOP MENU MENU MENU TIMESLIP CHANNEL VOLUME INPUT SELECT OPEN CLOSE CHP DIVIDE ANGLE SUBTITLE AUDIO REC MODE ZOOM SEARCH DISPLAY PROGRESSIVE EXTEND SETUP REMAIN NOV 2005 SA ...

Страница 175: ... 8 6 AIC02 AIC07 MC14052 Block Diagram 8 7 AIC03 AK5357 Block Diagram 8 8 AIC04 PCM1753 Block Diagram 8 9 KIC01 PT6961 Block Diagram 8 10 MIC01 78F4225 Block Diagram 8 11 MIC02 Block Diagram 8 12 SIC01 MM1647 Block Diagram 8 13 VIC01 74HC4051 Block Diagram 8 14 VIC05 MM1568 Block Diagram 8 2 8 3 8 4 8 5 8 6 8 7 8 8 8 9 8 10 8 11 8 12 8 13 8 14 8 15 ...

Страница 176: ...1_OUT SCART2_OUT SCART1_IN SCART2_IN CVBS_IN SCART1_IN SCART2_IN CVBS_IN TUNER_IN FRONT_IN RGB VIDEO SIGNALS AUDIO DAC AIC04 PCM1753 OP AMP AIC05 BA4560 L R L R OP AMP AIC06 BA4560 L R COAXIAL_OUT BUFFER AIC08 74HC04 MUX AIC02 MC14052 AUDIO ADC AIC03 AK5357 L R FRONT R IN FRONT L IN MUX AIC07 MC14052 PROCESSOR AIC01 MSP3417 L R SCART1 L R_IN SCART2 L R_IN SCART1 L R_OUT SCART2 L R_OUT L R L R SCAR...

Страница 177: ...Block Diagrams 8 3 8 2 Digital Block Diagram ...

Страница 178: ...X VIC07 MC14052 TUNER OP AMP AIC02 BA4560 L R L R OP AMP AIC06 BA4560 L R COAXIAL_OUT BUFFER AIC08 74HC04 MUX AIC02 MC14052 PROCESSOR AIC01 MSP3417 AUDIO ADC AIC03 AK5357 L R SCART1 L R_IN SCART2 L R_IN TUNER L R_IN FRONT L R_IN SCART1 L R_IN SCART2 L R_IN SCART1 L R_OUT SCART2 L R_OUT L R L R AUDIO DATA SETTING DATA R_IN L IN HDD ...

Страница 179: ... SWITCH VIC07 MM1503 SCART AV1 TV SWITCH VIC02 MM1507 C Y CANAL IC SIC01 MM1647 MUX VIC01 74HC4051 SCART AV2 EXT SWITCH VIC03 MM1508 TUNER FRONT IN COMPONENT_OUT CVBS CY Cb Cr SCART1_OUT SCART2_OUT SCART1_IN SCART2_IN CVBS_IN SCART1_IN SCART2_IN CVBS_IN TUNER_IN FRONT_IN RGB VIDEO SIGNALS HDD ...

Страница 180: ...Block Diagrams 8 6 8 5 AIC01 MSP3417 Block Diagram ...

Страница 181: ...Block Diagrams 8 7 8 6 AIC02 AIC07 MC14052 Block Diagram ...

Страница 182: ...Block Diagrams 8 8 8 7 AIC03 AK5357 Block Diagram ...

Страница 183: ...Block Diagrams 8 9 8 8 AIC04 PCM1753 Block Diagram ...

Страница 184: ...Block Diagrams 8 10 8 9 KIC01 PT6961 Block Diagram ...

Страница 185: ...Block Diagrams 8 11 8 10 MIC01 78F4225 Block Diagram ...

Страница 186: ...r circuit Synchronization recognition circuit Vertical separator circuit Timing generator AFC circuit VCO Data acquisition circuit Data latch circuit I2C interface SDA SCL DAV SYNIN SEPC SEPOUT SEPIN CTRL2 VDD1 2 VSS1 2 SYNCJDG CPOUT VCOIN VCOR HOUT VOUT XIN XOUT CTRL1 CDLR RST ...

Страница 187: ...Block Diagrams 8 13 8 12 SIC01 MM1647 Block Diagram ...

Страница 188: ...Block Diagrams 8 14 8 13 VIC01 74HC4051 Block Diagram ...

Страница 189: ...Block Diagrams 8 15 8 14 VIC05 MM1568 Block Diagram ...

Страница 190: ...Block Diagrams 8 16 MEMO ...

Страница 191: ...9 Wiring Diagram 9 1 ...

Страница 192: ...Wiring Diagram 9 2 MEMO ...

Страница 193: ...10 1 10 PCB Diagrams 10 1 S M P S PCB 10 2 Main PCB 10 3 Jack PCB 10 4 Key PCB 10 2 10 4 10 6 10 8 ...

Страница 194: ...PCB Diagrams 10 2 10 1 S M P S PCB COMPONENT SIDE ...

Страница 195: ...PCB Diagrams 10 3 CONDUCTOR SIDE ...

Страница 196: ...PCB Diagrams 10 4 10 2 Main PCB COMPONENT SIDE ...

Страница 197: ...E459 E460 E461 E462 E463 E464 E465 E466 E467 E468 E469 E470 EV01 EV02 EV03 EV04 EV05 EV06 EV07 EV08 EV09 EV10 EV11 EV12 EV13 EV14 EV15 EV16 EV17 EV18 EV19 EV20 EV21 EV22 EV23 EV24 EV25 EV26 EV27 EV29 EV30 EV31 IC202 IC203 IC302 IC304 IC306 IC314 IC315 IC316 ICV01 L303 L305 L307 L308 L311 L312 L323 L324 L343 LV01 LV02 Q306 Q307 Q309 R203 R204 R205 R206 R207 R208 R211 R301 R302 R303 R304 R307 R310 R...

Страница 198: ...PCB Diagrams 10 6 10 3 Jack PCB COMPONENT SIDE ...

Страница 199: ...PCB Diagrams 10 7 CONDUCTOR SIDE ...

Страница 200: ...PCB Diagrams 10 8 10 4 Key PCB COMPONENT SIDE CONDUCTOR SIDE ...

Страница 201: ... 11 1 S M P S SMPS PCB 11 2 Main Main PCB 11 3 Audio Jack PCB 11 4 Video Jack PCB 11 5 AV switch Scart Jack PCB 11 6 Tuner Front in Connection Jack PCB 11 7 Micom Jack PCB 11 8 Key Key PCB 11 2 11 3 11 4 11 5 11 6 11 7 11 8 11 9 ...

Страница 202: ...Schematic Diagrams 11 2 11 1 S M P S SMPS PCB ...

Страница 203: ...Schematic Diagrams 11 3 11 2 Main Main PCB ...

Страница 204: ...Schematic Diagrams 11 4 11 3 Audio Jack PCB ...

Страница 205: ...Schematic Diagrams 11 5 11 4 Video Jack PCB ...

Страница 206: ...Schematic Diagrams 11 6 11 5 AV switch Scart Jack PCB ...

Страница 207: ...Schematic Diagrams 11 7 11 6 Tuner Front in Connection Jack PCB ...

Страница 208: ...Schematic Diagrams 11 8 11 7 Micom Jack PCB ...

Страница 209: ...Schematic Diagrams 11 9 11 8 Key Key PCB ...

Страница 210: ...Schematic Diagrams 11 10 MEMO ...

Отзывы: