


3-142
<Charging of oil>
Insert the hose up to the end of suction pipe mounting part of the compressor
to be installed, and add the necessary amount of oil using funnel, etc.
<Installation>
• Install the compressor in the reverse order of removing of compressor.
NOTE :
After installation, open fully the valve at bottom side of the
compressor, using hexagonal wrench.
<Vacuuming>
• Connect the vacuum pump to the check joint of the
discharge and suction pipes, and operate the vacuum pump.
• Perform vacuuming until the vacuum low-pressure gauge
indicates 1 (mmHg).
<Charging of refrigerant>
• Add refrigerant of the same volume to the recovered
refrigerant into the check joint of the suction pipe.
2. Outdoor unit (fixed-speed units)
060 type
<Removal of parts>
• Remove the front panel. (M5 x 7)
• Disconnect all wires connected to the electric parts box.
Temp. sensor, pressure sensor, complete, 2-way valve,
PMV A
*
, PMV B and 4-way valve
*
(
*
: It is not provided in the cooling only model.)
• Remove the electric parts box. (M5 x 4, M4 x 3)
• Remove the cooling duct for the electric parts. (M5 x 5)
• Remove the crank case heater.
• Remove the sound-proof mat.
• Remove the terminal cover of the compressor, and remove all wires.
• Close the valve located under the compressor fully using a hexadecimal wrench.
<Extraction of oil from compressor>
• Cut the case bypass located at the bottom of the compressor by height same as that of the suction pipe.
• Connect hose to the cut case bypass, and insert the opposite side of the hose in the container which oil is
entered. 2
l
or more oil may flow through the hose, so use a container with capacity of 2.5
l
or more.
• Apply nitrogen gas with approx. 0.02MPa from service valve at gas side to extract oil.
(Extract oil completely.) (Be sure to spurt of oil when gas is applied exceedingly.)
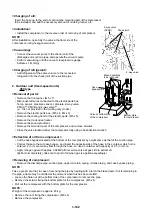
<Removing of compressor>
• Remove the discharge pipe, suction pipe, upper oil return piping, oil tank piping, and case bypass piping.
NOTE :
Take a great care that, in case of removing the pipe by heating with a torch the brazed part, if oil is remaining in
the pipe, a flame may be emitted at the moment when flux has been melted.
• Loosen the flare nut at the bottom side of the compressor to remove the pipe.
• Remove the screws fixing the bottom plate for the compressor. (M5 x 6)
• Pull out the compressor with the bottom plate for the compressor.
NOTE :
Weight of the compressor is approx. 45 kg.
• Remove the nuts fixing the compressor. (M8 x 4)
• Remove the compressor.
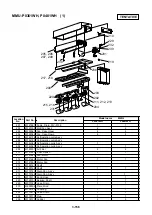
Bottom plate
for compressor
Brazed positions
to be removed
Case
bypass pipe
Valve at bottom side
of the compressor
4-way valve
Check joint
2-way valve
(SV3B)
Содержание MMC-P0151H
Страница 198: ...3 195 108 109 101 102 133 106 131 105 135 128 104 103 111 110 123 116 132 119 120 121 MMY MP06018 ...
Страница 206: ...3 203 108 109 101 102 133 106 131 105 135 128 104 103 111 110 123 116 132 119 120 121 MMY MP0601H8 ...
Страница 214: ...3 211 108 109 101 102 133 106 131 105 135 128 104 103 111 110 123 116 132 119 120 121 MMY MP0601H7 ...
Страница 216: ...TOSHIBA CARRIER CORPORATION 336 TADEHARA FUJI SHI SHIZUOKA KEN 416 8521 JAPAN ...


