GTCOM2 User manual
32 |
E N
4.1.3
Master code for access control via keypad
Master Code for access control via keypad
. Defaul Master code: 1234 or 123456
3.
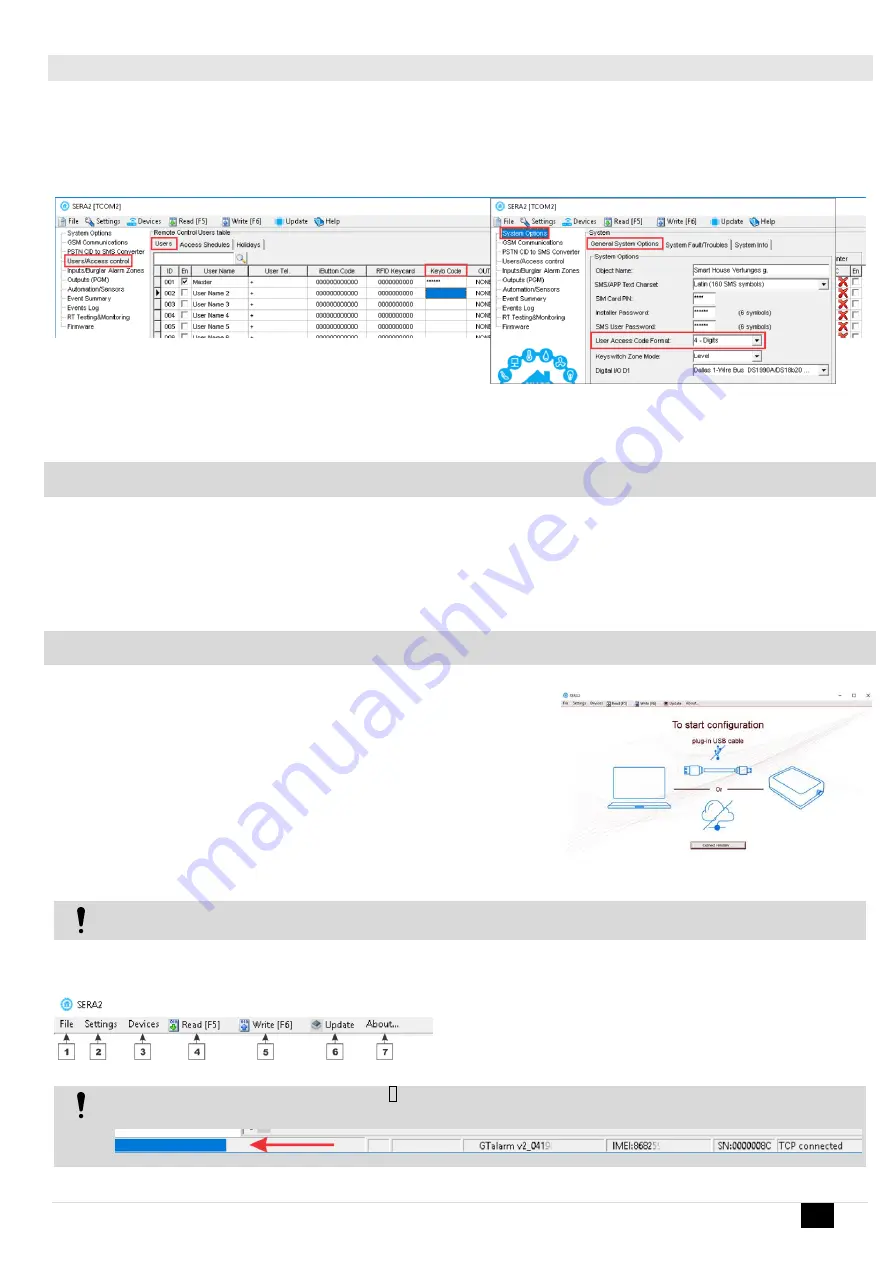
Select 6 or 4 digits user access code format. Sera2> System Options> General System Options>User Access Code Format
4.
Enter 6 or 4 digits codes in the Sera2> Users/ Access control > Keyb Code
Figure 47User/ Access control and System Options> General System Options
5
Programming
In order to configure and control the system by SMS text message, send the text command to the GTCOM2 phone number from one of the listed
user phone numbers. More
SERA2 software configuration tool is intended for the module GTCOM2 configuration locally via USB port or remotely via GPRS network. This
software simplifies system configuration process by allowing to use a personal computer in the process.
5.1
SERA2 Uploading/Downloading Software
We recommend programming the module GTCOM2 with SERA2 software
1.
Open the folder containing installation of the software SERA2. Click the file „SERA2
setup.exe“
2.
If installation directory of the software is OK, press [Next]. If you would like to install
the software in the other directory press [Change], specify other installation directory
and then press next>.
3.
Check if the correct data are entered and press Install
4.
After successful installation of the software SERA2, press [Finish]
Start the software SERA2. Go to „Start“> „All programs“> „SERA2“> „SERA2 “
or go to installation directory and click „SERA2.exe“.
Connection of the module to your PC
Power supply: DC 10-16V, Max 0.2A. The module should have inserted SIM card (with replenished account and removed PIN CODE
REQUEST). Module must be connected to the PC via mini USB cable
Work with the software SERA2
If you are sure that the module is fully connected to PC and power supply, please go to Devices > GTM1
Figure 49 Command line
Each time after configuring the module press Write 5 icon thus the software SERA2 will write configuration changes into the module!
Wait until progress bar line will indicate that the configuration has been written successfully
Figure 50 Progress bar
Figure 48How to start configuration with Sera2 software


