115
Chapter 9.
Camera Setup
This section deals with Camera setup procedures. These options can be accessed by
right-clicking the Camera entry in the
Device Browser.
9.1. Adding Cameras
Cameras can be added to the Server in two ways, VIA and automatic scan, or by
manually inputting the camera information.
9.1.1.
Automatic Scan for Cameras
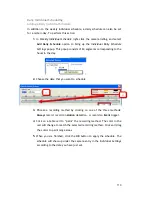
To begin an automatic scan for cameras:
1.
Right-click the Server entry and select
Scan for Cameras
. The system will
respond by beginning an automatic scan. Once the scan is complete,
the cameras that can be added to the Server will be displayed.
Information available for each camera will include:
Name
– The default camera name (Make/Model)
Status
– The camera will display
New
if it has not been added to
this Server, otherwise it will display
Assigned.
IP Address
MAC Address
Vendor - Including ACTI, ASONI, AVTECH, AXIS, Arecont, Sosch,
Brickcom, DyNACOLOR, D_Link, Dahua, EDIMAXHIKVISION,
EverFocus, HIKVISION, IQinVision, Lilin, Eessoa, Mobotix,
ONVIF, Panasonic, SIMON, SONY, Samsung, Surveon, VIVOTEK,
and General.
Model -
when
“
General
”
is selected,
“
RTP over TCP
”
and
“
RTP
over UDP
”
can be further defined.
Содержание NVR2100 Series
Страница 1: ...NVR2100 Series User Manual Release 1 3 ...
Страница 62: ...62 The following windows will prompt for validation ...
Страница 67: ...67 5 Optional You may go to the VI setting panel by clicking Go to VI Settings ...
Страница 80: ...80 ...
Страница 269: ...269 Edit Device Allows you to edit the added I O box Delete Device Allows you to delete the added I O box ...
Страница 274: ...274 13 5 2 Functional Authority Functionalities can be authorized according to different user levels ...
Страница 285: ...285 6 When completed all storage subsystems within the IP address range will appear in the sidebar ...

