


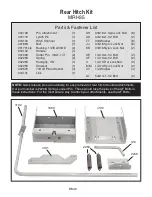

BM9
AD
2005
AB
2005
1665
1811
Remove Q Bolt
and HH Nut from
this location.
AD
2207
2005
1666
STEP 6.
Remove #Q Bolt and
#HH Nut from location in
lower center
of
Right Wall... see Photo at right.
STEP 7.
In the following order:
Insert #AD Bolt into #2005 Washer,
#2207 Bushing, 5/8” hole lower end of
#1665 Handle, #2005 Washer and fi-
nally into 5/16” hole “created” in STEP
6 above.
STEP 8.
Locate protruding #AD
Bolt on
inside lower center of
Right
Body Wall... secure with #2005 Washer
and #AB Nut... fully tighten... see Photo
at right.
STEP 9.
Following Photo [sec-
ond from bottom], insert (2) AC Bolts
and (2) ZZ Bolts into the four 3/8”
square holes on
inside face
of #1694
Front Hitch “arm”.
Slip #2207 Bushings over end of
“upper” & “lower” #AC Bolts... secure
with #KK Nut... tighten.
Slip #2207 Bushing, #1667 Arm Latch
over end of “upper” #ZZ Bolt... secure
with KK Nut... leave Bolts
loose
to be
tightened later. Do the same process for
the “lower” #ZZ Bolt.
STEP 10.
Form two #AO Car-
riage Bolt assemblies with #JJ Nuts ap-
plied so that “flange” of Nut points away
from head of Bolt by 1-7/8”... see
inset
Photo at right.
Remove “original” #Q Bolts and
#HH Nuts and replace with #AO Car-
riage Bolt assemblies [formed above]...
secure
inside Body
with #JJ Nuts... fully
tighten... see Photo at right.
KK
Nut
“upper” ZZ Bolt
“lower” ZZ Bolt
1694 Front Hitch
1-7/8”
#AO
#JJ
Former location
of #Q
Bolts & #HH Nuts...
now replaced
with
#AO Bolts & # JJ Nuts
“upper” AC Bolt
“lower” AC Bolt
KK
Nut
1667
1667
2207
2207


