BM11
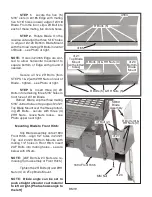
STEP 13.
Pull #1665 Handle
fully rearward
and secure it behind rear
“tab” of its #1654 Latch Plate... see
Photo at right.
STEP 14.
With “gloved” hands,
rotate each #2203 Spring
rearward
and
loop the
top loop
of each Spring
over
the head
of its appropriate #AO Bolt...
all four “top loops” should be over their
appropriate #AO Bolts... see Photo at
right.
STEP 15.
Remove #I Bolts and
#NN Nuts from #1654 Latch Plate.
In-
vert
Latch Plate [rear “tab” is now for-
ward] and replace it per Photo at right...
On
forward end,
secure it with only one
(1) #I Bolt and one (1) #NN Nut... finger
tight... see Photo at right.
STEP 16.
Push #1665 Handle
fully forward
and simultaneously
rotate
the #1654 Latch Plate
inward
aligning
1/4” hole in
rear
of Latch with mating
1/4” hole in rear of Right Fender. Insert
#I Bolt in mating 1/4” holes and secure
below with #NN Nut... finger tight... see
Photos at upper & lower right.
NOTE:
For Safety [with #1654 Latch
Plate in
above
position] your Spring’s
“pressure” is safely contained... see
Photo at right.
You will now attach your Dozer
Blade, Bucket Mouth and place approx-
imately 90 pounds of weight in the
Bucket Mouth to hold it down against
the floor.
For
weights
in our Photos
(STEP 21 below) we used two (2) 45
pound bags of sand. The assembler
could use any type of “stable weight”...
concrete chunks, stones, etc... it’s safer
to have a greater weight to keep Bucket
Mouth down on the floor, than less!
2203 Spring
1665 Handle “fully rearward”
AO Bolt
rear “tab”
1654 Latch Plate
AO Bolt
“top loop”
of Spring
I Bolt &
NN Nut
I Bolt & NN Nut
I Bolt &
NN Nut
1665 Handle
fully forward
#1665
Handle
Right
Fender
ROTATE
inward
to align mating
1/4” holes.
1654
Latch Plate
rear “tab”
1654 Latch Plate


