background image

49

3

SENDING FAXES USING THE 
RELAY REQUEST FUNCTION

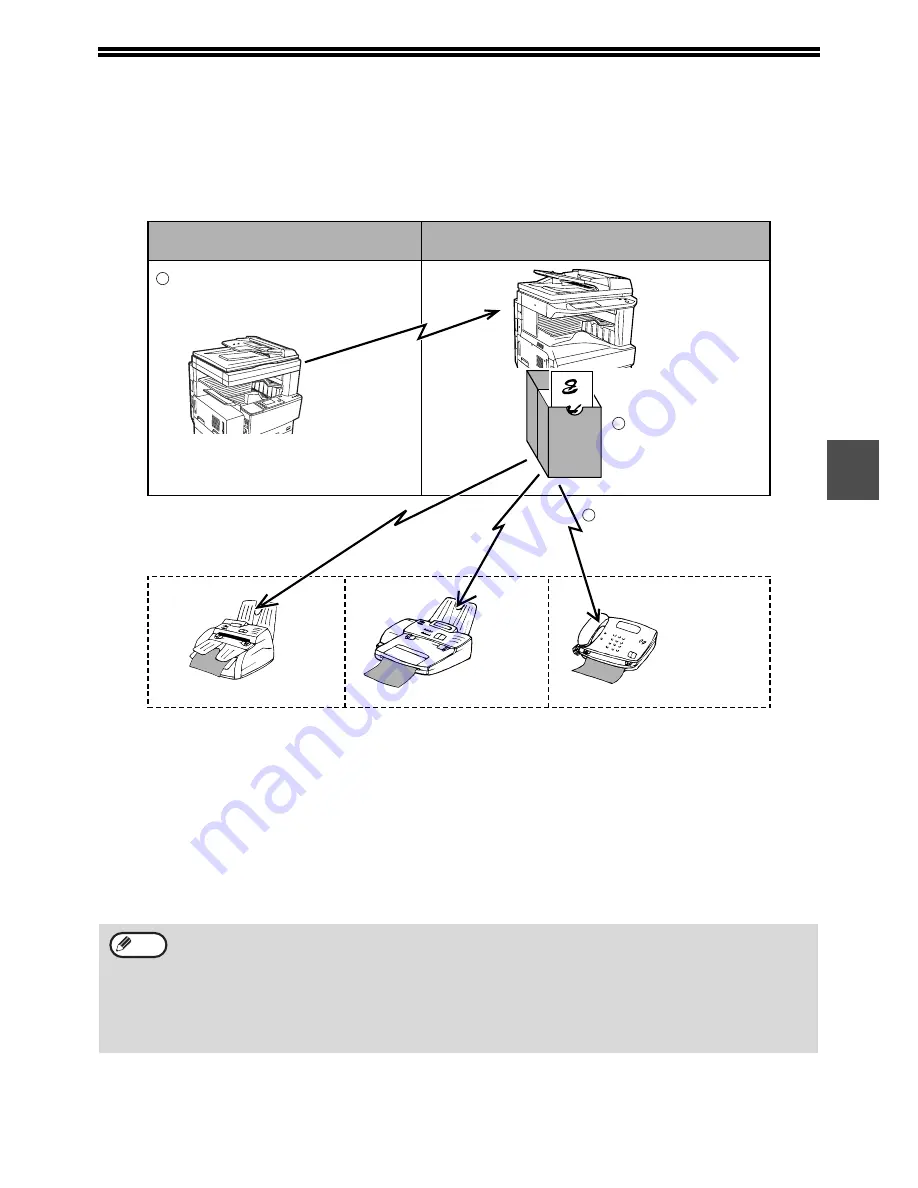
The relay request function is used to send a fax to a relay fax machine, and then have the relay fax machine send 
the fax to mulitple end receiving machines.

The fax machine that originally sends the fax is called the relay request machine, and then relays it to the 
programmed end machines is called the relay machine.
The fax is printed out by the relay machine as well as by the end receiving machines.

The relay request function is useful when the relay machine is sufficiently close to the end receiving machines that 
the overall cost of transmission is less than if you sent the fax directly to the end receiving machines using the 
broadcast function. If used together with a timer setting to take advantage of off-peak rates, the cost of transmission 
can be reduced even more.

Sending a fax to a relay machine and requesting relay transmission is called the relay request function. Receiving a 
fax and broadcasting it to a group of end receiving machines is called the relay broadcast function.

• This function can only be used when the relay machine is a Sharp model that has the relay broadcast function. 

For more information, consult your authorised service representative.

• To allow a relay request to take place, the fax number of the relay request machine (the programmed sender’s 

number) must be programmed in the relay machine as a relay ID code ("ID NUMBER MODE" (p.104)).

• To make a relay request, the relay group (the number of the relay machine and the numbers of the end 

receiving machines) must be programmed. ("STORING RELAY GROUPS" (p.76))

• The relay request machine only bears the cost of sending the fax to the relay machine. The relay machine 

bears the cost of sending the fax to each of the end receiving machines.

S.F.

Relay machine

Relay request machine 

(original sender of document)

End receiving machine C

End receiving machine B

End receiving machine A

The document is 

stored in memory

2

Document is successively 

transmitted to end receiving 

machines programmed 

in the relay machine

3

The document is sent from 

the relay request machine

1

Note

Содержание AR-FX7

Страница 1: ... OPERATION MANUAL BEFORE USING THE FAX FEATURE BASIC OPERATIONS ADVANCED TRANSMISSION METHODS TRANSMISSION USING F CODES CONVENIENT METHODS OF USE PROGRAMMING TROUBLESHOOTING KEY OPERATOR PROGRAMS APPENDIX 4 12 26 51 61 65 83 90 106 Page ...

Страница 2: ...ference in which case the user may be required to take adequate measures This equipment complies with the requirements of Directive 1999 5 EC Important safety information If any of your telephone equipment is not operating properly you should immediately remove it from your telephone line as it may cause harm to the telephone network The AC power outlet shall be installed near the equipment and sh...

Страница 3: ...CEIVING FAXES 25 RECEIVING A FAX 25 3 ADVANCED TRANSMISSION METHODS SENDING THE SAME DOCUMENT TO MULTIPLE DESTINATIONS IN A SINGLE OPERATION BROADCAST TRANSMISSION 26 USING BROADCAST TRANSMISSION 27 FORWARDING RECEIVED FAXES TO ANOTHER MACHINE WHEN PRINTING IS NOT POSSIBLE 28 USING THE FAX FORWARD FUNCTION 29 AUTOMATIC TRANSMISSION AT A SPECIFIED TIME TIMER TRANSMISSION 30 SETTING UP A TIMER TRANS...

Страница 4: ...NG ON THE PHONE MANUAL TRANSMISSION 62 RECEIVING A FAX AFTER TALKING MANUAL RECEPTION 63 FAXING A DOCUMENT FROM A COMPUTER PC FAX 65 USING PC FAX TRANSMISSION 65 6 PROGRAMMING PROGRAMMING 66 STORING EDITING AND DELETING AUTO DIAL KEYS PROGRAMS AND RELAY GROUPS 66 STORING RAPID DIAL KEYS 68 EDITING AND DELETING RAPID KEYS 71 PROGRAMMING A GROUP KEY 72 EDITING AND DELETING GROUP KEYS 73 STORING A PR...

Страница 5: ...unit keeps settings and programmed information in memory When the battery dies settings and programmed information will be lost Be sure to keep a written record of the settings and programmed information PRINTING PROGRAMMED INFORMATION p 80 Battery power is consumed when the machine s power switch is turned off Power is consumed even if no settings or information are stored in the machine When the...

Страница 6: ...lock automatically move forward and backward at the beginning and end of Daylight Saving Time The clock will move forward and backward as follows The last Sunday in March 1 00 A M 2 00 A M The last Sunday in October 1 00 A M 0 00 A M Follow these steps to enable Daylight Saving Time 1 Press the CUSTOM SETTINGS key 2 Touch the CLOCK key 3 Select the DAYLIGHT SAVING TIME SETTING checkbox 4 Touch the...

Страница 7: ...status of a job DATA light This light blinks when a fax has been received to memory The light stays on constantly when a fax is waiting in memory for transmission CUSTOM SETTINGS key Use to customize the machine settings to better suit your needs See CUSTOM SETTINGS in the operation manual for copier When using the fax function destinations can be stored p 66 and settings for fax reception p 63 an...

Страница 8: ...ut tray for received faxes can be changed to the centre tray using the key operator programs for the copy function Front cover Open this cover to remove a misfeed See the operation manual for copier Paper trays These hold the paper that is used for fax reception and copying Each tray holds approximately 500 sheets of paper See the operation manual for copier Power switch Turns the power on and off...

Страница 9: ... Directory screen p 8 Touch this key when you want to use an auto dial number rapid dialling or group dialling SUB ADDRESS key p 53 Touch this key to enter a sub address or passcode ADDRESS REVIEW key p 27 When performing a broadcast transmission touch this key to check your selected destinations A list of your selected destinations will appear and destinations can be deleted from the list DIRECT ...

Страница 10: ... displayed on one screen this shows how many screens are left Touch the keys to move through the screens CONDITION SETTINGS key This displays the condition setting screen p 7 which is used to set various conditions ABC GROUP key Touch this key to switch between the alphabetical index and the group index Index keys p 79 Destinations programmed in auto dialling are stored in indexes In the alphabeti...

Страница 11: ...ximum original size Using the RSPF 210 mm width x 148 mm length 8 1 2 width x 5 1 2 length 148 mm width x 210 mm length 5 1 2 width x 8 1 2 length 297 mm width x 1000 mm length 11 width x 39 3 length Long originals can be loaded Using the document glass 297 mm width x 420 mm length 11 width x 17 length Originals that are not a standard size p 20 can also be faxed There are restrictions on original...

Страница 12: ...then insert the pages face up in the document feeder tray Insert the stack into the document feeder tray until it stops The stack should not be higher than the indicator line maximum 100 pages USING THE DOCUMENT GLASS 1 Open the document cover RSPF place the original face down on the document glass and close the document cover RSPF Regardless of the size of the original place the original in the f...

Страница 13: ... fax number it does not retain the sub address or passcode If numeric keys were pressed during a phone conversation the REDIAL key may not dial the correct number The number is not retained when the following special operations are performed the last number that was dialled before the special operation is retained Broadcast transmission Serial polling Timer transmission Group dialling ON HOOK DIAL...

Страница 14: ... the address directory screen appears touch the CONDITION SETTINGS key to display the condition settings screen p 7 If you loaded a non standard size original or the original size was not correctly detected touch the ORIGINAL key and set the original size MANUALLY SETTING THE SCANNING SIZE p 20 5 If needed adjust the resolution and exposure settings Resolution Page 21 Exposure Page 22 If needed se...

Страница 15: ...her page to scan change pages and then press the START key Repeat this sequence until all pages have been scanned You can change the original size resolution and exposure settings as needed for each page If no action is taken for one minute the START key is not pressed scanning automatically ends and the transmission job is stored 9 After the final page is scanned touch the READ END key A beep sou...

Страница 16: ...sion will be automatically reattempted at a later time See If the receiving party is busy on page 15 Direct transmission mode When direct transmission mode is selected the document is directly transmitted after the destination is dialled Direct transmission mode does not use memory and thus transmission is possible even when the memory is full When On hook dialling is used direct transmission mode...

Страница 17: ... are rotated to A5 5 1 2 x 8 1 2 and 8 1 2 x 11 A4 originals are rotated to 8 1 2 x 11 R A4R A4R 8 1 2 x 11 R originals A5 5 1 2 x 8 1 2 originals and 8 1 2 x 11 R A4R originals are not rotated If desired you can turn this function off with the key operator program as explained on page 101 In Taiwan the machine is set to rotate an A4 8 1 2 x 11 original to A4R 8 1 2 x 11 R a B5R original to B5 an ...

Страница 18: ...6 of BASIC PROCEDURE FOR SENDING FAXES p 12 2 Touch the ADDRESS BOOK key The address directory screen appears This step is not necessary if the address directory screen already appears go directly to step 3 3 Touch the rapid key for the desired destination See page 8 for information on using the address directory screen The key you touched is highlighted If you touch the wrong key touch the key ag...

Страница 19: ...cessary if you placed the original so that it is oriented horizontally the top of the original is on the right or left side Otherwise go directly to step 6 6 Touch the OK key You will return to the initial screen A two sided original icon appears next to the ORIGINAL key Example The icon that appears when the 2 SIDED BOOKLET key is touched 7 Continue from step 5 of BASIC PROCEDURE FOR SENDING FAXE...

Страница 20: ...directory screen appears touch the CONDITION SETTINGS key to display the condition settings screen p 7 After touching the ORIGINAL key check the original size displayed in the key If the original size was not correctly detected set the correct original size MANUALLY SETTING THE SCANNING SIZE p 20 4 Touch the JOB BUILD key 5 Touch the OK key You will return to the initial screen The many originals ...

Страница 21: ...e scanned originals will be transmitted READ END Pg No 2 AL ESS READ END Note If the memory becomes full while originals are being scanned a message will appear and scanning will stop The page that was being scanned when the memory became full will be cleared To transmit only the originals that have already been scanned touch the SEND key To cancel the transmission touch the CANCEL key Depending o...

Страница 22: ... highlighted and INCH size keys are displayed To return to the AB palette touch the AB INCH key once again 4 Touch the outer OK key You will return to the initial screen Pressing the inner OK key in the step above returns you to step 2 5 The selected size appears in the top half of the ORIGINAL key Standard sizes Standard original sizes are sizes that can be correctly detected when the original is...

Страница 23: ... resolution setting cannot be changed once scanning has begun Even if you send a document using Fine Super fine or Ultra fine resolution some receiving fax machines may not be able to print the document at the same resolution AUTO A4R ORIGINAL STANDARD RESOLUTION STANDARD FINE SUPER FINE HALF TONE ULTRA FINE ARD E FINE HALF TONE OK FINE Note Standard Touch this key if your original consists of nor...

Страница 24: ...ll return to the initial screen The selected exposure will appear in the top half of the EXPOSURE key When using the document glass to scan a multi page original the original size resolution and exposure settings can be changed each time you change pages When using the RSPF the exposure setting cannot be changed once scanning has begun The default exposure setting is AUTO If desired you can change...

Страница 25: ...being transmitted Transmission of the priority job will begin when the current job finishes If a job key for a broadcast type transmission is selected the name or number of the destination to which the fax is currently being transmitted appears If the job has not yet begun the name or number of the first destination to which the fax will be transmitted appears To return to the job status screen to...

Страница 26: ...smission If a job key for a broadcast type transmission is selected the name or number of the destination to which the fax is currently being transmitted appears If the job has not yet begun the name or number of the first destination to which the fax will be transmitted appears To return to the job status screen touch the DETAIL key again or touch the or key If you do not wish to cancel the trans...

Страница 27: ...er must be loaded in the paper tray Refer to LOADING PAPER in operation manual for copier to load appropriate paper Incoming A4 8 1 2 x 11 and B5 5 1 2 x 8 1 2 size faxes will be automatically adjusted to the orientation of the printing paper so there is no need to load each size of paper both horizontally and vertically However if you receive a fax that is smaller than A4 8 1 2 x 11 size the pape...

Страница 28: ...from memory If you frequently use broadcasting to send faxes to the same group of destinations it is convenient to program those destinations into a group key A group key is a rapid key in which multiple destinations are programmed The procedure for programming group keys is explained on page 72 When using a group key to send a fax the destinations programmed in the group key are counted as broadc...

Страница 29: ... FOR SENDING FAXES p 13 If you enter an incorrect number If you make a mistake while entering a number press the CLEAR key and then re enter the correct digit s If you have already completed entry of a fax number you can delete the number using steps 4 and 5 If you select an incorrect auto dial key Simply touch the incorrect key one more time to cancel the selection The NEXT ADDRESS key only needs...

Страница 30: ...re received in memory to that point are forwarded The page that was being printed when the problem occurred and all following pages will be forwarded Faxes cannot be selected for forwarding Faxes received to a confidential box SENDING AND RECEIVING CONFIDENTIAL FAXES p 46 or a confidential memory box F CODE CONFIDENTIAL TRANSMISSION p 57 cannot be forwarded The result of forwarding is indicated in...

Страница 31: ...AX DATA FORWARD key When a forwarding number is not programmed THE DESTINATION IS NOT ENTERED will appear 3 Touch the FAX No key 4 Press the numeric keys to enter the forwarding number Enter the forwarding number with the numeric keys Up to 50 digits can be entered A sub address and passcode cannot be entered 5 Touch the OK key The entered forwarding number is stored To cancel touch the CANCEL key...

Страница 32: ...will change quickly The current time appears at the top of the screen If the current time is not correct press the CLEAR ALL key to cancel the operation Correct the date and time setting as explained in CUSTOM SETTINGS in operation manual for copier 5 Touch the outer OK key You will return to the screen in step 1 A timer icon will appear in the touch panel To cancel the timer transmission touch th...

Страница 33: ...ial polling p 32 F code polling p 54 F code confidential transmission p 57 F code relay request transmission p 59 Other operations can be performed after a timer transmission is set up If another operation is in progress when the specified time arrives the timer transmission will begin when the job in progress is completed If a timer transmission job is given priority in the fax job status screen ...

Страница 34: ... your machine to call a sending machine and initiate reception of a document in that machine A timer setting can also be established to have the operation take place at night or at another specified time p 30 Group keys and the broadcast transmission function p 26 can be used to successively poll multiple fax machines in a single operation serial polling Up to 200 machines can be polled In this ca...

Страница 35: ...k screen p 8 The selected auto dial key is highlighted If you are performing serial polling touch the NEXT ADDRESS key and repeat this step p 27 If the other machine has enabled a polling security function Restricting polling access polling security p 38 make sure that your own fax number sender s number is programmed in the key operator programs OWN NUMBER AND NAME SET p 98 and ask the operator o...

Страница 36: ...stination s press the START key JOB STORED appears in the screen Your machine prints the document following reception from the sending machine To cancel the operation Press the JOB STATUS key and then cancel the operation as explained CANCELLING A FAX TRANSMISSION p 24 Note ...

Страница 37: ...g in the new document 1 Make sure that the machine is in fax mode When the FAX key light is on the machine is in fax mode If the light is not on press the FAX key 2 Place the document in the RSPF or on the document glass p 10 3 Select the original size resolution exposure and other settings as needed MANUALLY SETTING THE SCANNING SIZE p 20 4 Touch the SPECIAL MODES key and then the MEMORY BOX key ...

Страница 38: ... PUBLIC BOX key To check the stored data you can print it out 1 Touch the SPECIAL MODES key in fax mode and then touch the MEMORY BOX key If the address book screen appears touch the CONDITION SETTINGS key to display the condition settings screen p 7 2 Touch the PRINT DATA key 3 Touch the PUBLIC BOX key Touching the CANCEL key will return you to the screen of step 2 4 Press the START key PRINT JOB...

Страница 39: ... to display the condition settings screen p 7 2 Touch the DELETE DATA key 3 Touch the PUBLIC BOX key A message screen appears 4 Touch the YES key All documents in the Public Box are deleted and you return to the screen of step 2 If you touch the NO key you will return to the screen of step 3 without deleting the documents PROGRAM MEMORY BOX POLLING SLOW SCAN MODE SUB ADDRESS ADDRESS REVIEW SPECIAL...

Страница 40: ...number of the polling machine s must be programmed in your machine The polling machine must also have its sender s number programmed Checking the receiving machine s programmed sender s number against the transmitting machine s passcode numbers Select polling or serial polling Reception Your receiving machine Transmitting machine Polling Beep Transmission Check sender s number against passcode num...

Страница 41: ...dy highlighted the function has already been enabled To disable the function touch the SLOW SCAN MODE key so that the key is no longer highlighted 3 Touch the OK key You will return to the condition settings screen 4 Place the document in the RSPF p 10 5 Fax the document p 12 A document that is extremely thin or which has folds or wrinkles may misfeed in the RSPF In this case scan the document fro...

Страница 42: ...ON SETTINGS key to display the condition settings screen p 7 2 Touch the OK key You will return to the main screen and the dual page scan icon will appear 3 Place the original on the document glass p 10 and perform the transmission operation If you have more originals to scan after pressing the START key and scanning the first original change originals and repeat scanning until all originals have ...

Страница 43: ...he SPECIAL MODES key and then the PROGRAM key If the address book screen appears touch the CONDITION SETTINGS key to display the condition settings screen p 7 The program selection screen appears 3 Touch the program key that you wish to execute Make sure that the key is highlighted and then touch the OK key The program key you touched is selected and you return to the screen of step 2 The PROGRAM ...

Страница 44: ...rform the fax transmission p 12 To appear on the cover sheet your sender s name and number must be programmed OWN NUMBER AND NAME SET p 98 A key operator program can be enabled to have a cover sheet added to every fax transmission AUTO COVER SHEET p 102 The cover sheet function cannot be used with F code polling memory p 54 relay request transmission p 50 or polling memory p 35 Beep Reception Tran...

Страница 45: ...ey the key and then the TX MESSAGE key If the address book screen appears touch the CONDITION SETTINGS key to display the condition settings screen p 7 3 Touch the key of the message that you wish to add The selected key is highlighted 4 Touch the OK key You will return to the condition settings screen 5 Perform the fax transmission p 12 SCAN FAX DATA DATA LINE JOB STATUS CUSTOM SE SENDING OPTIONS...

Страница 46: ...u can use a key operator program to have the page number omitted PRINTING PAGE NUMBER AT RECEIVER p 100 Position of sender s information You can select whether the sender s information is added outside the printed fax image or inside the image in the key operator programs DATE OWN NUMBER PRINT POSITION SETTING p 100 The initial factory setting is outside the image None of the transmitted image is ...

Страница 47: ...on settings screen p 7 2 Touch the key and then the OWN PASSCODE SELECT key The list of programmed senders appears 3 Touch the desired sender key in the list 4 Touch the OK key You will return to the screen of step 2 5 Toch the OK key You will return to the condition settings screen 6 Perform the fax transmission p 12 If multiple senders have been programmed and a sender is not selected the sender...

Страница 48: ...d sending a fax to a confidential box in the receiving machine is called confidential transmission The confidential function can only be used when the other fax machine is a Sharp model that has the confidential fax function For more information consult your dealer To use the confidential function the sender s number must be programmed in the sending machine and a confidential box number and an ID...

Страница 49: ... address book screen appears touch the CONDITION SETTINGS key to display the condition settings screen p 7 2 Touch the CONFIDENTIAL TX key 3 Touch the or key to specify the confidential box number of the recipient A number from 00 to 99 can be selected 4 Touch the inner OK key You will return to the sending options screen The CONFIDENTIAL TX key is highlighted and the confidential transmission ico...

Страница 50: ... ID code is not correct the message ID CODE IS NOT VERIFIED appears and you will return to the screen of step 4 To return to the screen of step 4 touch the CANCEL key 6 Press the START key Printing begins If other jobs are waiting to be printed the confidential fax es will be printed ahead of the other jobs after the current job is finished When a fax is received in a confidential box a transactio...

Страница 51: ... a fax and broadcasting it to a group of end receiving machines is called the relay broadcast function This function can only be used when the relay machine is a Sharp model that has the relay broadcast function For more information consult your authorised service representative To allow a relay request to take place the fax number of the relay request machine the programmed sender s number must b...

Страница 52: ...NDITION SETTINGS key to display the condition settings screen p 7 2 Touch the RELAY BROADCAST key 3 Touch the key of the relay group that you wish to use The selected relay group key is highlighted 4 Touch the inner OK key You will return to the special transmission screen The RELAY BROADCAST key is highlighted and a relay request icon appears 5 Touch the outer OK key You will return to the condit...

Страница 53: ...e standard as established by the ITU T The F code standard makes it possible to perform special operations such as relay broadcast and confidential transmission which previously could only be performed with another similar Sharp machine with any other machine that also supports F codes Before using any of the functions explained in this chapter verify that the other fax machine supports F codes an...

Страница 54: ...sscodes which are number sequences but also by names For example for the memory box with the sub address 7732123 and the passcode 1115 you could assign the name Product Planning Assigning names makes it easier to manage memory boxes Note that you do not need to inform the other party of a memory box name the other party only needs to know the sub address and passcode This machine uses the term sub...

Страница 55: ... passcode of the other machine s memory box max 20 digits If a passcode has not been established for the other box this step is not necessary CREATING A MEMORY BOX FOR F CODE TRANSMISSION F code operations that use memory boxes include F code polling memory p 54 F code confidential transmission p 57 and F code relay broadcast p 59 Memory boxes must be created to perform any of these operations A m...

Страница 56: ... another machine and retrieves a document that was scanned into the polling memory box of that machine the reverse of the above diagram To perform polling or polling memory without using an F code refer to page 32 To create an F code memory box for polling memory refer to page 105 Unlike normal polling the other machine s fax number or system number is not programmed as a passcode for F code polli...

Страница 57: ...scan the document the key is highlighted and selected as the scanning destination Checking and deleting a document in a memory box The procedure for checking a document in an F code polling memory box by printing it and the procedure for deleting a document from a box are almost the same as the procedures for printing and clearing document data from the Public Box Instead of touching the PUBLIC BO...

Страница 58: ... to display the address book screen See ENTERING A SUB ADDRESS AND PASSCODE FOR A MEMORY BOX IN THE OTHER MACHINE on page 53 for the procedure for entering sub addresses and passcodes 4 Press the START key JOB STORED appears on the screen After communicating with the other machine your machine prints the received document You must know the sub address SEP and passcode PWD of the other machine s F ...

Страница 59: ...ransmission function which uses the programmed sender s fax number and ID code see SENDING AND RECEIVING CONFIDENTIAL FAXES on page 46 See F CODE MEMORY BOX on page 105 for the procedures for creating editing and deleting F code confidential memory boxes Take care not to forget the print PIN that is programmed in the F code confidential memory box If you forget the passcode print it out in the key...

Страница 60: ...h digit is entered changes to If the print PIN you entered is correct the message PRESS START TO PRINT DATA appears If the passcode is not correct the message PIN IS NOT VERIFIED appears and you will return to the screen of step 3 To return to the screen of step 3 touch the CANCEL key 5 Press the START key Printing begins If another print job is already is progress the confidential document is pri...

Страница 61: ...s the regular broadcast transmission function p 26 This function can also be combined with a timer setting p 30 to take advantage of off peak rates allowing a further reduction in phone charges Transmission by the relay machine is called F code relay broadcast transmission and transmission from the relay request machine to the relay machine is called F code relay request transmission For informati...

Страница 62: ...he document data is automatically cleared after transmission to all end receiving machines is finished USING THE F CODE RELAY REQUEST FUNCTION your machine requests a relay broadcast First ask the operator of the other F code machine to create an F code relay broadcast memory box and program the end receiving machines in that box Ask the operator of the other machine for the sub address SUB and pa...

Страница 63: ...Insert the end of the extension phone cord into the adapter Make sure you hear a click sound indicating that the cord is securely connected 1 Insert the end of the extension phone cord into the extension phone jack on the rear of the machine Make sure you hear a click sound indicating that the cord is securely connected If you connect a combination telephone answering machine to the machine you wi...

Страница 64: ...Lift the extension phone Or you can press the SPEAKER key ON HOOK DIALLING p 11 5 Dial the number of the other party or touch a rapid key You can also dial using the keypad on the extension phone You cannot use a group key or a rapid key that includes a sub address and passcode 6 Speak to the other party when they answer If you used the SPEAKER key to dial lift the extension phone to talk 7 After ...

Страница 65: ...without breaking the connection Changing the reception mode to MANUAL 1 Press the CUSTOM SETTINGS key 2 Touch the RECEIVE MODE key 3 Touch the MANUAL RECEPTION key The MANUAL RECEPTION key is highlighted 4 Touch the OK key The reception mode is set to MANUAL SCAN FAX DATA DATA LINE JOB STATUS CUSTOM SE LIST PRINT RECEIVE MODE AUTO RECEPTION MANUAL RECEPTION CEPTION ECEPTION OK To return the recept...

Страница 66: ... the other party begins transmission To adjust the receiver volume touch the VOLUME ADJUSTMENT key You will switch through 3 levels low medium and high 3 Replace the extension phone When reception is finished you will hear a beep sound and the fax will be printed This function cannot be used if you are on a pulse dial line and the extension phone cannot issue tone signals To find out whether or no...

Страница 67: ...open the manual click the Windows Start button select All Programs Programs in operating systems other than Windows XP SHARP PC FAX Driver and then Operation manual This function can only be used for transmission Faxes sent to the machine cannot be received by the computer After sending a fax from your computer check with the recipient to see if the fax was received You can also check the result o...

Страница 68: ...ed PROGRAMMING FREQUENTLY USED OPERATIONS on page 41 and the procedure for using relay groups is explained in SENDING FAXES USING THE RELAY REQUEST FUNCTION on page 49 A combined total of 500 rapid keys and group keys can be stored Eight programs and ten relay groups can also be stored If you attempt to store more than these a warning message will appear In this case delete any auto dial keys prog...

Страница 69: ...ROGRAM key Storing a program key p 74 RELAY GROUP key Storing a relay group p 76 GROUP key Storing a group key p 72 AMEND DELETE key Rapid key p 71 Group key p 73 Program p 75 Relay group p 78 DIRECT ADDRESS PROGRAM ESS CONTROL CUSTOM SETTINGS DIRECT ADDRESS PROGRAM RAPID GROUP STORE OK PROGRAM RELAY GROUP AMEND DELETE 2 3 4 5 1 1 2 3 4 5 If no auto dial numbers rapid keys or group keys programs o...

Страница 70: ...he desired index key Select one of the upper row of keys USER 1 through USER 6 to determine the location of the rapid key when the GROUP index is displayed instead of the ABC index p 79 The lower keys are for selecting whether or not to include the rapid key in the FREQUENT USE index If you touch the wrong key simply touch the correct key 7 Touch the OK key 8 Touch the FAX No key The fax number en...

Страница 71: ...s 14 Check the transmission settings The initial transmission settings are TRANSMISSION SPEED 33 6 kbps and INTERNATIONAL CORRESPONDENCE MODE NONE To change either of the settings touch the MODE key If you do not wish to change the settings this step is not necessary After touching the MODE key you can change either of the two settings When finished touch the OK key Transmission speed Speed select...

Страница 72: ...you touch the NEXT key you will return to the screen of step 1 on page 68 When sending a fax to a foreign country telephone line conditions can sometimes distort the fax or interrupt the transmission Selecting the right international correspondence mode can help alleviate these problems If errors frequently occur when sending a fax to a foreign country try each of modes 1 to 3 and select the mode ...

Страница 73: ...ROUP CORPO TPS SHARP GROUP D E F G H PROGRAM RELAY GROUP DIRECT ADDRESS AMEND DELETE NAME SHARP CORPORATION S INITIAL DELETE EXIT INDEX USER 3 0666211221 3456 987654 FAX No KEY NAME SHARP CORPORATION 33 6 kbps NONE MODE S INITIAL DELETE EXIT S INITIAL DELETE EXIT DELETE THE ADDRESS SHARP CORPORATION NO YES If you cannot edit or delete a rapid key If you attempt to edit or delete a rapid key in the...

Страница 74: ...a message appears asking if you want to delete the destination touch the YES key 5 Touch the outer OK key The number of destinations in the group appears to the right of the ADDRESS key 6 Check the name of the key see step 13 on page 69 The characters appearing next to the KEY NAME key will be displayed in the group key To change these characters touch the KEY NAME key this step is not necessary i...

Страница 75: ...ith the numeric keys after touching the 10 KEY PAD key delete the destination from the broadcast list See step 4 on page 74 Rapid dial keys can also be deleted from the broadcast list When finished touch the OK key 4 Make sure that the edited information is correct and then touch the EXIT key If you wish to edit another group key repeat steps 2 through 4 5 Touch the DELETE key 6 Touch the YES key ...

Страница 76: ...p 43 Sender p 45 Confidential transmission p 47 Relay request transmission p 50 4 Touch the OK key If you cannot edit or delete a group key If you attempt to edit or delete a group key in the following situations a warning message will appear and editing deletion will not be possible The rapid key you wish to change or delete is currently being used for transmission or is used in a currently store...

Страница 77: ...ame the edit delete screen for the selected program appears Touching the ADDRESS BOOK key returns you to the screen of step 2 4 To edit the program follow the same procedure as for storing the program To delete the program touch the DELETE key and then touch the YES key in the confirmation screen that appears PROGRAM PROGRAM NAME SETTINGS ADDRESS 2 ADDRESSES STANDARD REGISTRATION IS COMPLETED PROG...

Страница 78: ...ey is touched the letter entry screen appears Enter up to 36 characters for the name See page 81 for the procedure for entering letters 2 Touch the RELAY STATION key The number entry screen for the relay machine appears 3 Press the numeric keys to enter the fax number of the relay machine To insert a pause between digits of the number touch the PAUSE key The pause appears as a hyphen See page 98 t...

Страница 79: ...er two digits of the number Touch the or key to enter the number Continuing to touch the key makes the number change quickly The numbers entered will vary depending on the model used for the relay machine For more information consult your authorised service representative Also see the operation manual for copier 7 Touch the OK key The screen for entering the numbers of the end receiving machines a...

Страница 80: ... Touch the DELETE key 7 Touch the YES key To delete another relay group repeat steps 3 6 and 7 AMEND DELETE 1 1 PROGRAM RELAY GROUP DIRECT ADDRESS AMEND DELETE SELECT ADDRESS TO AMEND DELETE RELAY GROUP EXIT 1 1 SHARP CORPORATION CORPO TPS SHARP GROUP D E F G H ADDRESS BOOK PROGRAM DIRECT ADDRESS AMEND DELETE DELETE EXIT SHARP CORPORATION RECIPIENT 012345568795 2 GROUP NAME RELAY STATION RECIPIENT...

Страница 81: ... ADDRESS CONTROL key see steps 1 and 2 on page 66 2 Touch the CUSTOM INDEX key 3 Touch an index key USER 1 to USER 6 You can enter a name for the selected index When the index key is touched the letter entry screen appears 4 Enter a maximum of 6 characters for the index name Use the key to clear the displayed name and then enter the desired name See page 81 for the procedure for entering character...

Страница 82: ...ey of the list you wish to print PRINT JOB IN MEMORY PLEASE WAIT UNTIL PRINT OUT appears in the message display and printing begins DATA LINE B STATUS CUSTOM SETTINGS Y T S L LIST PRINT RECEIVE MODE SENDING ADDRESS LIST FAX REPORT GS SS LIST RAPID DIAL LIST RELAY GROUP LIST GROUP LIST PROGRAM LIST TELEPHONE NUMBER LIST The list is printed before other print jobs are printed If you attempt to print...

Страница 83: ...sor back one space and then enter the correct character You can also press the AB ab 12 key during entry to enter a number or symbol 4 Touch the SPACE key The cursor moves forward and a space is entered 5 Touch the ÃÄÂ ãäâ key 6 Touch the ä key To switch between upper case and lower case highlighted lower case letters are entered 7 Touch the ÃÄÂ ãäâ key NAME SPACE ÃÄÂ ãäâ 12 ABC AB ab CANCEL OK ab...

Страница 84: ...reen and return to the programming screen If you touch the CANCEL key you will return to the programming screen without storing the entered characters NAME SPACE ABC abc ÃÄ CANCEL OK ãäâ Sharp ä NAME SPACE ABC abc ÃÄ CANCEL OK ãäâ Sharp äÄ The layout of the letter keys can be changed in the custom settings See Keyboard select in the operation manual for copier The above explanation assumes that ...

Страница 85: ...rs You can also touch another or AB ab 12 key to enter characters other than numbers and symbols 3 When you have finished entering characters touch the OK key You will exit the character entry screen and return to the programming screen If you touch the CANCEL key you will return to the programming screen without storing the entered characters NAME SPACE ÃÄÂ ãäâ 12 ABC AB ab CANCEL OK abc NAME SPA...

Страница 86: ... sending PRINT OUT ALL REPORT NO PRINTED REPORT Receiving PRINT OUT ALL REPORT PRINT OUT ERROR REPORT ONLY Broadcasting PRINT OUT ERROR REPORT ONLY NO PRINTED REPORT Confidential reception NO PRINTED REPORT The Transaction Report shows the date of transmission the time transmission began the other party s name the duration of the operation the number of pages and the result The list count appears ...

Страница 87: ...m occurred PASSCODE E The connection was broken because the polling passcode was not correct RX NO POLL The machine that was polled does not have a polling function NO RX POLL The other machine refused the polling operation or your machine broke the connection when polled because no data was in polling memory SA POL TX ERR The other machine refused an F code polling operation SA POLL ERR Your mach...

Страница 88: ...s and sending receiving parties TIMER LIST Timer settings stored transmission jobs and recall jobs MEM POLLING LIST Documents scanned into polling memory and F code polling memory PASSCODE LIST Programmed sender information relay request settings and polling settings CONFIDENTIAL RECEPTION LIST Confidential box numbers Sharp mode and F code boxes that have received faxes and the number of pages 1 ...

Страница 89: ...is installed Remove the printed pages TONER SUPPLY IS LOW Little toner remains in the toner cartridge Replace the toner cartridge operation manual for copier CHANGE THE TONER CARTRIDGE The toner cartridge is out of toner and the received document cannot be printed Replace the toner cartridge THE MEMORY BECOMES FULL Pg No XX SEND SCANNED DATA OR CANCEL THE JOB The memory became full while the origi...

Страница 90: ...t possible The transmitted image prints out blank at the receiving side The transmitted image is distorted Transmission does not take place at the specified time White or black lines appear in the transmitted image Reception problems 90 Reception does not take place at the specified time Printing does not take place after reception A received image prints out blank The received image is faint The ...

Страница 91: ...ess or passcode is not correct Check with the operator of the receiving machine The receiving machine is using the line Check with the operator of the receiving machine The size of the original was not correctly detected Check the original size The transmitted image prints out blank at the receiving side The original was placed so that the wrong side was scanned Make sure the original is placed so...

Страница 92: ...ed in the transmitting machine Check with the operator of the transmitting machine The received image is faint The original is faint Ask the other party to resend the document using a suitable exposure setting The received image is distorted The line conditions were poor due to thunder or other reason Ask the other party to send the document again A ringing sound is not made The ringer volume has ...

Страница 93: ...tion explains key operator programs for the fax features of the machine For key operator programs that are related to general operation the copy function the printer function and the network scanner function see the key operator s guide To access the key operator programs the key operator code must be entered The key operator code is initially set to 00000 at the factory ...

Страница 94: ...8 PAUSE TIME SETTING 2 sec 98 SPEAKER VOLUME SETTING SPEAKER Medium RINGER VOLUME Medium LINE MONITOR Medium TRANSMISSION COMPLETE SOUND Medium 99 TRANSMISSION COMPLETE SOUND SETTING PATTERN 2 99 TRANSMISSION COMPLETE SOUND TIME SETTING 3 0 sec 99 ACTIVITY REPORT PRINT SELECT SETTING AUTO PRINT AT MEMORY FULL Disabled PRINT DAILY AT DESIGNATED TIME Disabled 99 FAX DEFAULT SETTINGS TRANSACTION REPO...

Страница 95: ...UPLEX RECEPTION SETTING Disabled 102 PRINT STYLE SETTING AUTO SIZE SELECT 102 NUMBER OF CALLS IN AUTO RECEPTION 2 times 103 SET THE TELEPHONE NUMBER FOR DATA FORWARDING Un registering 103 INDEX PRINT Disabled 103 RECEIVED DATA PRINT CONDITION Enabled 103 LETTER SIZE RX REDUCE PRINT Disabled 103 ENTER JUNK FAX NUMBER Un registering 103 ANTI JUNK FAX Disabled 103 Program name Factory default setting...

Страница 96: ...ORY PRINT SELECT SETTING REMOTE RECEPTION NUMBER SETTING EXTERNAL TELEPHONE SETTING PBX SETTING not available in UK FAX SEND SETTINGS AUTO REDUCTION SENDING SETTING PRINTING PAGE NUMBER AT RECEIVER DATE OWN NUMBER PRINT POSITION SETTING ROTATION SENDING SETTING CALL TIMER AT MEMORY SENDING RECALL IN CASE OF LINE BUSY RECALL IN CASE OF COMMUNICATION ERROR QUICK ON LINE SENDING DEFAULT SENDING MODE ...

Страница 97: ...de that has not been programmed as an account number for auditing mode a number that has been programmed as an account number cannot be used The entered number will be the new key operator code Be sure to remember this number 6 Touch the OK key You will return to the screen of step 4 This completes the procedure for changing the key operator code If you wish to configure another program touch the ...

Страница 98: ...e form is touched the setting screen of that key will appear If the settings continue on the following screen s touch the and keys to move back and forth through the screens To return to the category selection screen touch the OK key The currently set numerical value is displayed Numerical values can be set by touching the and keys 20 1 999 1 2 3 4 5 OK RESETTING ACCOUNT TOTAL PAGES PER ACCOUNT AU...

Страница 99: ...RESS KEY AT BROADCAST SETTING You can select whether or not the NEXT ADDRESS key must always be pressed before entering the next destination when performing a broadcast transmission p 27 If this program is disabled the NEXT ADDRESS key can be omitted except when the numeric keys are used to enter one full fax number after another full fax number When this program is enabled it will no longer be po...

Страница 100: ...HARACTERS on page 81 3 Touch the FAX No key and enter the fax number Enter up to 20 digits for the number using the numeric keys To enter a press the key To enter a hyphen touch the PAUSE key To enter a space press the SPACE key If you make a mistake press the CLEAR key and re enter the correct digit 4 Touch the OK key 5 To exit touch the EXIT key To enter another sender touch the NEXT key 1 Touch...

Страница 101: ...same way AUTO PRINT AT MEMORY FULL and PRINT DAILY AT DESIGNATED TIME can be simultaneously selected TRANSACTION REPORT PRINT SELECT SETTING This setting is used to select the conditions for printing out Transaction Reports Conditions can be selected for regular transmissions broadcast transmissions receptions and confidential receptions Touch the key to display the next setting Select the print c...

Страница 102: ...m 0 to 9 can be entered in the left box and digits 0 to 9 and can be entered in the central and right boxes If your external line number is two digits enter in the right box and if your external line number is one digit enter in the central and right boxes When PBX CONNECTION is enabled the R key appears in the base screen of fax mode p 7 This key can be touched to switch to fax transmission insid...

Страница 103: ...whether your machine will automatically re attempt the call when the other machine fails to answer or the line is busy The number of recall attempts can be set from 1 to 9 and the interval between attempts can be set from 1 to 15 minutes in increments of 1 minute To disable automatic recalling select the NO RECALL checkbox RECALL IN CASE OF COMMUNICATION ERROR When sending a document this setting ...

Страница 104: ...S IN AUTO RECEPTION SET THE TELEPHONE NUMBER FOR DATA FORWARDING INDEX PRINT RECEIVED DATA PRINT CONDITION LETTER SIZE RX REDUCE PRINT ENTER JUNK FAX NUMBER ANTI JUNK FAX AUTO RECEIVE REDUCE SETTING When you receive a fax that includes the sender s name and number the received image is slightly larger than the standard sizes This setting can be enabled to have the received image automatically redu...

Страница 105: ...sed to have an index black mark printed at the top of received fax pages The mark moves from left to right as pages are printed RECEIVED DATA PRINT CONDITION When this program is enabled and a received fax is held in memory because there is a problem that prevents printing such as no suitable paper any faxes received after that fax which can be printed will be given priority and printed LETTER SIZ...

Страница 106: ...d ID numbers This method can only be used if the other machine is also a Sharp machine excluding certain models Up to 10 ID numbers can be programmed To check the programmed ID numbers print out the Passcode list in the custom settings p 86 SYSTEM NUMBER MODE This program is used to store a system number Your system number provides another means of receiving permission to poll a machine Polling wi...

Страница 107: ... 8 6 To enter a passcode touch the PASS CODE key A slash appears after the sub address If you make a mistake press the CLEAR key and then enter the correct number 7 Use the numeric keys to enter a passcode maximum of 20 digits Numbers and and can be used in a passcode If you make a mistake press the CLEAR key and then enter the correct number 8 Touch the OK key You will return to the memory box pr...

Страница 108: ...f needed touch the or key to move through screens The selected rapid keys are highlighted and stored as end receiving machines If you touch an incorrect rapid key touch it again so that it is not highlighted You can also touch the 10 KEY PAD key to enter full fax numbers with the numeric keys 4 To check the stored end receiving machines touch the ADDRESS REVIEW key A list of the selected destinati...

Страница 109: ...tion LIST PRINT This program is used to print lists of key operator programs related to the fax function The following five lists can be printed FAX KEY OPERATOR PROGRAMS LIST FAX ACCOUNT USAGE LIST CONFIDENTIAL CODE LIST F CODE MEMORY BOX LIST JUNK FAX NUMBER LIST Only appears when AUDITING MODE is enabled in the key operator programs The factory default setting for AUDITING MODE is disabled See ...

Страница 110: ...108 9 Chapter 9 APPENDIX This chapter contains reference information regarding the fax features of the machine ...

Страница 111: ...ng Scanning resolution Supports ITU T standards 8 x 3 85 lines mm Standard 8 x 7 7 lines mm Fine Fine Halftone 8 x 15 4 lines mm Super Fine Super Fine Halftone 16 x 15 4 lines mm Ultra Fine Ultra Fine Halftone Recording method Laser electrostatic charge method Transmission speed 33 6 kbps 2 4 kbps Automatic fallback Transmission time 1 2 seconds Super G3 mode 33 6 kbps JBIG 6 seconds G3 ECM mode 1...

Страница 112: ...on 29 Fax mode 12 Fax receive settings 102 Fax send settings 100 Fax transmission Broadcast transmission 26 Cancelling 24 Confidential transmission 47 Direct transmission 14 F code transmission 51 Large number of pages 18 Manual transmission 62 Message 43 Own number sending 44 PC FAX transmission 65 Quick on line 14 Relay request function 49 Storing transmission jobs 15 Thin sheet document 39 Time...

Страница 113: ...5 Group indexes 79 Group keys 72 Programs 74 Rapid dial keys 68 Relay groups 76 Programs 41 R Rapid dialling 11 16 Read end 13 Receiving party is busy 15 Reception Automatic reception 25 Extension phone remote reception 64 Forward function 29 Manual reception 63 Reception mode 63 Redialling 11 Relay broadcast function 49 Relay machine 49 59 Relay request function 49 Relay request machine 49 59 Rep...

Страница 114: ...eception 25 Manual reception 63 Sending faxes Basic procedure for sending faxes 12 Cancelling a fax transmission 24 Manual transmission 62 F code transmission F code relay broadcast transmission 59 P Preparations Connecting the telephone line cord 3 Date and time checking 4 Own name set 98 Own number set 98 Printing List print 107 Programmed information 80 Reports 86 Programming settings Character...

Страница 115: ......

Страница 116: ...PRINTED IN FRANCE TINSE1118TSZZ AR FX7 SHARP CORPORATION ...

Отзывы: