


4.5
Inspecting and Cleaning the Gripper and Barcode Reader
4-8
501610 Rev. 07-01-19
Required tools and equipment:
Make sure you have the following:
•
Cotton swabs
•
Isopropyl alcohol
•
Kimwipes® or lint-free cloth for cleaning lenses
Procedure overview:
Table 4-1
provides an overview of inspecting and cleaning the
gripper pads and sensors and the mirror on the barcode reader.
Step
Task
Refer to...
1
Power off the gripper
Section 4.5.1
2
Inspect and clean the parts if necessary
Section 4.5.2 on page 4-9
3
Power on the gripper and resume
operation
Section 4.5.3 on page 4-11
Table 4-1
Overview of inspecting and cleaning gripper components
4.5.1
Powering Off the Gripper
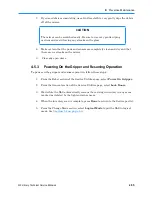
Before inspecting or cleaning gripper components, you must power off the gripper. Follow
these steps:
1.
If necessary, press the
Home
button in the upper right corner of any page to
return to the Home page.
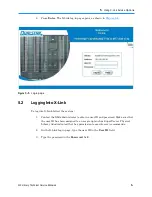
2.
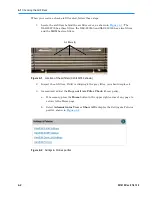
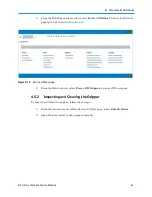
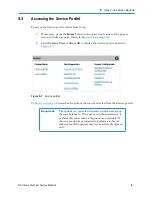
Select
Service View
or
Show All
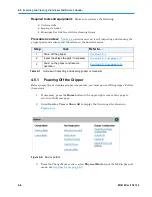
to display the Service portlet, shown in
Figure 4-9
.
Figure 4-9
Service portlet
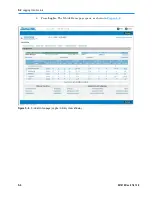
3.
From the Change Mode section, select
Physical Mode
to put the XLS in physical
mode. See
Section 5.4 on page 5-8
.
Содержание XLS Series
Страница 1: ...Technical Service Manual Document No 501610 Rev 07 01 19 XLS Series of Tape Libraries...
Страница 14: ...501610 Rev 07 01 19 Part I Before You Begin Notes...
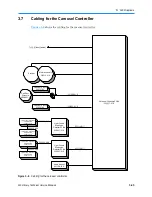
Страница 58: ...3 7 Cabling for the Carousel Controller 3 12 501610 Rev 07 01 19 Notes...
Страница 70: ...4 5 Inspecting and Cleaning the Gripper and Barcode Reader 4 12 501610 Rev 07 01 19 Notes...
Страница 72: ...Part II Using X Link 501610 Rev 07 01 19 Notes...
Страница 96: ...Part III Replacing FRUs 501610 Rev 07 01 19 Notes...
Страница 136: ...8 8 Bringing a Tape Drive Online 8 14 501610 Rev 07 01 19 Notes...
Страница 158: ...9 5 Replacing a Drive Bay with a Cartridge Bay 9 22 501610 Rev 07 01 19 Notes...
Страница 172: ...10 3 Replacing a Side Panel 10 14 501610 Rev 07 01 19 Notes...
Страница 186: ...11 3 Upgrading a Fixed Port Assembly to an I O Port 11 14 501610 Rev 07 01 19 Notes...
Страница 226: ...12 6 Replacing the Y Motor Assembly 12 40 501610 Rev 07 01 19 Notes...
Страница 324: ...Part IV Reference 501610 Rev 07 01 19 Notes...
Страница 352: ...B 2 Packing the XLS B 14 501610 Rev 07 01 19 Notes...
Страница 354: ...C 2 501610 Rev 07 01 19 Notes...
Страница 360: ...Glossary GL 6 501610 Rev 07 01 19 Notes...
Страница 366: ...Index IN 6 501610 Rev 07 01 19 Notes...


