
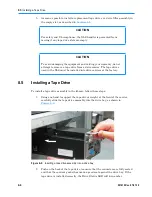


8.5
Installing a Tape Drive
8-8
501610 Rev. 07-01-19
5.
As soon as possible, install a replacement tape drive or a drive filler assembly in
the empty slot, as described in
Section 8.5
.
CAUTION
For safety and UL compliance, the XLS handler is prevented from
moving if any tape drive slots are empty.
CAUTION
To avoid damaging the equipment and voiding your warranty, do not
attempt to remove a tape drive from a drive carrier. The tape drives
used in the XLS must be installed into drive carriers at the factory.
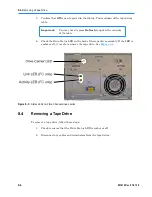
8.5
Installing a Tape Drive
To install a tape drive assembly in the library, follow these steps:
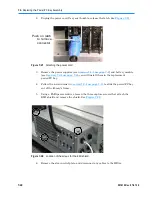
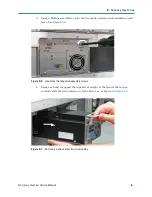
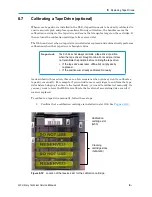
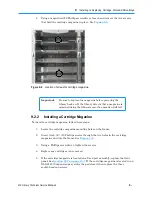
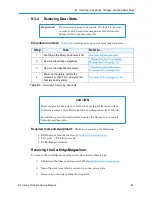
1.
Using one hand to support the tape driv
e’s
weight at the front of the carrier,
carefully slide the tape drive assembly into the drive bay, as shown in
Figure 8-8
.
Figure 8-8
Inserting a tape drive assembly into a drive bay
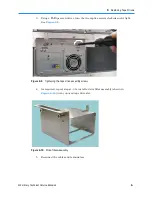
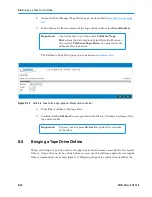
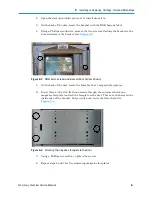
2.
Push on the back of the tape drive to ensure that the connectors are fully seated
and that the ca
rrier’
s gasket has made a good seal against the drive bay. If the
tape drive is installed correctly, the Drive Status LED will turn amber.
Содержание XLS Series
Страница 1: ...Technical Service Manual Document No 501610 Rev 07 01 19 XLS Series of Tape Libraries...
Страница 14: ...501610 Rev 07 01 19 Part I Before You Begin Notes...
Страница 58: ...3 7 Cabling for the Carousel Controller 3 12 501610 Rev 07 01 19 Notes...
Страница 70: ...4 5 Inspecting and Cleaning the Gripper and Barcode Reader 4 12 501610 Rev 07 01 19 Notes...
Страница 72: ...Part II Using X Link 501610 Rev 07 01 19 Notes...
Страница 96: ...Part III Replacing FRUs 501610 Rev 07 01 19 Notes...
Страница 136: ...8 8 Bringing a Tape Drive Online 8 14 501610 Rev 07 01 19 Notes...
Страница 158: ...9 5 Replacing a Drive Bay with a Cartridge Bay 9 22 501610 Rev 07 01 19 Notes...
Страница 172: ...10 3 Replacing a Side Panel 10 14 501610 Rev 07 01 19 Notes...
Страница 186: ...11 3 Upgrading a Fixed Port Assembly to an I O Port 11 14 501610 Rev 07 01 19 Notes...
Страница 226: ...12 6 Replacing the Y Motor Assembly 12 40 501610 Rev 07 01 19 Notes...
Страница 324: ...Part IV Reference 501610 Rev 07 01 19 Notes...
Страница 352: ...B 2 Packing the XLS B 14 501610 Rev 07 01 19 Notes...
Страница 354: ...C 2 501610 Rev 07 01 19 Notes...
Страница 360: ...Glossary GL 6 501610 Rev 07 01 19 Notes...
Страница 366: ...Index IN 6 501610 Rev 07 01 19 Notes...


