


17.4
Restarting the XLS if the Fiducial Positions were Altered
17-8
501610 Rev. 07-01-19
17.4
Restarting the XLS if the Fiducial Positions were Altered
This section includes instructions for applying power to the XLS if a fiducial position
could have changed while the XLS was shut down, even though the hardware
configuration remained the same. Use the instructions in this section if you replaced a
drive bay or any other component containing a fiducial target. Components containing
fiducial targets include cartridge magazines, cartridge bays, I/O ports, and MEMs.
CAUTION
Since the I/O ports and fixed port assemblies contain fiducial targets,
you must scan fiducials and targets whenever you remove and replace
the front panel.
For example, you would use these instructions after performing any of the following
procedures:
•
Replacing a cartridge magazine
•
Replacing a cartridge bay with another cartridge bay
•
Replacing a drive bay with another drive bay
•
Removing and replacing the front panel in order to service an internal component
(such as the touch screen or an I/O port solenoid)
•
Replacing an I/O port
•
Reattaching a MEM after removing it to access an internal component, such as
the carousel motor assembly
•
Replacing a fixed port assembly
Important:
Do not use the instructions in this section if you:
• Replaced a cartridge bay with a drive bay (or vice versa)
• Replaced a fixed port assembly with an I/O port (or vice
versa)
• Installed or removed door slots
• Installed or removed a MEM or expansion pod
Instead, refer to
Section 17.5 on page 17-12
.
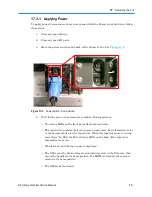
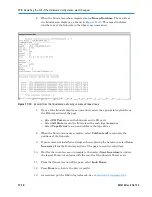
17.4.1 Applying Power
To apply power if the front panel was removed or a drive bay, cartridge magazine, or I/O
port was replaced, follow these steps:
Содержание XLS Series
Страница 1: ...Technical Service Manual Document No 501610 Rev 07 01 19 XLS Series of Tape Libraries...
Страница 14: ...501610 Rev 07 01 19 Part I Before You Begin Notes...
Страница 58: ...3 7 Cabling for the Carousel Controller 3 12 501610 Rev 07 01 19 Notes...
Страница 70: ...4 5 Inspecting and Cleaning the Gripper and Barcode Reader 4 12 501610 Rev 07 01 19 Notes...
Страница 72: ...Part II Using X Link 501610 Rev 07 01 19 Notes...
Страница 96: ...Part III Replacing FRUs 501610 Rev 07 01 19 Notes...
Страница 136: ...8 8 Bringing a Tape Drive Online 8 14 501610 Rev 07 01 19 Notes...
Страница 158: ...9 5 Replacing a Drive Bay with a Cartridge Bay 9 22 501610 Rev 07 01 19 Notes...
Страница 172: ...10 3 Replacing a Side Panel 10 14 501610 Rev 07 01 19 Notes...
Страница 186: ...11 3 Upgrading a Fixed Port Assembly to an I O Port 11 14 501610 Rev 07 01 19 Notes...
Страница 226: ...12 6 Replacing the Y Motor Assembly 12 40 501610 Rev 07 01 19 Notes...
Страница 324: ...Part IV Reference 501610 Rev 07 01 19 Notes...
Страница 352: ...B 2 Packing the XLS B 14 501610 Rev 07 01 19 Notes...
Страница 354: ...C 2 501610 Rev 07 01 19 Notes...
Страница 360: ...Glossary GL 6 501610 Rev 07 01 19 Notes...
Страница 366: ...Index IN 6 501610 Rev 07 01 19 Notes...


