


15.3
Replacing the Carousel Motor
15-30
501610 Rev. 07-01-19
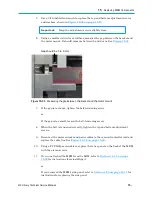
15.3.4 Powering the Carousel Controller Back On
To power the carousel controller back on after replacing the carousel motor, follow these
steps:
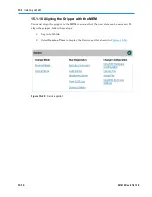
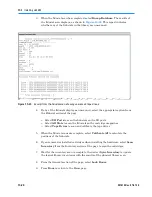
1.
From the Home page in X-Link, select
Service View
or
Show All
to display the
Service portlet, shown in
Figure 15-26 on page 15-24
.
2.
From the Change Mode section, select
Physical Mode
to put the library in
physical mode. See
Section 5.4.3 on page 5-10
for more information.
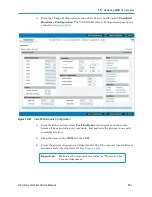
3.
From the Run Diagnostics section, select
Service Utilities
. The Service Utilities
page opens, as shown in
Figure 15-27 on page 15-24
.
4.
Power on the carousel controller using the appropriate command, as follows:
–
If you want to power on the carousel attached to the
left
side of the MEM,
select
Power On Carousel Left
from the Carousels section of the page.
–
If you want to power on the carousel attached to the
right
side of the LRM,
select
Power On Carousel Right
from the Carousels section of the page.
5.
Wait while the XLS automatically homes the carousel.
6.
If you detached the MEM from the LRM to access the carousel motor, follow the
instructions in
Section 15.1.12 on page 15-19
to scan the fiducials and the
cartridges.
7.
As required, put the XLS in logical mode and restart the applications. See
Section 5.4.4 on page 5-11
.
Содержание XLS Series
Страница 1: ...Technical Service Manual Document No 501610 Rev 07 01 19 XLS Series of Tape Libraries...
Страница 14: ...501610 Rev 07 01 19 Part I Before You Begin Notes...
Страница 58: ...3 7 Cabling for the Carousel Controller 3 12 501610 Rev 07 01 19 Notes...
Страница 70: ...4 5 Inspecting and Cleaning the Gripper and Barcode Reader 4 12 501610 Rev 07 01 19 Notes...
Страница 72: ...Part II Using X Link 501610 Rev 07 01 19 Notes...
Страница 96: ...Part III Replacing FRUs 501610 Rev 07 01 19 Notes...
Страница 136: ...8 8 Bringing a Tape Drive Online 8 14 501610 Rev 07 01 19 Notes...
Страница 158: ...9 5 Replacing a Drive Bay with a Cartridge Bay 9 22 501610 Rev 07 01 19 Notes...
Страница 172: ...10 3 Replacing a Side Panel 10 14 501610 Rev 07 01 19 Notes...
Страница 186: ...11 3 Upgrading a Fixed Port Assembly to an I O Port 11 14 501610 Rev 07 01 19 Notes...
Страница 226: ...12 6 Replacing the Y Motor Assembly 12 40 501610 Rev 07 01 19 Notes...
Страница 324: ...Part IV Reference 501610 Rev 07 01 19 Notes...
Страница 352: ...B 2 Packing the XLS B 14 501610 Rev 07 01 19 Notes...
Страница 354: ...C 2 501610 Rev 07 01 19 Notes...
Страница 360: ...Glossary GL 6 501610 Rev 07 01 19 Notes...
Страница 366: ...Index IN 6 501610 Rev 07 01 19 Notes...


