


14
Replacing Library Sensors and Solenoids
XLS Library Technical Service Manual
14-
229
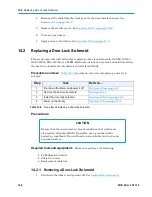
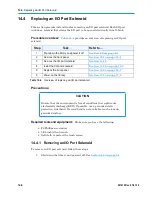
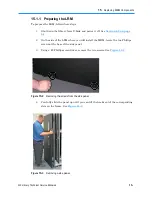
2. Remove the front panel as described in
Section 10.1 on page 10-1
and lay it flat
on the floor, with the touch screen facing down.
CAUTION
The touch screen is easily scratched. Protect the screen with a soft cloth
or other padding before placing the front panel on the floor.
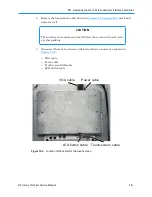
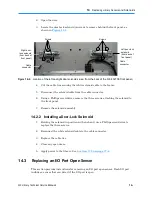
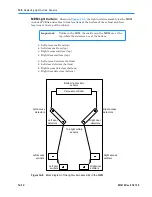
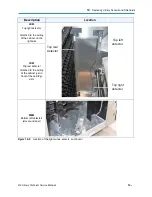
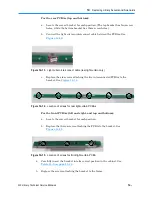
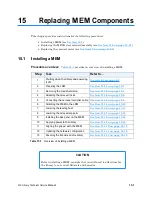
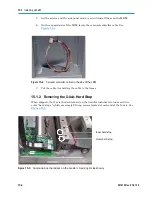
3. Locate the I/O port solenoid you want to replace behind the front panel, as shown
in
Figure 14-6
,
I/O port
solenoid
Figure 14-6
I/O port solenoid
4. Use a 5/64-inch Allen wrench to remove the screw connecting the solenoid release
to the bracket.
5. Using a Phillips screwdriver, remove the three screws attaching the solenoid to
the front panel.
6. Remove the solenoid assembly.
7. Disconnect the white solenoid cable from the cable harness.
14.4.2 Installing an I/O Port Solenoid
To install an I/O port solenoid, follow these steps:
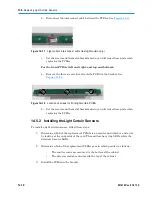
1. Reconnect the white solenoid cable to the cable harness.
2. Line up the solenoid with the release lever and replace the Allen screw.
3. Hold the solenoid in position and use a Phillips screwdriver to replace the three
screws.
Содержание XLS Series
Страница 1: ...Technical Service Manual Document No 501610 Rev 07 01 19 XLS Series of Tape Libraries...
Страница 14: ...501610 Rev 07 01 19 Part I Before You Begin Notes...
Страница 58: ...3 7 Cabling for the Carousel Controller 3 12 501610 Rev 07 01 19 Notes...
Страница 70: ...4 5 Inspecting and Cleaning the Gripper and Barcode Reader 4 12 501610 Rev 07 01 19 Notes...
Страница 72: ...Part II Using X Link 501610 Rev 07 01 19 Notes...
Страница 96: ...Part III Replacing FRUs 501610 Rev 07 01 19 Notes...
Страница 136: ...8 8 Bringing a Tape Drive Online 8 14 501610 Rev 07 01 19 Notes...
Страница 158: ...9 5 Replacing a Drive Bay with a Cartridge Bay 9 22 501610 Rev 07 01 19 Notes...
Страница 172: ...10 3 Replacing a Side Panel 10 14 501610 Rev 07 01 19 Notes...
Страница 186: ...11 3 Upgrading a Fixed Port Assembly to an I O Port 11 14 501610 Rev 07 01 19 Notes...
Страница 226: ...12 6 Replacing the Y Motor Assembly 12 40 501610 Rev 07 01 19 Notes...
Страница 324: ...Part IV Reference 501610 Rev 07 01 19 Notes...
Страница 352: ...B 2 Packing the XLS B 14 501610 Rev 07 01 19 Notes...
Страница 354: ...C 2 501610 Rev 07 01 19 Notes...
Страница 360: ...Glossary GL 6 501610 Rev 07 01 19 Notes...
Страница 366: ...Index IN 6 501610 Rev 07 01 19 Notes...


