11.1
Replacing an I/O Port
11-2
501610 Rev. 07-01-19
2.
Remove the front panel, as described in
Section 10.1 on page 10-1
, and
carefully lean it against a wall. Make sure you can easily access the I/O ports
from the back and allow enough room in front for the I/O ports to open freely.
CAUTION
The touch screen is easily scratched. Protect the screen with a soft cloth
or other padding before leaning the front panel against any surface.
3.
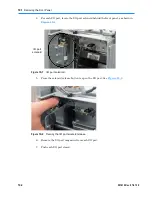
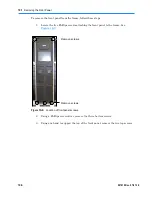
Locate the I/O port solenoid on the back of the front panel, as shown in
Figure 11-1
.
I/O port
solenoid
Figure 11-1
I/O port solenoid
4.
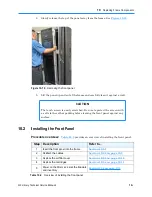
Press the solenoid release button to open the I/O port. See
Figure 11-2
.
Figure 11-2
Pressing the I/O port solenoid release
Содержание XLS Series
Страница 1: ...Technical Service Manual Document No 501610 Rev 07 01 19 XLS Series of Tape Libraries...
Страница 14: ...501610 Rev 07 01 19 Part I Before You Begin Notes...
Страница 58: ...3 7 Cabling for the Carousel Controller 3 12 501610 Rev 07 01 19 Notes...
Страница 70: ...4 5 Inspecting and Cleaning the Gripper and Barcode Reader 4 12 501610 Rev 07 01 19 Notes...
Страница 72: ...Part II Using X Link 501610 Rev 07 01 19 Notes...
Страница 96: ...Part III Replacing FRUs 501610 Rev 07 01 19 Notes...
Страница 136: ...8 8 Bringing a Tape Drive Online 8 14 501610 Rev 07 01 19 Notes...
Страница 158: ...9 5 Replacing a Drive Bay with a Cartridge Bay 9 22 501610 Rev 07 01 19 Notes...
Страница 172: ...10 3 Replacing a Side Panel 10 14 501610 Rev 07 01 19 Notes...
Страница 186: ...11 3 Upgrading a Fixed Port Assembly to an I O Port 11 14 501610 Rev 07 01 19 Notes...
Страница 226: ...12 6 Replacing the Y Motor Assembly 12 40 501610 Rev 07 01 19 Notes...
Страница 324: ...Part IV Reference 501610 Rev 07 01 19 Notes...
Страница 352: ...B 2 Packing the XLS B 14 501610 Rev 07 01 19 Notes...
Страница 354: ...C 2 501610 Rev 07 01 19 Notes...
Страница 360: ...Glossary GL 6 501610 Rev 07 01 19 Notes...
Страница 366: ...Index IN 6 501610 Rev 07 01 19 Notes...

