
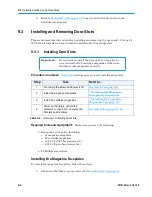


8
Replacing Tape Drives
XLS Library Technical Service Manual
8-
119
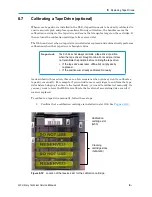
8.7
Calibrating a Tape Drive (optional)
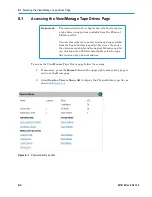
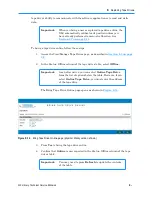
Whenever a tape drive is installed in the XLS, its position needs to be exactly calibrated to
ensure accurate pick and place operations. During
calibration
, the handler moves the
calibration cartridge to the tape drive and scans the triangular target on the cartridge. It
then returns the calibration cartridge to its reserved slot.
The XLS can detect when a tape drive is installed or replaced and automatically performs
calibration when that tape drive is brought online.
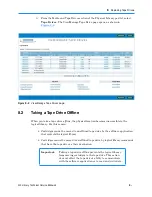
Important:
The XLS does not always calibrate a tape drive
’s position
when the tape drive is brought online. For example, it does
not recalibrate the position before onlining the tape drive:
• If the tape drive was taken offline but not physically
replaced
• If the position was already calibrated manually
As described in this section, there are a few occasions when you may want to calibrate a
tape drive manually. For example, if you intend to move cartridges to and from the tape
drive
before
bringing it online to the logical library, you need to calibrate it manually. Or,
you may want to force the XLS to recalibrate the location of an existing drive even if it
was not replaced.
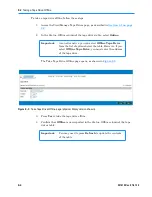
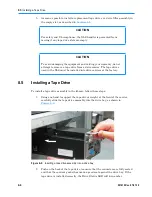
To calibrate a tape drive manually, follow these steps:
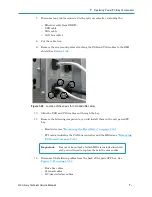
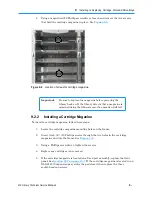
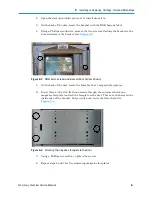
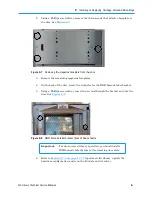
1. Confirm that a calibration cartridge is installed in slot G50. See
Figure 8-12
.
Calibration
cartridge slot
(G50)
Cleaning
cartridge slots
(G46-G49)
Figure 8-12
Location of the reserved slot for the calibration cartridge
Содержание XLS Series
Страница 1: ...Technical Service Manual Document No 501610 Rev 07 01 19 XLS Series of Tape Libraries...
Страница 14: ...501610 Rev 07 01 19 Part I Before You Begin Notes...
Страница 58: ...3 7 Cabling for the Carousel Controller 3 12 501610 Rev 07 01 19 Notes...
Страница 70: ...4 5 Inspecting and Cleaning the Gripper and Barcode Reader 4 12 501610 Rev 07 01 19 Notes...
Страница 72: ...Part II Using X Link 501610 Rev 07 01 19 Notes...
Страница 96: ...Part III Replacing FRUs 501610 Rev 07 01 19 Notes...
Страница 136: ...8 8 Bringing a Tape Drive Online 8 14 501610 Rev 07 01 19 Notes...
Страница 158: ...9 5 Replacing a Drive Bay with a Cartridge Bay 9 22 501610 Rev 07 01 19 Notes...
Страница 172: ...10 3 Replacing a Side Panel 10 14 501610 Rev 07 01 19 Notes...
Страница 186: ...11 3 Upgrading a Fixed Port Assembly to an I O Port 11 14 501610 Rev 07 01 19 Notes...
Страница 226: ...12 6 Replacing the Y Motor Assembly 12 40 501610 Rev 07 01 19 Notes...
Страница 324: ...Part IV Reference 501610 Rev 07 01 19 Notes...
Страница 352: ...B 2 Packing the XLS B 14 501610 Rev 07 01 19 Notes...
Страница 354: ...C 2 501610 Rev 07 01 19 Notes...
Страница 360: ...Glossary GL 6 501610 Rev 07 01 19 Notes...
Страница 366: ...Index IN 6 501610 Rev 07 01 19 Notes...


