3-12
Chapter 3: Installing and Configuring the ITS
Step 4. Perform Initial Configuration of the APCs to be Installed.
The Access Point Controllers are shipped from Philips in a factory default state. Prior
to operation on a network, each APC must have the following parameters configured
via its serial port interface:
• Static IP address
• Static Subnet Mask
• Static Default Gateway
• Set APC to control 1.4 GHz or 2.4 GHz Access Points
This initial configuration procedure is detailed below. All other configuration settings
of the IntelliVue Telemetry System are configured via the APC web-accessed
management screens.
The default configuration for an APC is:
• IP Address - 172.31.1.0
• Subnet Mask - 255.255.248.0
• Gateway - 172.31.3.0
• Alert Destination - 172.31.3.0
• AP Type - 1.4GHz Smart Hopping
Refer to your completed APC configuration worksheet (page 2-29) for your planned
and documented APC configurations. Repeat this initial configuration procedure for
each APC to be installed and connected to the ITS wireless subnet.
Note
All Static IP address assignments for Access Point Controllers must be unique within
the system. If two or more Access Point Controllers are configured with the same IP
address, system behavior is unpredictable and unspecified.
To perform initial configuration of an Access Point Controller:
1. Connect a serial cable between COM1: on your PC and the APC serial interface
port.
2. Connect a power cable to the APC and power up the APC.
3. Select Start/Programs/Accessories/Communications/Hyperterminal to open a
HyperTerminal session on your computer.
4. Set up HyperTerminal:
a) Enter a name for the New Connection.
b) Select COM1 from the Connect Using drop-down menu, and then click OK.
c) Set the serial port settings as follows:
-
Bits per second: 9600
-
Data bits: 8
-
Parity: None
-
Stop bits: 1
-
Flow Control: None
d) Click OK.
Содержание IntelliVue Telemetry System Infrastructure
Страница 8: ...viii Contents ...
Страница 14: ...xiv About This Guide ...
Страница 100: ...3 22 Chapter 3 Installing and Configuring the ITS Figure 3 10 APC Filter Configuration Screen ...
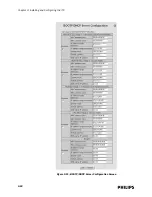
Страница 102: ...3 24 Chapter 3 Installing and Configuring the ITS Figure 3 11 BOOTP DHCP Server Configuration Screen ...
Страница 162: ...5 12 Chapter 5 Troubleshooting and Testing ...
Страница 168: ...A 6 Chapter A Installing Multiple ITSs at a Single Hospital Site ...
Страница 180: ...Index 8 Index ...


