background image

Starting Chromera.  17 


5.


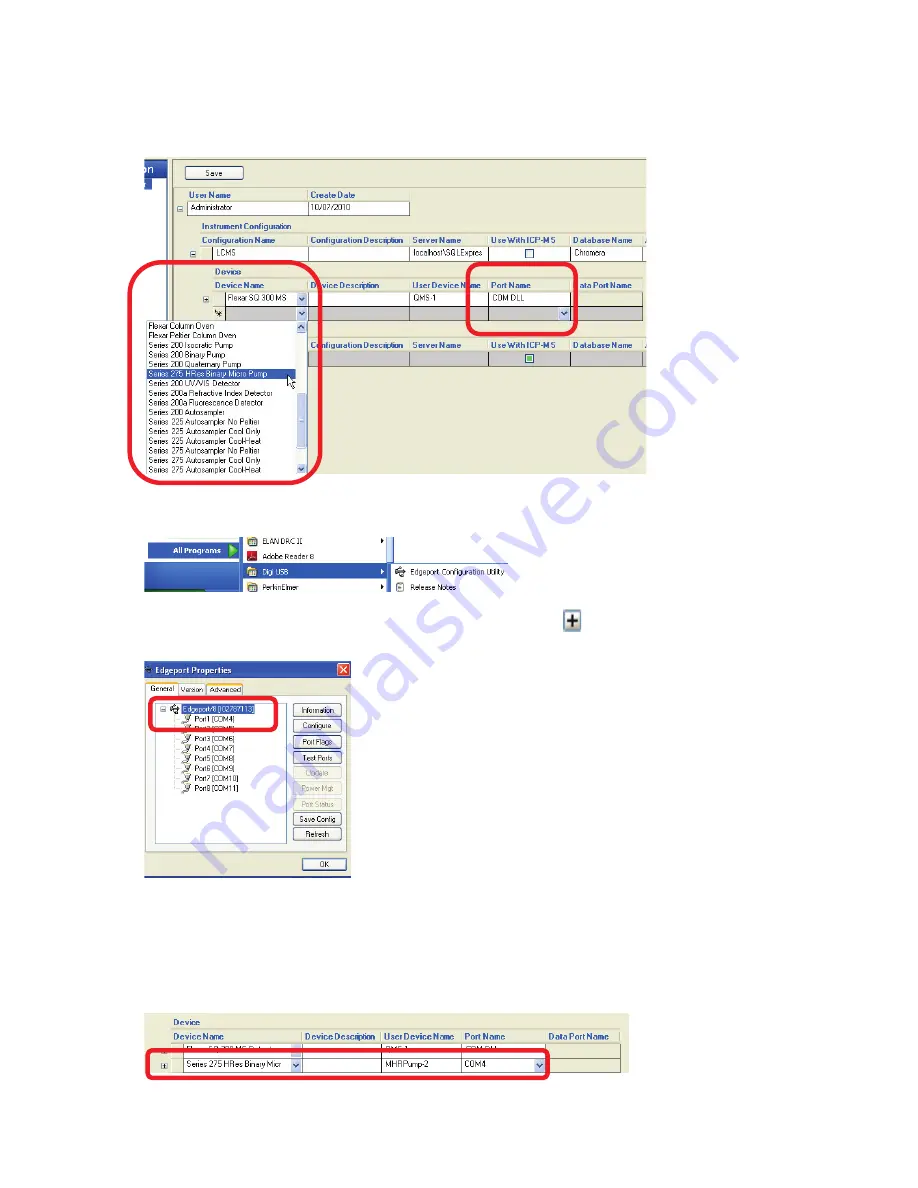
Select your LC Pump from the 

Device Name

 drop-down list. 

In this example, the 

Series 275 HRes Binary

 pump. 


6.


To determine a correct 

Port Name

 for the pump, open the 

Edgeport Configuration Utility

 from 

the 

Start

 button > 

All Programs

 > 

Digi USB

 > 

Edgeport Configuration Utility


7.


The 

Edgeport Properties

 dialog displays.  Click the plus sign


to display a list of the physical 

Ports (1 – 8) on the Edgeport with the corresponding COM port numbers. 


8.


In the 

Device Name

 pump row (in this example, Series 275 HRes Binary Micro Pump), click on the 

drop-down button in the 

Port Name

 field. 

9.


Select 

COM4

 from the 

Port Name

 drop-down list. 

If your LC Pump is plugged into Port 1 on the Edgeport the corresponding COM port is COM4 as 

shown in the Edgeport Properties dialog above. 


Содержание FLEXAR SQ 300 MS

Страница 1: ... 520 5 5 64 06 86 5 6 8 Chromera Chromatography Data System ...

Страница 2: ......

Страница 3: ...Chromera and Flexar SQ 300 MS User s Guide ...

Страница 4: ...imited to the implied warranties of merchantability and fitness for a particular purpose PerkinElmer shall not be liable for errors contained herein for incidental consequential damages in connection with furnishing performance or use of this material Copyright Information This document contains proprietary information that is protected by copyright All rights are reserved No part of this publicat...

Страница 5: ...a Sample Infusion 37 Creating a Peak Detection Mini Method 38 Ramping Parameters Optimizing the Capillary Exit Voltage 46 Creating Methods and Sequences 53 Creating an MS Method 54 Creating a Chromera Method 61 Creating a Chromera Sequence 64 Starting Data Acquisition 67 Preparing for an Analysis 68 Equilibrate the System 69 Running a Sequence 71 Analyze Results in Post Run 75 Viewing the Results ...

Страница 6: ...mand 106 Using the Generate Mass Spectrum Dialog 106 Creating an EIC and BIC from a Mass Spectrum 108 Processing of Mass Spectra 110 Freezing and Thawing Mass Spectra 110 Zooming In 110 Displaying Statistics 111 Using Right Mouse Click Menus 111 Baseline Calculations 111 Setting Spectrum Noise Calculation Preferences 112 Setting the Mass Spectrum Threshold 113 Mass Spectrum Smoothing 113 Mass Spec...

Страница 7: ...combination with mass spectrometry the software also needs to provide complete control of both techniques and to allow the smooth integration of data from the two systems PerkinElmer s Chromera CDS was specifically developed for chromatographers but built to provide full mass spectrometer control and spectral data handling This unparalleled integration enables the software to smoothly transition f...

Страница 8: ...6 Flexar SQ 300 MS User s Guide ...

Страница 9: ...Starting ...

Страница 10: ...esentative of PerkinElmer NOTE When planning analyses bear in mind that the instrument needs a minimum of 12 hours from initial installation power on to establish the required vacuum However after venting for routine maintenance allow 1 hour after pump down and HV activation to allow equilibration of all electronics prior to performing analyses Capillary tubing delivers sample infusion to the prob...

Страница 11: ...e following indicator lights LED Functionality Power On LED Instrument Status OFF OFF ON green ON Ready Error LED Instrument Status OFF OFF ON green Ready Running No Error ON red Error Vacuum LED Instrument Status OFF OFF ON green At vacuum ON red Not to vacuum Power On LED Ready Error LED Vacuum LED Green Green Red Green Red ...

Страница 12: ...p should light Make sure the power switch on the roughing pump is on so that the Vacuum System will start when Pumpdown is selected in the SQ 300 MS driver NOTE Do not switch the electronics on at this stage 2 Switch on power to the PC and login 3 Check that the fans are operating A cooling air flow should exit at the bottom of the instrument 4 Double click on the SQ 300 MS driver icon on the desk...

Страница 13: ... the Position of the ESI Probe 1 Observe the ESI probe through the inspection window and align to the center of the Capillary loosen the lock ring and move the manifold by turning the position adjustment screw Tighten the lock ring 2 The marks on the probe assembly can be used for quick positioning Observe the needle through the inspection window and adjust the tip if necessary 3 Loosen the lock r...

Страница 14: ...12 Flexar SQ 300 MS User s Guide ...

Страница 15: ...Starting Chromera ...

Страница 16: ...ime you install Chromera you must create a System Database To create a System Database 1 Create a Chromera Manager shortcut on your desktop Click the Windows Start button then click All Programs locate then right click on Chromera Manager then select Send To Desktop create shortcut 2 Start Chromera Manager by double clicking on it 3 Click the System Database Management button The system database f...

Страница 17: ...rument In addition a Port Name for communication to each device must also be defined in the Instrument configuration Next create an LCMS instrument to use with the SQ 300 MS in a system Creating an LCMS Instrument NOTE Prior to creating an Instrument Configuration make sure all cables are connected between all devices and the Edgeport box except To create an LC instrument for the SQ 300 MS Detecto...

Страница 18: ...press the Enter key A next to the row with the name displays 3 Click on the and the Device row displays 4 Click on the drop down button in Device Name box and device choices appear Select the appropriate devices modules for the Instrument you are creating In this example select Flexar SQ 300 MS Detector The Flexar SQ 300 MS Detector automatically fills in the Port Name field with COM DLL ...

Страница 19: ...lity 7 The Edgeport Properties dialog displays Click the plus sign to display a list of the physical Ports 1 8 on the Edgeport with the corresponding COM port numbers 8 In the Device Name pump row in this example Series 275 HRes Binary Micro Pump click on the drop down button in the Port Name field 9 Select COM4 from the Port Name drop down list If your LC Pump is plugged into Port 1 on the Edgepo...

Страница 20: ...base The default database is Chromera The field Archive Database Name is the name of the archived database when an archive is created The default archive database is Chromera Archive You can change the default names by typing new names into these fields If the names are changed the you must click the Save button 13 When all instrument components have been defined click the Save button located at t...

Страница 21: ...thod At this time you must assign an Operate method The Standby method not selectable all you have to do is apply it when necessary NOTE When you close Chromera you lose the Operate method settings You must reassign it every time you Launch Chromera 1 In the row below Operate click Browse for method ...

Страница 22: ... ESI folder 3 Select Operate method and click Open 4 Look at the Manual Control section of the Run Time screen 5 To verify the methods work with Chromera in the Standby row click Apply Observe that in the Status Panel the MS Detector State displays Standby ...

Страница 23: ...Starting Chromera 21 6 Next in the Operate row click Apply Observe that in the Status Panel the MS Detector State displays Operate 7 Leave the SQ 300 MS Detector in the Operate mode ...

Страница 24: ... sec 5k sec and 10k sec These Tunes will be the foundation upon which you build an MS acquisition method Auto Tune is performed through the SQ 300 MS driver About the Samples PKI Tune Mix Negative Mode Ions 92 205 531 1166 1466 2666 Positive Mode Ions 123 195 506 1022 1422 2222 2522 Calibrants There are two calibration mixtures that can be employed at the present time The PKI positive ion tune mix...

Страница 25: ...proximately 15 mL of tune mix 3 Re insert the calibration vial making sure the small draw tube is inserted into the 50 mL calibration vial Also make sure that the calibration vial is securely fastened into the blue cap to avoid leaks after pressurization 4 Connect the peak tubing that extends from the calibration compartment and use a Peak Finger tight fitting to secure the tubing to the sprayer p...

Страница 26: ...uto Tune 1 Click Method to open the Chromera Method screen 2 Select Create Edit MS Method Tune from the File menu The SQ 300 MS driver screen displays Sprayer Probe Finger tight Peak Fastener Peak Tubing coming from the calibration compartment ...

Страница 27: ...ls If you are tuning in positive ion mode open the tune Autotune_pos Tune or if you are tuning in the negative ion mode open Autotune_neg Tune 1 Select Open Tune from the File menu The Open Tune dialog displays 2 Select a tune file and double click on the tune file to open it The above example shows selecting Autotune_pos as the Tune file ...

Страница 28: ...tore This displays the Load Calibration Parameters screen 5 For Positive ion highlight PKI tune mix positive up to 3000u and simply double click on it If calibration is only required up to 2000u then the PKI tune mix positive up to 2000u file is available to use After running the PKI tune mix positive up to 3000u you will run Auto Tune again using the PKI Tune mix negative up to 3000u ...

Страница 29: ...e Tune Setup dialog displays 8 Type in the System Name and the User Name Note that the Syringe Pump selections are grayed out 9 Click the Start Pumping button A mid range mass is displayed with the corresponding TIC Keep priming the system until a steady signal intensity is achieved This generally takes about 30 seconds Start Pumping Button Analyte Source ...

Страница 30: ...ts Depth of probe adjustment for maximum sensitivity NOTE After clicking the Start Pumping button make sure you are getting flow through the PEEK tubing If there is no flow remove the tubing connection to the probe cut off about inch of tubing with a tubing cutter and reconnect the tubing to the probe If this fails to work replace the tubing A steady TIC is achieved in around 30 seconds Mid Range ...

Страница 31: ...et the Probe Tilt position as shown below 11 To start auto tune click on the Auto Tune button Each Auto Tune takes approximately 20 min If the Auto Tune stops abruptly you can re prime by clicking on the Sample Prime button and then click the Start Pumping button and wait an additional 30 seconds before running Auto Tune again Set Horizontal Set Tilt Position Here ...

Страница 32: ...For example 1 Pos_1K_04_Oct_2010_16h21m 2 Pos_5K_04_Oct_2010_16h21m 3 Pos_10K_04_Oct_2010_16h21m where Pos means Positive Ion Mode Neg means Negative Ion Mode 1K means a scan rate of 1000 u sec 5K means a scan rate of 5000 u sec 10K means a scan rate of 10 000 u sec The time and date stamp tunes should be used to create any Tunes to be used in a method for data acquisition The date and time stamp ...

Страница 33: ...mplete a Check Tune Results screen displays For each mass there are four evaluation criteria The Mass criterion checks to see if the mass accuracy of a peak is within 0 1 u of the actual mass The Width criterion checks the Full Width at Half Maximum is between 0 5 and 0 7 u Note that the Width criteria is expanded up to 0 85 u for high mass ions The Area criterion checks the relative intensities o...

Страница 34: ...Auto tune FAILED masses displays the masses which failed Auto tune otherwise the status light will be green if all masses passed Auto Tune and Check Tune This example shows the status light is Red and that many tune masses failed the Check Tune criteria Typically one would just rerun Check Tune another time to see if it passes since running Check Tune takes considerably less time than running Auto...

Страница 35: ...ringe tip and connects to the probe sprayer with a peek finger tight connector 2 Click the Sample Prime button The Tune Setup dialog displays 3 Type in the System Name and the User Name 4 In the Syringe Pump section select the Make of the syringe from the drop down menu When using a 500 uL Hamilton Syringe select Custom user entered in the drop down and the set the syringe inner diameter to 3 26 m...

Страница 36: ...34 Flexar SQ 300 MS User s Guide ...

Страница 37: ...Initial Process to Configure an Optimal Tune and Method on the SQ 300 MS Detector ...

Страница 38: ...lts Note that the first time this process is followed it will appear to be rather complex and tedious However once it is completed it can be used for all future analyses with minimal modifications The process consists of the following steps Infuse a target analyte into the SQ 300 MS This will provide a constant signal to the MS so the analyte can be properly mass labelled and optimized for maximum...

Страница 39: ... infuse a reserpine standard directly into the MS using a syringe Reserpine was chosen because it is a widely used standard in the LCMS community and it is readily available from a variety of commercial sources 1 Fill a syringe with a 100 pg µl reserpine solution in LCMS grade methanol and water in a 3 1 ratio 2 Disconnect the calibration line from the ESI sprayer on the SQ 300 MS and connect a Pe...

Страница 40: ...ting this routine will facilitate data evaluation for the process being described here as well as for many future evaluations To create a peak detection mini method 1 Click Method to open the Chromera Method screen 2 Select Create Edit MS Method Tune from the File menu The SQ 300 MS driver screen displays 3 If an Acquisition Method displays close the displayed Acquisition Method ...

Страница 41: ...electing pos_1k_29_OCT_2010_14h30m as the tune file pos_1k tune file and click OK to open it 6 A scanning experiment is going to be run so a few changes need to be made to the calibration Tune created by Auto Tune Reserpine has a molecular weight of 608 2 so using electrospray a protonated molecular ion at m z 609 2 and an isotopic distribution from m z 609 611 is expected Set the following parame...

Страница 42: ...alse off Set Cal Sample 1 and 2 On to False off 7 Enter the on board Syringe Pump settings for the syringe that will be used In this example since we are using a Hamilton 500 µl syringe that is not listed in the drop down list we select CUSTOM User Entered Syringe Make CUSTOM User Entered Set Syringe Diameter mm 3 26 Set Syringe Flow rate µl min 15 Note Tune window shows 10 ...

Страница 43: ...cified rate 9 To start the data acquisition click the green run button Acquire data for 1 2 minutes to allow enough time for the reserpine standard to be pumped all the way to the ESI sprayer so data can be collected on it 10 Take a snapshot of the data by selecting Snapshot from the Collect menu A snapshot allows preliminary processing of the data acquired up to the point in time the snapshot was...

Страница 44: ... SQ 300 MS User s Guide 11 Close the Mass data evaluation screen 12 Left click and drag a box over the TIC area as shown below 13 When you release the mouse button select Average Spectra from the drop down list ...

Страница 45: ...een appears 14 Left mouse click and drag a box around the reserpine protonated molecular ion cluster at m z 609 and select Zoom X Y Axis from the drop down list 15 Move the cursor to the peak apex it then turns into a hand and right click The peak table is displayed on the botton of the Mass data evaluation screen ...

Страница 46: ...cilitate data evaluation for this and all future analyses Select Peak Detect from the Evaluation menu The Mass Spectrum Peak Detect dialog box displays 17 Enter the parameters shown in the above screen then click OK A peak table is generated for all identified peaks at the bottom Mass data evaluation screen ...

Страница 47: ... the SQ 300 MS Detector 45 18 Select Save from the Evaluation menu and the Save Spectrum Evaluation Method dialog box displays 19 Type Peak Detect to name the method then click OK 20 Close the Snapshot screens 21 Stop the acquisition by clicking the red button ...

Страница 48: ...s or both The Capillary Exit voltage operates in two different ways the first is to set the voltage to a specific value and the second is to leave it set to Calibrated In this case the software will pick a value based on the values used for the individual calibration ions analyzed during Auto Tune This means a higher Capillary Exit voltage will be applied to higher molecular weight species To Ramp...

Страница 49: ...red To expedite this process in the future the settings should typically be Step Size 10 Spectra 1 6 Click on Capillary Exit Volts to apply the values 7 Click the green run button to start acquiring Acquire about 3 to 4 minutes of data 8 Take a snapshot of the data by selecting Snapshot from the Collect menu The TIC Snapshot screen displays 9 Left click and drag a box over the TIC area around 2 5 ...

Страница 50: ...ary exit values When the Ramp completes the Base Peak Preferences dialog displays In the Trace Selection section uncheck the following Resolution m z Width In the Evaluation Method drop down list select Peak Detect 12 Set the Base Peak Preferences as shown above then click OK The two Base Ion Chromatograms BIC display the red curve 194 0 to 196 0 Amplitude Peak Detect is a reserpine fragmentation ...

Страница 51: ...s to Configure an Optimal Tune and Method on the SQ 300 MS Detector 49 13 On the green curve move the cursor to the apex of the highest point it turns to a hand and left click The Mass data evaluation window displays ...

Страница 52: ...mum of the curve was equal to 152 volts This is the Capillary Exit value that provides the maximum intensity for the reserpine protonated molecular ion With a typical bell shaped curve as is demonstrated here any value near the maximum will be perfectly acceptable So in this example any value in between 150 to 160 volts will provide the maximum signal intensity for reserpine 15 Close all Snapshot ...

Страница 53: ...eserpine fragment ion a bit In the BIC screen click on the red line 194 to 196 Amplitude Peak Detect This makes the red line a solid line 17 Left click on the highest point of the red curve for the fragment ion The Mass window displays 18 Select Tune from the View menu Note that the Capillary Exit value is Single 250 ...

Страница 54: ...cture e g drugs and their metabolites It also provides additional ions associated with the analyte that can be measured instead of or in addition to the protonated molecular ion For example in quantitative analyses there is occasionally an issue with a contaminant or mobile phase ion at the same nominal mass as the analyte to be measured This may have a significant effect on the detection limits o...

Страница 55: ...Creating Methods and Sequences ...

Страница 56: ...calibrated Tune depends on the However if there is any doubt regarding whether the MS is still properly calibrated the easiest thing to do is to run a Check Tune to verify that the MS is operating to specification If Check Tune indicates that retuning is required simply run Auto Tune to recalibrate the system scan speed required to get enough sample points to properly profile the chromatographic T...

Страница 57: ...ds and Sequences 55 3 Select New from the File menu The following dialog displays 4 Select Method then click OK The following method screen displays 5 Click the plus sign to expand the method row and display Periods ...

Страница 58: ...od NOTE At this point in time it is up to the user Since you have not yet created a Chromera HPLC method set the run duration to 4 minutes then set your HPLC method to a 4 minute run duration time to insure that the MS Time Period equals the the run Duration specified in Chromera Otherwise the timing issues may arise during the running of a sequence 8 Click on Scan the blue dot 9 Select Import fro...

Страница 59: ...xample uses m z 609 3 13 Set the Pulse Counting Time µs to 300000 This is a 300 msec dwell time which will give excellent signal to noise It is possible to acquire data with much shorter dwell times to achieve higher sampling rates such as those required for UHPLC separations or if the acquisition requires monitoring many SIM ions simultaneously current limit is 38 14 Set the Drying Gas Flow Rate ...

Страница 60: ...rom the optimal values determined for the masses in the calibration mix during the Auto Tune procedure 16 Left click on Capillary Exit Volts again to set this value 17 Select Save from the File menu to save the method Notice that in Time Period 1 the Sim displays the set values 18 Click on the blue dot next to Sim 19 Select Copy from the Edit menu click on the Time Period green dot then select Pas...

Страница 61: ...hange it to Scan in Acquisition Function of the Global Variables section 21 Set the Low m z to 500 and the High m z to 625 22 Set the Pulse Counting Time µs to 100 NOTE The pulse counting dwell time entered here applies to each data point within the scan In this example the scan range is m z 500 625 and there are 10 samples per mass resulting in 1251 total data points acquired per scan each 23 Set...

Страница 62: ...p Function Calibrated to Q1 m z 25 Left click on Capillary Exit again to set this value 26 Select Save from the File menu This example MS acquisition Method comprised of two Tunes 1 SIM and 1 Scan that will cycle continuously until the end of Period 1 is now defined and saved 27 Close the SQ 300 MS driver ...

Страница 63: ...romera method The Chromera method will define all the operating requirements for all the other components in the Chromera configuration To create a Chromera method 1 Click Method to open the Method screen 2 Select New Method from the File menu 3 Type a Method Name and a Group Optionally you can also enter a Description ...

Страница 64: ...s by clicking on each instrument Click on BPump 1 and enter the pump parameters Click Advanced to show additional parameters 6 Click on AS275CO 2 and enter the autosampler parameters Click Advanced to show additional parameters 7 Click on QMS 3 in order to link the MS Method previously defined in the SQ MS driver software to the Chromera method being defined 8 Click Browse for Method ...

Страница 65: ...g Methods and Sequences 63 The Select Method dialog displays 9 Select the method you created in the SQ 300 MS driver then click Open This example shows MS Method 1 sqm 10 Select Save Method from the File menu ...

Страница 66: ...s with the last run sequence displayed 2 Select New Sequence from the File menu A blank sequence screen displays 3 Set the sequence identifiers Click in the Name box and type a name for this sequence This example shows Reserpine Select the Group from the drop down list This example shows New Method Group Select the Sample Tray Type of your autosampler This example shows 100 Position Tray 4 Click t...

Страница 67: ...shows 5 µL 6 Select the Method for this sequence by clicking the button in the Method field The Data Selector Single Method dialog displays 7 Since you saved the method in the Reserpine Group click the plus sign to expand the Method Group Reserpine Group This displays all methods saved in the Reserpine Group 8 Click in the Select box to select the method This example shows Demo Method is selected ...

Страница 68: ...66 Flexar SQ 300 MS User s Guide ...

Страница 69: ...Starting Data Acquisition ...

Страница 70: ... below for the analysis The analysis conducted for the example shown on the following pages utilizes an isocratic HPLC method which is delivered from a single Mobile Phase 5 mM ammonium formate in 75 25 Methanol Water mobile phase reservoir A in the example Sample 100pg µL reserpine Column 3x3 CR C18 column and column holder ...

Страница 71: ...e and to properly condition the LC column To equilibrate the system 1 In Chromera click Run Time then click Manual Control for the Control Mode 2 Make sure the SQ 300 MS in the Operate mode Observe that in the Status Panel the MS Detector State displays Operate If not Look at the Manual Control section of the Run Time screen 3 In the Operate row click Apply ...

Страница 72: ... Make sure the chromatographic tubing is connected between the LC system and the SQ 300 MS detector 5 Enter your Pump Settings 0 4 mL min and 100 A 6 Click the Apply button to start the pump Monitor the pump pressure in the Status Panel ...

Страница 73: ...ol Mode 2 Select Open Sequence from the File menu The Data Selector Single Sequence screen displays 3 Since you saved the sequence in New Method Group click the plus sign to expand the Sequence Group New Method Group This displays all sequences saved in this group 4 Click in the Select box to select the sequence This example shows the Sequence named Reserpine is selected ...

Страница 74: ... Flexar SQ 300 MS User s Guide 5 Click Open to open this sequence The sequence displays and is ready to run indicated by the green Start button 6 Click on the green Start button The sequence starts to run ...

Страница 75: ...the sum of intensities for all ions observed in each scan is is displayed as a black line and the SIM of m z 609 3 is displayed as a blue line 7 Observe the Plots pane on the left side Click the plus signs to expand the plots 8 During an analysis you can view the SIM or Scan individually by unchecking the PER 0 0 4 0 PSIM 6 box This example shows only the Scan ...

Страница 76: ...74 Flexar SQ 300 MS User s Guide When the run completes the display clears You can review the results in Post Run ...

Страница 77: ...Analyze Results in Post Run ...

Страница 78: ... only from the standard Post Run display Individual results can be optimized graphically The current version of the method can be graphically modified GME Graphic Method Editing using the selected sample data Data can be viewed in Single Plot mode Stacked Plot mode Matrix mode for multiple channels and replicate injections or in Overlay and 3D mode 3D mode is only available for PDA data at present...

Страница 79: ...and select the data you want to analyze then click Open 2 Uncheck the pump pressure BPump 1 3 Click on SIM A SIM chromatogram is displayed in the top plot window and the SIM data are displayed in the Results pane 4 Click on Scan The TIC total ion chromatogram is displayed in the top plot window and the TIC chromatographic data are displayed in the Results pane ...

Страница 80: ...78 Flexar SQ 300 MS User s Guide 5 Move the mouse pointer to the apex of the peak it turns to a hand at retention time 1 2 min and then right click 6 Select Examine Mass Spectra from the menu ...

Страница 81: ...w and a copy of the TIC is displayed in the top portion of the window 7 Move the mouse pointer to the apex of the m z 609 3 peak it turns to a hand then right click to display the peak table on the bottom of the window The peak table provides some statistical data on the identified peak including absolute intensity the peak width etc ...

Страница 82: ...ide Importing Chromera Data and Methods To import the data into Chromera 1 Select Import from the Tools menu then select Chromera Results The Import Results dialog appears 2 Click the browse button to the right of Source file name ...

Страница 83: ...un 81 The Open dialog appears 3 Navigate to the directory containing your data 4 Select the data file then click Open This example shows data file name External std results chxb that appears in the Select batches to import list ...

Страница 84: ...ser s Guide 5 Select External stds UTM 2 then click the Import button The progress bar shows the import progress Upon completion the message Import of results successful appears in the Messages box 6 Click the Close button ...

Страница 85: ...data has been imported into Chromera you can open it using the Data Selector To open a data file using the Data Selector follow this procedure 1 Click on the Post Run button The Post Run environment opens 2 Select Open Data from the File menu The Data Selector opens ...

Страница 86: ...tored in groups Use the Data Selector to choose data for guiding the method editing The operation of the Data Selector is the same throughout the software 4 Click in the check box to Select the Batch of data this example shows 092810 seq 4 quant 3again then click the Open button This selects all of the samples under the batch The Post Run screen displays the Example Data ...

Страница 87: ...f this guide Providing additional fragmentation ions will increase the probability of success when trying to compare unknown spectra to previously acquired library spectra This example assumes there are previously acquired and stored spectra in the library which can be searched for comparison to the unknown spectra The following steps summarize the procedure for searching a library to identify unk...

Страница 88: ...exar SQ 300 MS User s Guide 4 Select Save Spectrum to Library from the Evaluation menu 5 Run a library search by selecting Run Library Search from the Evaluation menu 6 The search results are then displayed ...

Страница 89: ...ost Run 87 For additional information on library searching refer to the NIST manual which should be installed on the hard drive and is also available on line Unknown vs Match Difference Unknown Spectrum Best Library Match ...

Страница 90: ...ed by the SQ 300 MS detector 1 As demonstrated earlier moving the mouse pointer to a point on the chromatogram in Chromera and then right clicking and selecting Examine Mass Spectra from the drop down list will open the SQ 300 MS driver processing window 2 Another way to enter the mass spectral processing domain demonstrated on a different data file is to select Examine Spectra from the Chromera A...

Страница 91: ...TIC in the upper half of the window If the mouse was right clicked in the Chromera chromatogram as in the first example above the spectrum from that retention time will be displayed If no point in the Chromera chromatogram is selected then the first spectrum from the acquisition will be displayed ...

Страница 92: ... that were within the sampled mass range which was determined by the Method used for the data acquisition and the Tune contained within that Method of intensities of all ions detected for each scan Consequently each data point in a TIC has a scan associated with it The TIC mirrors a typical chromatogram displayed in an LC analysis where the amplitude is UV absorbance ...

Страница 93: ...han extracting them from scan data acquired over a large mass range Using the EIC dialog Using a box procedure in a generated mass spectrum Using the EIC Dialog To create an Extracted Ion Chromatogram EIC 1 Select the TIC in the SQ 300 MS driver window 2 Select EIC from the View menu 3 Enter the first mass range in the first row of the m z Range Selection table by clicking in the cell and entering...

Страница 94: ...ect Full Range Time Range or Spectrum Range 8 Select how to display the created EIC NOTE An EIC cannot be displayed in the same window as a TIC 9 Click OK to close the Range Limit dialog and click OK to close the Extracted Ion Chromatogram dialog The EIC displays ...

Страница 95: ...box procedure in a generated mass spectrum To create a Base Ion Chromatogram BIC 1 Select a TIC in the SQ Driver window 2 Select BIC from the View menu 3 In the m z Range Selection section enter the m z range to cover the mass peak to be studied 4 In the Display section select how to display the chromatogram 5 In the Trace Selection section select the Traces to be displayed 6 Select the Evaluation...

Страница 96: ...enter the number of the first and last spectrum 9 Click OK to close the Range Limit dialog then click OK to close the Base Peak Preference dialog The BIC will display mass intensity and resolution for the selected base peak as a function of retention time 10 To display intensity only right click and select Customization Dialog from the menu to display the Customization dialog In the Subsets tab se...

Страница 97: ...oom in 1 Left click and drag a box around the area of interest release button and select Zoom X axis The zoomed area appears 2 Left click and drag a box somewhere in the chromatogram release the button and select Zoom Out 3 Use the right mouse button command Undo Zoom ...

Страница 98: ...phical package which includes functions to modify and export graphs Individual functions can be selected or the Customization Dialog can be used Baseline Calculation 1 When a TIC EIC or BIC window is selected select Baseline from the Evaluation menu 2 To calculate an Auto baseline with the morphological function select Auto and the Function APB morph 3 Enter shortest Baseline Segment Size and Base...

Страница 99: ...rom the Evaluation menu Setting the Chromatogram Noise Calculation Preferences 1 When a TIC EIC or BIC window is selected select Noise from the Evaluation menu 2 To detect the noise manually select Manual and enter a mass range where there are not any peaks 3 Select Peak to peak or Root mean square In the default version of the signal to noise calculation the following is done If the noise is Peak...

Страница 100: ...ta file has to be closed and opened again Chromatogram Smoothing 1 Select a TIC EIC or BIC 2 Select Smooth from the Evaluation menu 3 Enter number of smooths 1 10 window size 0 01 100 and select a Function from the drop down list 0 Mean For each data point in the source curve the processed curve is calculated as the average of the data points within the specified window 1 Median The processed curv...

Страница 101: ... right mouse button and display peak detect results in the Peak Table NOTE The S N value is calculated using the centroid amplitude Automatic Peak Detection 1 Select a TIC or an EIC 2 Select Peak Detect from the Chromatogram Evaluation menu Peaks with a signal to noise ratio lower than this limit will be excluded from the peak table ...

Страница 102: ...ne function will be used to find the top amplitude and retention time for each chromatogram peak If Centroid is selected you must enter a value in percent of the peak amplitude from where the centroid is calculated 6 Click OK 7 Click Close below the table to close the peak table To export the peak table click the Export button below the table The complete table will be copied to the clipboard 8 Op...

Страница 103: ...Analyze Results in Post Run 101 9 Select Print from the File menu in Microsoft Excel to print the table ...

Страница 104: ...102 Flexar SQ 300 MS User s Guide ...

Страница 105: ...Evaluating Mass Spectra ...

Страница 106: ... down list will open the SQ 300 processing window Another way to enter the mass spectral processing domain demonstrated on a different data file is to select Examine Spectra from the Chromera Actions menu The spectra open in the SQ 300 MS driver window The SQ Driver will display a Total Ion Chromatogram TIC in the upper half of the window If the mouse was right clicked in the Chromera chromatogram...

Страница 107: ...trum from that retention time will be displayed If no point in the chromatogram is selected then the first spectrum from the acquisition is displayed When a data file is opened a TIC window and a Mass spectrum window will be displayed ...

Страница 108: ... spectrum Using the Generate Mass Spectrum Dialog 1 To create an average spectrum activate the TIC spectrum and select Generate Spectrum from the View menu 2 In the Range Selection section select whether to use Time Range or Spectra Range to define the average spectrum 3 If Time Range is selected enter a Start Time and End Time in seconds If Spectra Range has been selected enter the first and last...

Страница 109: ...tra 107 5 Decide how to display the mass spectra in the Display section NOTE Average spectra are not displayed in the same window as single spectra 6 Click OK 7 The Mass spectrum will be updated to an average Mass spectrum ...

Страница 110: ...d a peak of interest in the Mass spectrum The width of the box will be the set m z range 2 Release the button and select Display EIC from the menu The Extracted Ion Chromatogram dialog displays 3 Click OK and the EIC is displayed The EIC displays where in the chromatogram mass peaks occur with m z values within the set m z range ...

Страница 111: ...o create a BIC 1 Left click and drag a box around a peak of interest in the mass spectrum The width of the box will be the set m z range 2 Release the button and select Display BIC from the menu 3 Press OK and the BIC is displayed ...

Страница 112: ...mass spectrum is created using the hand the mass spectrum can be frozen by activating the spectrum window and selecting Freeze from the Spectrum View menu 2 Then when a new spectrum is created it will be displayed in a new window The previous spectrum is still available 3 To thaw a frozen mass spectrum activate the spectrum and select Thaw from the View menu Zooming In To zoom in 1 Left click and ...

Страница 113: ...us The application obtains a graphical package which includes functions to modify and export graphs Individual functions can be selected or the Customization Dialog can be used Baseline Calculations To calculate a baseline 1 When a mass spectrum window is selected select Baseline from the Evaluation menu 2 To calculate an Auto baseline with the morphological function select Auto and the Function A...

Страница 114: ...Noise Calculation Preferences To set mass spectrum noise calculation preferences 1 When a mass spectrum window is activated select Noise from the Evaluation menu 2 To detect the noise manually select Manual and enter a mass range where there are not any peaks 3 Select a Function Peak to peak or Root mean square 4 In the default version of the signal to noise calculation the following is done If th...

Страница 115: ...value Mass Spectrum Smoothing To smooth mass spectra 1 Activate a mass spectrum and select Smooth from the Evaluation menu 2 Enter the number of smooths 1 10 window size 0 01 10 and select the function by clicking on the drop down list 0 Mean For each data point in the source spectrum the processed curve is calculated as the average of the data points within the specified window 1 Median The proce...

Страница 116: ...ts This makes it easier to see the individual data points in the spectrum 2 Move the mouse cursor to a data point until the hand is displayed 3 Right mouse click and a Peak Information box is displayed NOTE The S N value is calculated using the centroid amplitude Automatic Peak detection 1 Select the mass spectrum 2 Select Peak Detect from the MS Evaluation menu ...

Страница 117: ...to find the top amplitude and its m z value for each mass peak If Centroid is selected a centroid will be calculated using the upper 50 of the peak 6 To display a peak table check the box Display Results 7 Click OK 8 To annotate the m z values in the mass spectrum select Annotations from the View menu Zoom in for a better display 9 To close the peak table click the Close button below the table 10 ...

Страница 118: ...ar SQ 300 MS User s Guide The following example shows a default peak annotation The following example shows an enhanced peak annotation 12 To print the table from Microsoft Excel select Print from the File menu ...

Страница 119: ......

Страница 120: ...PerkinElmer 710 Bridgeport Avenue Shelton CT 06484 4794 U S A Internet http www perkinelmer com email info perkinelmer com PerkinElmer is a registered trademark of PerkinElmer Inc ...

Отзывы: