Description main hardware parts
8
The print module holds the ink printheads, and the print belt.
9
The print belt in the print module uses the suction air technique to ensure that sheets re-
main flat under the printheads.
10 Sheet cooling decreases the temperature of sheets printed on one side.
11 The operator attention light displays the status of the printer (green, orange, or red).
12 The air supply unit connects the conditioning module with the print module.
13 The fixation module with the fixation drum dries the prints while the suction air technique
ensures that sheets remain flat on the fixation drum.
14 The registration output module brings the paper path to the height of the high capacity
stacker and correctly transfers the prints.
15 One or two high capacity stackers collect and stack the prints. When the printer is attached
to a third-party finisher such as a booklet maker or a perforator, the DFD (Document Finish-
ing Device) interface kit connects the finisher to the high capacity stacker.
16 The conditioning module controls the climate in the print module. The location of the con-
ditioning module is in the middle of the printer, next to the print module.
Rear view
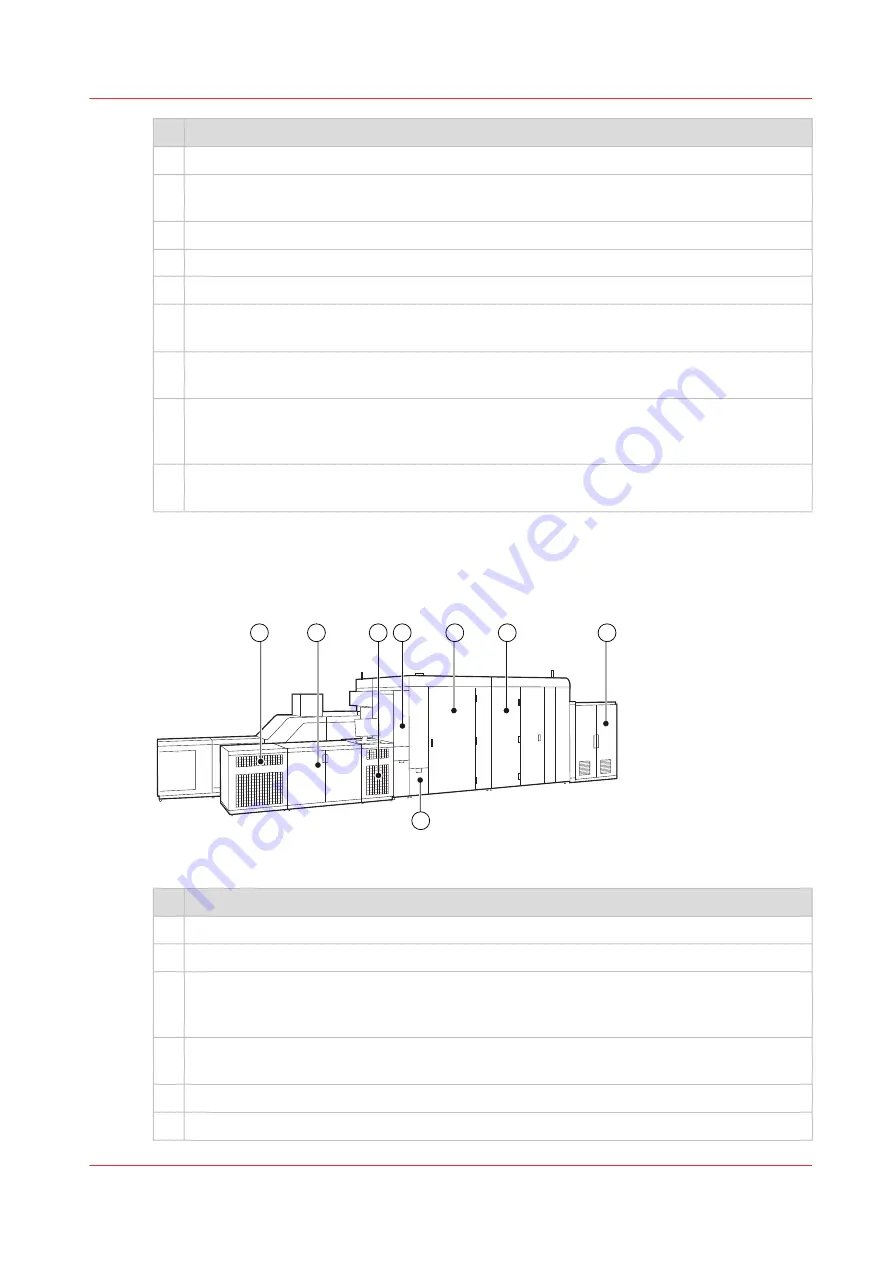
Below is an overview of the parts visible from the rear side of the printer.
8
7
5
3
2
1
6
4
[2] Rear view of the printer
Description main hardware parts
1
The chiller module optimises the temperature within the printer.
2
The ink cabinet stores the ink and and maintenance liquid containers.
3
The control module is the heart of the printer. It contains the controllers that steer the print
process and the RIP units that process the print data. The control panel on top of the mod-
ule is used by the Service organisation.
4
The conditioning module controls the climate in the print module. Waste water is collected
in the waste water container.
5
The waste compartment stores the waste containers.
6
The maintenance module keeps the printheads in optimal condition.
4
Main hardware parts
Chapter 2 - Explore the printer
21
Содержание VarioPrint i Series
Страница 1: ...Operation guide VarioPrint i series ...
Страница 8: ...Contents 8 ...
Страница 9: ...Chapter 1 Introduction ...
Страница 18: ...Notes for the reader 18 Chapter 1 Introduction ...
Страница 19: ...Chapter 2 Explore the printer ...
Страница 25: ...1 2 3 4 1 2 6 Open 1 a paper tray and unassign 2 its media Paper input Chapter 2 Explore the printer 25 ...
Страница 35: ...Chapter 3 Getting started ...
Страница 44: ...Log in to the printer 44 Chapter 3 Getting started ...
Страница 51: ...Chapter 4 Define defaults ...
Страница 74: ...Download account log files 74 Chapter 4 Define defaults ...
Страница 75: ...Chapter 5 Job media handling ...
Страница 91: ...Chapter 6 Transaction printing ...
Страница 111: ...Chapter 7 Document printing ...
Страница 143: ...2 Touch Split Combine jobs Chapter 7 Document printing 143 ...
Страница 183: ...Chapter 8 Manage media definitions ...
Страница 198: ...Edit a media print mode 198 Chapter 8 Manage media definitions ...
Страница 199: ...Chapter 9 Manage colour definitions ...
Страница 232: ...Reset spot colours 232 Chapter 9 Manage colour definitions ...
Страница 233: ...Chapter 10 Print what you expect ...
Страница 242: ... 255 Exceeding tolerance level Read media family calibration feedback 242 Chapter 10 Print what you expect ...
Страница 244: ...3 Click Edit Read tolerance levels for the media family calibration 244 Chapter 10 Print what you expect ...
Страница 271: ...Chapter 11 Save energy ...
Страница 276: ... 301 Automatic shut down time Configure the energy save timers 276 Chapter 11 Save energy ...
Страница 278: ...Prepare printer for a long shut down period 278 Chapter 11 Save energy ...
Страница 279: ...Chapter 12 Maintain the printer ...
Страница 339: ...Chapter 13 Solve problems ...
Страница 359: ...Chapter 14 References ...
Страница 388: ...Status indicators 388 Chapter 14 References ...
Страница 400: ...metrics 377 Index 400 ...
Страница 401: ......


