


User’s Manual
46
NOTE: Any cameras that are Off, have lost video or are set to Covert (unless the user has authority to view covert
cameras) will be excluded from the Cameo sequence.
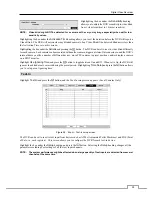
You can define the screen layout in a variety of formats and set the DVR to sequence through the different screen layouts
(pages) so that all the cameras will be displayed. You can also set up the DVR to display one camera or a group of
cameras all the time while cycling through the remaining cameras in a “cameo” window. This can be done with one
camera displayed full screen while displaying the cameras in a grid pattern with the bottom right window as the cameo.
NOTE: Sequence cannot be used in the 4x4 display mode of the 16-channel, and 3x3 mode of the 8-channel DVR.
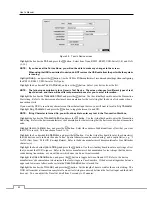
You can adjust the display dwell time by highlighting the box beside
Interval
and pressing the button. You can
select dwell intervals ranging from 3 seconds to 2 minutes.
Highlight the box beside
Event Monitoring
and press the
button. You can select the event monitoring mode from
None
,
Local Camera
and
Network Camera
. Selecting
Local Camera
displays local cameras associated with the
event, and selecting
Network Camera
displays network cameras associated with the event.
NOTE: “Network Camera” includes both network cameras and network video transmitters.
Displaying cameras associated with the event from both local cameras and network devices at the same
time is not supported.
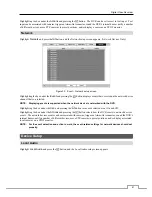
Highlight the box beside
Resolution
and press the
button. You can select from 1280x1024, 1440x900, 1600x900,
1680x1050 and 1920x1080 for NTSC video, and 1280x1024, 1440x900, 1600x900, 1680x1050 and 1920x1080 (@
60Hz or 50Hz) for PAL video.
Highlight the box beside
Set Resolution to Manual Mode
and press the button. Pressing the button toggles
between
On
and
Off
. When it is
On
, you can set the resolution manually regardless of the resolution supported by the
monitor.
Highlight the box beside
Hide Unsupported Resolution
and press the button. Pressing the button toggles between
On
and
Off
. When it is
On
, the unsupported resolution on the connected monitor will not be shown.
NOTE: When selecting unsupported resolution, video might NOT be displayed on the monitor screen. In this
case, pressing the
DISPLAY
button for more than five seconds will change to the different frequency (Hz)
resolution or restart the system and display video with the maximum resolution supported on the monitor.
Highlight
Fit To Screen
and press the
button. Pressing the button toggles between
On
and
Off
. When it is
On
,
the DVR will resize video to fit the primary monitor screen.
Highlight the box beside
Apply Monitor Information
and press the button. Pressing the button toggles between
On
and
Off
. When it is
On
, the DVR will provide clearer display by applying the monitor information.
Highlight the box beside
HDMI Mode
and press the button. Pressing the button toggles between
On
and
Off
.
When it is
On
, the DVR will optimize the HDMI video out.
NOTE: The system restarts automatically after changing the resolution settings. If the system restarts when
the monitor is not connected, the resolution will be set to 1280x1024@60Hz as default without saving
your changes.
When the individual primary monitors are connected to the HDMI and VGA connectors for simultaneous
operation, it is recommended to use monitors supported with the same resolution. If monitors unsupported
with the same resolution are connected, video might not be displayed on either of the two monitors.
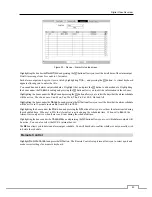
Secondary Monitor
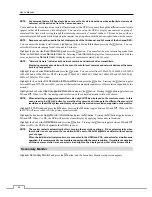
Highlight
Secondary Monitor
and press the
button, and the Secondary Monitor setup screen appears.
Содержание 16-channel models
Страница 1: ......
Страница 2: ......
Страница 16: ...User s Manual 8 ...
Страница 93: ...Digital Video Recorder 85 Map of Screens ...