65 of 271
Hook Timing Inspection/Adjustment
It is recommended that you read the Head Timing Tab section before performing hook timing inspection/
adjustment.
It is possible for the machine rotary hook to slip from the factory-set hook timing. Inadequate timing be-
tween the hook and the needle can be one of the causes of upper thread breaks. The following inspec-
tion procedure will allow you to check the hook timing of your machine(s). If the hook timing position
needs to be adjusted, follow the provided adjustment procedures.
Before making any hook timing changes, you need to perform an inspection to determine if adjustment
is needed.
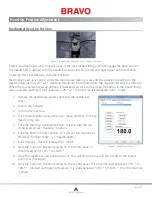
The procedures below refer to the part of the rotary hook called the “hook point.” See the image below
for the location of the hook point.
List of Tools
• Hex Wrench, 2mm
• Hex Wrench, 2.5mm
• Hex Wrench, 1.5mm bent, short arm
• Magnifying Glass (Optional)
• Flashlight (Optional)
Rotational Hook Timing Inspection Procedure
1. Make sure your machine is turned on and Bravo OS is running.
2. Engage the emergency stop button (by pushing it in).
3. Push the x-beam all the way to the back of the machine to ensure that the hoop arms will be out
of the way during the procedure. (As an alternative to this, you could remove the hoop arms.)
4. Remove the needle plate, bobbin case, and rotary hook cover (using 2mm Hex wrench).
5. Disengage the emergency stop button (by twisting it).
6.
You now need to determine the machine’s “closest needle.” The closest needle is defined as the
needle that is closest to the hook point. The number of the closest needle is noted in the bottom
right corner of the machine casting (under the black base cover). Lift the base cover, then make a
note of the closest needle. The closest needle number is identified as C-X, where X is the needle
number.
Table of Contents
Содержание Bravo
Страница 1: ...Technical Manual Rev 082115 ...


