


217 of 271
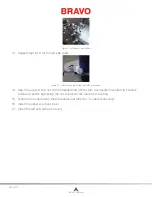
Figure 2 - Left Timing Belt Clamp and X/Y Home PCB
6. Remove the x/y home PCB from the y-drive belt clamp. Leave it hanging on the connected
harnesses.
7. Remove the timing belt clamp and remove the old belt.
8. Install a replacement belt and pull the ends over the bearing block assembly so that the ends of
the belt are no more than one tooth width apart and extend equally underneath the clamp.
9. Install the timing belt clamp and tighten the screws down just enough to hold the belt in position.
10. Tighten the adjusting nuts on the idler pulley studs just until the slack is removed from the belt.
11.
Tighten the screws on the belt clamp to the torque specifications.
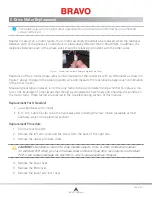
Figure 3 - Right Y-Drive Timing Belt Clamp
12. Reinstall the x/y home PCB back onto the left timing belt and leave the screws installed loose for
now.
13. Adjust the x/y home PCB using the procedures prescribed in “X/Y Home PCB Replacement”.
14. Adjust the y-axis timing belt tensions using the procedures prescribed in “Y-Axis Timing Belt
Adjustment”
15.
Reinstall the left upper arm front cover and tighten the screws to the torque specifications.
16. Color change to Needle #1.
17. Remove the right upper arm front cover.
18. Repeat steps 5 through 16 for the right y-drive timing belt, ignoring any references to the x/y
home PCB.
19. Reinstall both the left and right upper arm covers.
20. Double check the x-home and y-home adjustments using the procedures prescribed in “X/Y Home
Adjustment”.
21. Do a short machine functional test and observe for correct x- and y-axis movement. Make neces-
sary adjustments or additional repairs if needed.
22. Run the following test designs on the machine:
• AMBTESTXXX.EXP - Belt Tension Test (Circles)
• AMRTESTXXX.EXP - Registration Test (Diamond)
Table of Contents
Содержание Bravo
Страница 1: ...Technical Manual Rev 082115 ...


