


53
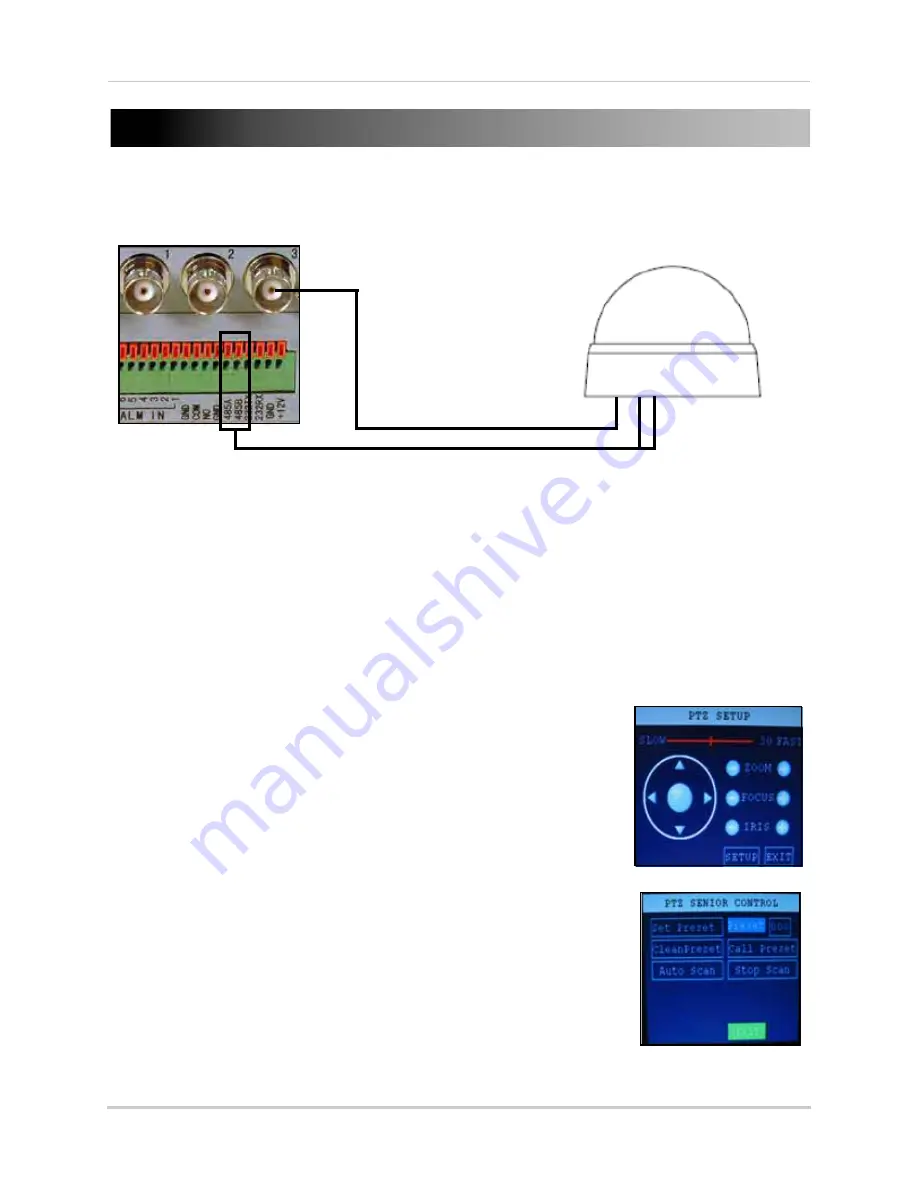
APPENDIX D: CONNECTING A PTZ CAMERA
You can connect RS-485 PTZ cameras (not included) to the PTZ Control Block on the rear panel of
the system. Additional PTZ cameras are available at
www.lorexcctv.com
To install a PTZ Camera:
1. Connect the Transmit Cable to the
485A TX (+)
port of the PTZ block on the rear panel.
2. Connect the Receive Cable to the
485B RX (-)
port of the PTZ block on the rear panel.
3. Connect the video cable to a BNC port.
4. Open the MAIN MENU and then click
ADVANCE
. The Advanced Setup menu opens.
5. Click
PTZ
.
6. Configure the settings based on the instructions of your PTZ camera and click
APPLY
.
NOTE:
The PTZ camera settings depend on the type of PTZ camera. Please refer to the specific camera
manual for your brand and model of PTZ camera.
To use a PTZ camera:
1. Make sure the camera is properly connected and configured
prior to using the PTZ camera.
2. From live viewing, right-click anywhere on the screen to open
the sub-menu and select
PTZ
. The PTZ control panel opens.
3. Click the navigation keys to move the lens.
4. Click and drag the slider to adjust panning speed.
5. Click
+ / -
to control Zoom, Focus and Iris.
6. Click
SETUP
to open Senior Control.
To use Senior Control:
1. Under Preset, enter a number using the Virtual Keyboard
(mouse only). Click Set Preset to save the preset.
2. Click
Clean Preset
to erase a preset.
3. Click
Call Preset
to set a preset.
4. Click
Auto Scan
to scan for presets. Click
Stop Scan
to stop the
scan.
5. Click
EXIT
to close the Senior Control menu.
DVR
PTZ CAMERA
(not included)
Figure 37.0 Connecting a PTZ camera (not included)
Figure 37.1 PTZ control
Figure 37.2 PTZ Senior control