6600-NG User’s Manual
125-9110A
Page 74
TYPICAL USE
STEP 0: PREP AIRCRAFT
0.1
Connect adapters and hoses to the aircraft, tape-up all unused ports on the aircraft.
0.2
Leave hose ends near the tester but DO NOT connect to tester yet.
0.3
Set the BARO adjust on the aircraft to 29.92 or 1013.25 or 760 mmHg or Standard.
STEP 1: PREP tester & SELF TEST
1.1
Turn ON tester. Check / adjust leak timers.
1.2
Set Units: Ps1 & Ps2 to “inHg” and Pt to “Pt inHg”. (Key sequence:
5, 3; 9, 1; 1, 5
)
1.3
Set all Rate targets to 4.0 inHg/min. (Key sequence:
3, 4, ENTER; period, 4, ENTER; 7, 4,
ENTER
)
1.4
Open Ps1, Ps2, Pt ports on tester to ambient. Close Vent valves. Run Self-test (
TEST
)
STEP 2: GO-TO-GROUND
2.1
Connect hoses from aircraft to tester. Go-To-Ground (
GND
)
STEP 3: LOW-LEVEL LEAK CHECK
3.1
Verify stable control at Ground on all 3 outputs. If not stable at the target values, there must be
a large leak on the output that is not stable at the target. Turn Off tester and fix problem.
3.2
If Actual values are stable at Ground, set Target values as follows:
Ps1= 7 inHg
below
Ground, Ps2= 6 inHg
below
Ground, Pt= 5 inHg
below
Ground
(Example: If the Ground target value is 29.0 inHg then set targets as follows:
Ps1= 22.0 inHg, Ps2= 23.0 inHg, Pt= 24.0 inHg. For this example, the key sequence would be:
6, 2, 2, ENTER; 0, 2, 3, ENTER; 2, 2, 4, ENTER
).
3.3
Press
GO
. If targets cannot be achieved, there must be a large leak, so press
GND
, wait for
Actual values to come close to Ground, then turn Off tester and fix problem.
3.4
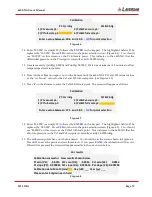
If targets can be achieved and all 3 Actual values are stable, wait for 1 minute, then put all 3
outputs into Leak mode (Follow this key sequence:
4, 2; ±, 2; 8, 2
). All 3 modes will be
flashing “Leak”. Press
GO.
The lower screen will show the leak values.
3.5
At the end of 1 minute, Ps1, Ps2 and Pt, each should not leak more than 0.1 inHg.
3.6
Press
CANC
to exit out of Leak mode. All 3 outputs will automatically return to Control mode.
3.7
Return to Ground by pressing
GND
and
GO
. Wait for Actual values to be stable at Ground.
3.8
If any of the Leak values in step 3.5 exceeded 0.1 inHg, turn Off tester, fix the problem and
restart from step 2.1
3.9
If all 3 Leak values in step 3.5 were less than 0.1 inHg, proceed to Step 4.
STEP 4: TEST AIRCRAFT INSTRUMENTS
4.1
Execute your Test Procedure to test cockpit instruments and perform high-level leak checks.
4.2
After testing is complete, Go-to-Ground (
GND
). Wait for Ground to be achieved.
4.3
Turn off tester, then disconnect hoses.
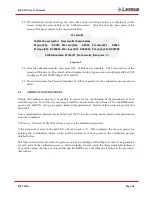
Figure 5.1


